This chapter describes some linguistic and structural features of Objective-C having to do with classes; in the next chapter, we’ll do the same for instances.
In Objective-C, as in many other object-oriented languages, a mechanism is provided for specifying a relationship between two classes: they can be subclass and superclass of one another. For example, we might have a class Quadruped and a class Dog and make Quadruped the superclass of Dog. A class may have many subclasses, but a class can have only one immediate superclass. I say “immediate” because that superclass might itself have a superclass, and so on in a rising chain, until we get to the ultimate superclass, called the base class, or root class.
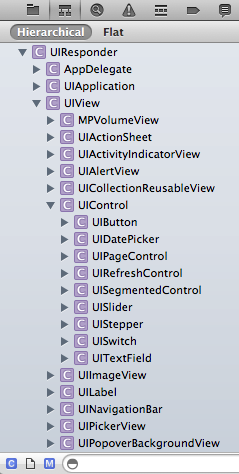
Because a class can have many subclasses but only one superclass, there is a hierarchical tree of subclasses, each branching from its superclass, and so on, with a single class, the base class, at the top. Indeed, Cocoa itself consists of just such a tree (a huge tree!) of hierarchically arranged classes, even before you write a single line of code or create any classes of your own. We can imagine diagramming this tree as an outline, with a single ultimate superclass at the top, then all of its immediate subclasses in the next level below that, then each of their immediate subclasses in the next level below that, and so on. And in fact Xcode will show you this outline: choose View → Navigators → Show Symbol Navigator and click Hierarchical, with the first and third icons in the filter bar darkened (Figure 4.1).
The reason for the class–subclass relationship is to allow related classes to share functionality. Suppose, for example, we have a Dog class and a Cat class, and we are considering defining a walk method for both of them. We might reason that both a dog and a cat walk in pretty much the same way, by virtue of both being quadrupeds. So it might make sense to define walk as a method of the Quadruped class, and make both Dog and Cat subclasses of Quadruped. The result is that both Dog and Cat can be sent the walk message, even if neither of them has a walk method, because each of them has a superclass that does have a walk method. We say that a subclass inherits the methods of its superclass.
The purpose of subclassing is not merely so that a class can inherit another class’s methods; it’s so that it can define methods of its own. Typically, a subclass consists of the methods inherited from its superclass and then some. If Dog has no methods of its own, it’s hard to see why it should exist separately from Quadruped. But if a Dog knows how to do something that not every Quadruped knows how to do — let’s say, bark — then it makes sense as a separate class. If we define bark in the Dog class, and walk in the Quadruped class, and make Dog a subclass of Quadruped, then Dog inherits the ability to walk from the Quadruped class and also knows how to bark.
It is also permitted for a subclass to redefine a method inherited from its superclass. For example, perhaps some dogs bark differently from other dogs. We might have a class NoisyDog, for instance, that is a subclass of Dog. Dog defines bark, but NoisyDog also defines bark, and defines it differently from how Dog defines it. This is called overriding. The very natural rule is that if a subclass overrides a method inherited from its superclass, then when the corresponding message is sent to an instance of that subclass, it is the subclass’s version of that method that is called.
As you already know from Chapter 2, all your code is going to go into some class or other. So the first thing we must do is specify what is meant by putting code “into a class” in Objective-C. How does Objective-C say, linguistically and structurally, “This is the code for such-and-such a class”?
To write the code for a class, you must provide two chunks or sections of code, called the interface and the implementation. Here’s the complete minimum code required to define a class called MyClass. This class is so minimal that it doesn’t even have any methods of its own:
@interface MyClass
@end
@implementation MyClass
@end
The @interface and @implementation compiler directives show the compiler where the interface and implementation sections begin for the class that’s being defined, MyClass; the corresponding @end lines show where each of those sections end.
In real life, the implementation section is where any methods for MyClass would be defined. So here’s a class that’s actually defined to do something:
@interface MyClass
@end
@implementation MyClass
- (NSString*) sayGoodnightGracie {
    return @"Good night, Gracie!";
}
@end
Observe how a method is defined. The first line is just like a method declaration, stating the type of method (class or instance), the type of value returned, and the name of the method along with the types of any parameters and local names for those parameters (see Chapter 3). That’s followed by curly braces containing the code to be executed when the method is called, just as with a C function (see Chapter 1).
Our minimal class is still pretty much useless, because it can’t be instantiated. In Cocoa, knowledge of how to be instantiated, plus how to do a number of other things that any class should know how to do, resides in the base class, which is the NSObject class. Therefore, all Cocoa classes must be based ultimately on the NSObject class,
by declaring as the superclass for your class either NSObject or some other class that inherits from NSObject (as just about any other Cocoa class does). The syntax for this declaration is a colon followed by the superclass name in the @interface line, like this:
@interface MyClass : NSObject
@end
@implementation MyClass
- (NSString*) sayGoodnightGracie {
    return @"Good night, Gracie!";
}
@end
Note
NSObject is not the only Cocoa base class. It used to be, but there is now another, NSProxy. NSProxy is used only in very special circumstances and is not discussed in this book. If you have no reason for your class to inherit from any other class, make it inherit from NSObject.
In its fullest form, the interface section might contain some more material. In particular, if we want to declare our methods, so that other classes can learn about them and call them, those method declarations go into the interface section. A method declaration in code matches the name and signature for the method definition and ends with a semicolon (required):
@interface MyClass : NSObject
- (NSString*) sayGoodnightGracie;
@end
@implementation MyClass
- (NSString*) sayGoodnightGracie {
    return @"Good night, Gracie!";
}
@end
(Actually, it’s legal for a method definition to have a semicolon as well, before the curly braces. But that notation is rare, and I never use it in this book.)
There are also instance variables to be considered. If our class is to have any instance variables (other than those inherited from its superclass), they must be declared. In actual fact, in modern Objective-C, you will probably declare most of your instance variables implicitly, using a technique that I’ll explain in Chapter 5 and Chapter 12. But you might still occasionally declare an instance variable explicitly; and in any case, you certainly need to know how to do so.
Before iOS 5.0, explicit declaration of instance variables had to take place in curly braces at the start of the interface section:
@interface MyClass : NSObject {
    // instance variable declarations go here
}
- (NSString*) sayGoodnightGracie;
@end
@implementation MyClass
- (NSString*) sayGoodnightGracie {
    return @"Good night, Gracie!";
}
@end
However, starting with LLVM compiler version 3.0 (Xcode 4.2 and later), it is permitted to put instance variable declarations in curly braces at the start of the implementation section instead. This is a more logical place for variable declarations to go, because, as I’ll explain in the next section, the interface section is usually visible to other classes, but there is no reason why instance variables need to be visible to other classes, as they are usually private. Therefore, I prefer the new style, and will use it consistently throughout this book:
@interface MyClass : NSObject
- (NSString*) sayGoodnightGracie;
@end
@implementation MyClass {
    // instance variable declarations go here
}
- (NSString*) sayGoodnightGracie {
    return @"Good night, Gracie!";
}
@end
I’ll go into more detail about instance variables in Chapter 5.
It’s perfectly possible for the interface and implementation of a class to appear in the same file, or for multiple classes to be defined in a single file, but that isn’t the usual convention. The usual convention is one class, two files: one file containing the interface section, the other file containing the implementation section. For example, let’s suppose you are defining a class MyClass. Then you have two files, MyClass.h and MyClass.m. (The file naming is not magical or necessary; it’s just part of the convention. The file extensions are pretty much necessary, though, because the build process and Xcode itself rely on them.) The interface section goes into MyClass.h, which is called the header file.
The implementation section goes into MyClass.m, which is called the implementation file.
The separation into two files is not inconvenient, because Xcode, expecting you to follow this convention, makes it easy to jump from editing a .h file to the corresponding .m file and vice versa (Navigate → Jump to Next Counterpart). Finally, the implementation file imports the header file (see Chapter 1 on the #import directive); this effectively unites the full class definition, making the definition legal even though it is split between two files.
With this arrangement in place, further imports become easy to configure. The header file imports the basic header file for the entire Cocoa framework; in the case of an iOS program, that’s UIKit.h (again, see Chapter 1). There is no need for the implementation file to import UIKit.h, because the header file imports it, and the implementation file imports the header file. If a class needs to know about another class that isn’t already imported in this way, its implementation file imports that class’s header file. Example 4.1 summarizes this conventional schema.
Example 4.1. Conventional schema for defining a class
// MyClass.h:

#import <UIKit/UIKit.h>

@interface MyClass : NSObject
- (NSString*) sayGoodnightGracie;
@end

// MyClass.m:

#import "MyClass.h"
#import "OtherClass.h"

@implementation MyClass {
    // instance variable declarations go here
}
- (NSString*) sayGoodnightGracie {
    return @"Good night, Gracie!";
}
@end
The result of this arrangement is that everything has the right visibility. No file ever imports an implementation file; that way, what’s inside a class’s implementation file is private to that class. If something about a class needs to be public, such as a method that you want other classes to be able to call, it is declared in the header file, and other classes import that header file in their implementation files (as I do with OtherClass.h in Example 4.1); this keeps the chain of imports clear and simple.
A header file is also an appropriate place to define constants. In Chapter 1, for example, I talked about the problem of mistyping the name of a notification or dictionary key, which is a literal NSString, and how you could solve this problem by defining a name for such a string:
#define MYKEY @"mykey"
The question then arises of where to put that definition. If only one class needs to know about it, the definition can go near the start of its implementation file (it doesn’t need to be inside the implementation section). But if multiple classes need to know about this name, then a header file is an appropriate location; every implementation file that imports this header file will acquire the definition, and you can use the name MYKEY in that implementation file.
Note
The ultimate header file in an Xcode project is the .pch file. The suffix .pch stands for "precompiled header", and your project has exactly one such file, which is implicitly imported by all .h files. It isn’t common to edit the .pch file, but sometimes it’s the most convenient place to define a constant, or even to import a class interface section, that needs to be visible to pretty much every class in your program. I’ll talk more about the .pch file in Chapter 6.
A slight problem arises when a header file needs to mention one of your other classes. Suppose, for example, that MyClass has a public method that takes or returns an instance of MyOtherClass. So MyClass.h needs to speak of MyOtherClass*. But MyClass.h does not import MyOtherClass.h, so MyClass.h doesn’t know about MyOtherClass, and the compiler will complain. To silence the compiler without violating the arrangement of imports (by importing MyOtherClass.h in the header file MyClass.h), use the @class directive. The word @class is followed by a comma-separated list of class names, ending with a semicolon. So MyClass.h might start out like this:
#import <UIKit/UIKit.h>
@class MyOtherClass;
Then the interface section would follow, as before. The @class directive simply tells the compiler, “Don’t worry, MyOtherClass really is the name of a class.” That’s all the compiler needs to know in order to permit the mention of the type MyOtherClass* in the header file.
If, on the other hand, MyClass is to be a subclass of some other class, then MyClass’s header file must import that superclass’s header file (or some other header file that imports that superclass’s header file); otherwise, it would be unable to speak of that superclass. For instance, in Example 4.1, MyClass.h imports UIKit.h; thus it knows about NSObject, so that MyClass can declare NSObject as its superclass.
The Global Namespace
When defining classes, choose your class names wisely to prevent name collisions. Objective-C has no namespaces; there’s a single vast namespace containing all names. You don’t want your own class name (or, for that matter, any other top-level constant name) to match a name defined in Cocoa. Instead of namespaces, there’s a convention: each Cocoa framework prefixes its names with a particular pair of capital letters (NSString and NSArray, CGFloat and CGRect, and so on). Apple suggests that you use a prefix of your own as well; in fact, when you create a new project in Xcode, you’re offered an opportunity to specify a prefix, which will appear before the automatically created class names. Don’t use any of Apple’s prefixes. Nothing limits your prefix to two letters, or requires that both letters be uppercase. In fact, because all of Apple’s own prefixes are two uppercase letters, “My” as a prefix is safe.
Class methods are useful in general for two main purposes:
- Factory methods
-
A factory method is a method that dispenses an instance of that class. For example, the UIFont class has a class method
fontWithName:size:. You supply a name and a size, and the UIFont class hands you back a UIFont instance corresponding to a font with that name and size. A class method that vends a singleton instance, such as appears at the end of Chapter 1, is also a factory method. - Global utility methods
-
Classes are global (visible from all code, Chapter 13), so a class is a good place to put a utility method that anyone might need to call and that doesn’t require the overhead of an instance. For example, the UIFont class has a class method
familyNames. It returns an array of strings (that is, an NSArray of NSString instances) consisting of the names of the font families installed on this device. Because this method has to do with fonts, the UIFont class is as good a place as any to put it.
Most methods that you write will be instance methods, but now and then you might write a class method. When you do, your purpose will probably be similar to those examples.
A class method may be called by sending a message directly to the name of a class. For example, the familyNames class method of UIFont that I mentioned a moment ago might be called like this:
NSArray* fams = [UIFont familyNames];
Clearly, this is possible because a class is an object (Chapter 2), and the name of the class here represents that object.
You don’t have to do anything to create a class object. One class object for every class your program defines is created for you automatically as the program starts up. (This includes the classes your program imports, so there’s a MyClass class object because you defined MyClass, and there’s an NSString class object because you imported UIKit.h and the whole Cocoa framework.) It is to this class object that you’re referring when you send a message to the name of the class.
Your ability to send a message directly to the bare name of a class is due to a kind of syntactic shorthand. You can use the bare class name only in two ways (and we already know about both of them):
- To send a message to
-
In the expression
[UIFont familyNames], the bare nameUIFontis sent thefamilyNamesmessage. - To specify an instance type
-
In the expression
NSString*, the bare nameNSStringis followed by an asterisk to signify a pointer to an instance of this class.
Otherwise, to speak of a class object, you need to obtain that object formally. One way to do this is to send the class message to a class or instance. For example, [MyClass class] returns the actual class object. Some built-in Cocoa methods expect a class object parameter, whose type is described as Class. To supply this as an argument, you’d need to obtain a class object formally. Take, for example, introspection on an object to inquire what its class is. The isKindOfClass: instance method is declared like this:
- (BOOL)isKindOfClass:(Class)aClass
So that means you could call it like this:
if ([someObject isKindOfClass: [MyClass class]]) // ...
A class object is not an instance, but it is definitely a full-fledged object. Therefore, a class object can be used wherever an object can be used. For example, it can be assigned to a variable of type id:
id classObject = [MyClass class];
You could then call a class method by sending a message to that object, because it is the class object:
id classObject = [MyClass class];
[classObject someClassMethod];
All class objects are also members of the Class class, so you could say this:
Class classObject = [MyClass class];
[classObject someClassMethod];