A nib file, or simply nib, is a file containing a drawing of a piece of your interface. The term nib is not really an English word (it has nothing to do with fountain pens or bits of chocolate); it is based on the file extension .nib, which originated as an acronym for “NeXTStep Interface Builder”. Nowadays, you will usually develop your interface using a file format whose extension is .xib; when your app is built, your target’s .xib files are translated (“compiled”) into .nib format (Chapter 6). But a .xib file is still referred to as a nib file. I will speak of the same nib file as having either a .xib extension (if you’re editing it) or a .nib extension (if it’s in the built app).
You construct your program in two ways — writing code, and drawing the interface. But these are really two ways of accomplishing the same ends; drawing the interface is a way of writing code. When the app runs and your drawing of the interface in a nib file is loaded, it is translated into instructions for instantiating and initializing the objects in the nib file. You could equally have instantiated and initialized those same objects in code. (This point is crucial; see Nib-Based Instantiation.) Indeed, deciding whether to create an interface object in code or through a nib file is not always easy; each approach has its advantages. The important thing is to understand how interface objects drawn in a nib file are instantiated and connected to your code when the app runs. That’s the subject of this chapter.
(Most of this chapter applies equally to storyboards. Don’t skip this chapter on the grounds that you intend to use storyboards instead of nibs! Storyboards do not relieve you of the need to understand nib management. I’ll discuss the particular nature and use of storyboards in Chapter 19.)
Note
Up through Xcode 3.2.x, nib editing was performed in a separate application, Interface Builder. Starting in Xcode 4, the functionality of Interface Builder was rolled into Xcode itself. Nevertheless, the Xcode interface for nib editing is still referred to as Interface Builder.
Let’s use an actual nib file to explore the Xcode nib-editing interface. In Chapter 6, we created a simple Xcode project, Empty Window; it contains a nib file, so we’ll use that. In Xcode, open the Empty Window project, locate the ViewController.xib listing in the Project navigator, and click it to edit it.
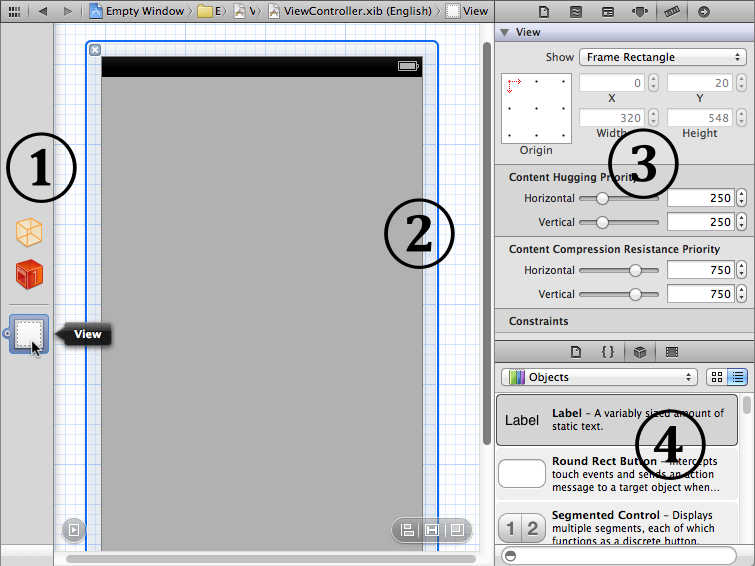
Figure 7.1 shows the project window after selecting ViewController.xib and making some additional adjustments. The Navigator pane is hidden; the Utilities pane is showing. Within the Utilities pane, the Size inspector and the Object library are showing. The interface may be considered in four pieces:
- At the left of the editor is the dock. In Figure 7.1, the dock is collapsed, showing the nib’s top-level objects graphically. The dock can be expanded by dragging its right edge or by clicking the right-pointing triangle-in-a-square-in-a-circle at its lower right; then it shows all of the nib’s objects hierarchically by name.
- The remainder of the editor is devoted to the canvas, where you physically design your app’s interface. The canvas portrays views in your app’s interface and things that can contain views. (A view is an interface object, which draws itself into a rectangular area. The phrase “things that can contain views” is my way of including view controllers, which are represented in the canvas even though they are not drawn in your app’s interface.)
- The inspectors in the Utilities pane are where you view and edit details of the currently selected object.
- The libraries in the Utilities pane, especially the Object library, are your source for interface objects to be added to the nib.
The collapsed dock, as I’ve already said, shows the nib’s top-level objects. To see what this means, you need first to envision the nib as containing objects. Some of these objects — those that represent views — are arranged in a hierarchy of containment. Objects that are contained by no other object are top-level objects.
A view can contain other views (its subviews) and can be contained by another view (its superview); for example, if we were to put a button into the view that occupies the canvas in Figure 7.1, the button would be a subview of that view, and that view would be the button’s superview. One view can contain many subviews, which might themselves contain subviews. But each view can have only one immediate superview. Thus there is a hierarchical tree of subviews contained by their superviews with a single object at the top. The highest superview of any such hierarchy in the nib is a top-level object and appears in the dock. That’s why the view object (labeled View in Figure 7.1) appears in this nib’s dock: it is a view contained by no other view.
A top-level object, then, is either a view without a superview or else not a view at all. A nib file can actually portray two types of top-level object:
- Placeholders (proxy objects)
- A placeholder, or proxy object, isn’t actually in the nib. It represents an object that already exists in your app’s code at the time the nib is loaded. Proxy objects are portrayed as top-level objects in a nib file chiefly so that you can provide communication between objects in your app’s code and objects instantiated from the nib (by means of connections, discussed later in this chapter). You can’t create or delete a proxy object; the dock is populated automatically with them. Proxy objects are shown above the dividing line in the dock.
- Nib objects
- A nib object is an object that is instantiated by the nib — that is, the instance it represents will be created when your code runs and the nib loads. You can create new nib objects. Top-level nib objects are shown below the dividing line in the dock.
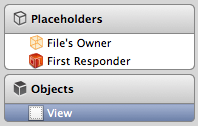
The dock can be expanded (by clicking the right-pointing triangle-in-a-square-in-a-circle at its lower right); it then portrays objects by name, and shows as an outline the full hierarchy of objects in this nib (Figure 7.2). At present, expanding the dock may seem silly, because there is no hierarchy; all objects in this nib are top-level objects. But when a nib contains many levels of hierarchically arranged objects (plus, starting in iOS 6, their autolayout constraints — see Chapter 14), you’re going to be very glad of the ability to survey them all in a nice outline, and to select the one you’re after, thanks to the expanded dock. You can also rearrange the hierarchy here; for example, if you’ve made an object a subview of the wrong view, you can reposition it within this outline by dragging its name.
You can also select objects using the jump bar at the top of the editor. For example, if you click on the canvas background so that no object is selected, and the rightmost jump bar path component reads No Selection, then the entire hierarchy of objects in your nib is shown as a set of hierarchical menus off that path component (Control-6). Again, this may seem like small potatoes now, when your nib contains just three top-level objects and nothing more, but it will be valuable when you’ve many nib objects in a hierarchy.
The name by which a nib object is designated is its label. This name is meaningful to the nib file, not to your code. When the dock is expanded, each object is portrayed by its label, as shown in Figure 7.2. When the dock is collapsed, you can see a top-level object’s label by hovering the mouse over it, as shown in Figure 7.1. If you find an object’s label unhelpful, you can change it: select the object and edit the Label field in the Document section of the Identity inspector (Command-Option-3). Alternatively, select the object’s label in the expanded dock and press Return to make it editable.
The canvas provides a graphical representation of a top-level nib object along with its subviews, similar to what you’re probably accustomed to in any drawing program. If a top-level nib object has a graphical representation (not every top-level nib object has one), you can click on it in the dock to display that representation in the canvas.
To remove the canvas representation of a top-level nib object, click the X at its upper left; this merely clears the representation from the canvas — it does not remove the top-level nib object from the dock (or from the nib), and of course you can always bring back the graphical representation by clicking that nib object in the dock again. On the other hand, the canvas is scrollable and automatically accommodates however many graphical representations it contains, so, rather than removing and restoring graphical representations, you can keep many graphical representations open in the canvas and scroll to see each one.
Our simple Empty Window project’s ViewController.xib contains just one top-level nib object that has a graphical representation — the UIView destined to be the root view of the app’s window, called View. The term “root” here implies that the view occupies the entire window. Because this view will be the root view of our app’s window, any changes you make here will be reflected in the app’s user interface when you run it. To see this, we’re going to add a subview to it:
- Ensure that the View in the dock is being displayed in the canvas.
- Look at the Object library (Control-Option-Command-3). Click the second button in the segmented control to put the Object library into list view, if it isn’t in list view already. Locate the Round Rect Button (you can type “button” into the filter bar at the bottom of the library as a shortcut).
- Drag the Round Rect Button from the Object library into the View in the canvas (Figure 7.3). Don’t accidentally drop the button onto the canvas background, outside of the View! This would cause the button to become a top-level object, which is not what you want. If that happens, select the button in the dock and press Delete, and try again.
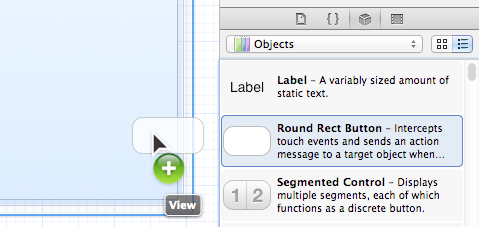
A button now appears in the view in the canvas. The move we’ve just performed — dragging from the Object library into the canvas — is extremely characteristic; you’ll do it often as you design your interface. Alternatively, select an object in the Object library and press Return to copy the object into your interface (you might first want to make sure the correct superview is selected in the canvas). Filtering by name with the filter bar also selects, and switching to the Object library with Control-Option-Command-3 also puts focus in the filter bar, so a rapid keyboard-only way to add a button to your interface is to type Control-Option-Command-3, “button”, possibly Up or Down arrow to select Round Rect Button, Return.
Take a moment to play around with the button in the view in the canvas. Much as in a drawing program, the nib editor provides features to aid you in designing your interface. Here are some things to try:
- Select it: resizing handles appear.
- Resize it to make it wider: dimension information appears.
- Drag it near the edge of the view: a guideline appears, showing a standard margin space between the edge of the button and the edge of the view. Similarly, drag it near the center of the view: a guideline shows you when the button is centered.
- With the button selected, hold down the Option key and hover the mouse outside the button: arrows and numbers appear showing the distance between the button and the edges of the view. (If you accidentally clicked and dragged while you were holding Option, you’ll now have two buttons. That’s because Option-dragging an object duplicates it. Select the unwanted button and press Delete to remove it.)
- Shift-Control-click on the button: a menu appears, letting you select the button or whatever’s behind it (in this case, the view).
(In Xcode 4.5 and later, you’ll also see what look like guidelines or dimension bars when the button is selected and at rest. Those are autolayout constraints, to be discussed in Chapter 14.)
Let’s prove that we really are designing our app’s interface. We’ll run the app to see that its interface has changed.
- Make sure that the Breakpoints button in the project window toolbar is not selected, as we don’t want to pause at any breakpoints you may have created while reading the previous chapter.
- Make sure the destination in the Scheme pop-up menu is the iPhone Simulator.
- Choose Product → Run (or click the Run button in the toolbar).
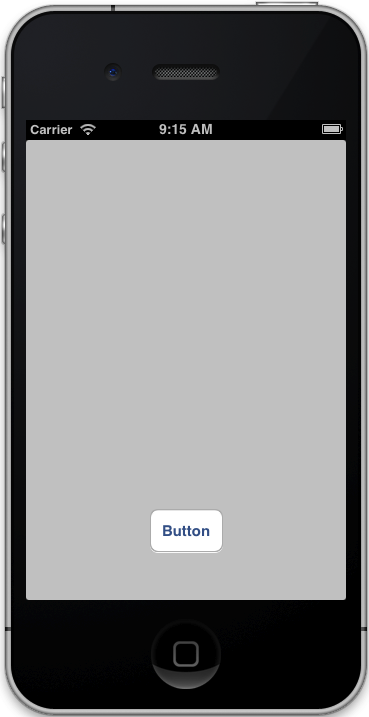
After a heart-stopping pause, the iOS Simulator opens, and presto, our empty window is empty no longer (Figure 7.4); it contains a round rect button! You can tap this button with the mouse, emulating what the user would do with a finger; the button highlights as you tap it.
There are four inspectors that appear only when you’re editing a nib and apply to whatever object is selected in the dock or canvas:
- Identity inspector (Command-Option-3)
- Far and away the most important section of this inspector is the first one, the Custom Class. The selected object’s Class setting tells you the object’s class, and you can use it to change the object’s class. Some situations in which you’ll need to change the class of an object in the nib appear later in this chapter.
- Attributes inspector (Command-Option-4)
-
Settings here correspond to properties and methods that you might use to configure the object in code. For example, changing the setting in the Background pop-up menu in the Attributes inspector for our view corresponds to setting the
backgroundColorproperty for the view in code. Similarly, typing a value in the Title field in the Attributes inspector for our button is like calling the button’ssetTitle:forState:method.The Attributes inspector has sections corresponding to the selected object’s class inheritance. For example, the UIButton Attributes inspector has three sections, because a UIButton is also a UIControl (“Control” in the inspector) and a UIView (“View” in the inspector).
Warning
The correspondence between Attributes inspector settings and Objective-C methods is mostly a matter of guesswork. The Attributes inspector doesn’t always tell you, and there’s no way to see the code generated when the nib actually loads.
- Size inspector (Command-Option-5)
-
The X, Y, Width, and Height fields determine the object’s frame (its position and size within its superview), corresponding to its
frameproperty in code; you can equally do this in the canvas by dragging and resizing, but numeric precision can be desirable.What else you see in the Size inspector depends on whether this nib is using autolayout or not. Autolayout, a new iOS 6 feature, may be toggled on or off for a nib at file level: select the nib file in the Project navigator, show the File inspector (Command-Option-1), and check or uncheck Use Autolayout. The default for new nibs in Xcode 4.5 and later, and thus for our Empty Window project, is that autolayout is on. The possibilities for what you’ll see in the rest of the Size inspector are:
- Autolayout is off
-
The Size inspector displays an Autosizing box that corresponds to the
autoresizingMaskproperty, determining how the object will be repositioned and resized when its superview is resized; a delightful animation demonstrates visually the implications of your settings. The Arrange pop-up menu contains useful commands for positioning the selected object. - Autolayout is on
- The Size inspector displays autolayout-related settings: the object’s content hugging and content compression resistance priorities, plus any autolayout constraints involving this object. There is no Arrange pop-up menu, but effectively the same menu pops up from the leftmost segment of the little cartouche at the lower right of the canvas.
- Connections inspector (Command-Option-6)
- I’ll discuss this later in this chapter.
There are two libraries that are of particular importance when you’re editing a nib:
- Object library (Control-Option-Command-3)
- This library, as we’ve already seen, is your source for objects that you want to add to the nib.
- Media library (Control-Option-Command-4)
- This library lists media in your project, such as images that you might want to drag into a UIImageView or directly into your interface (in which case a UIImageView is created for you).
A nib file is useless until your app runs and the nib file is loaded. If a nib is designated by the Info.plist key “Main nib file base name” (NSMainNibFile, see Chapter 6), it is loaded automatically as the app launches; but this is an exceptional case, and has now fallen out of favor — there are no automatically loaded main nib files in the current project templates. In general, nibs are loaded explicitly as needed while the app runs.
In our Empty Window application, you can actually see where this happens, in AppDelegate.m:
self.viewController =
    [[ViewController alloc] initWithNibName:@"ViewController" bundle:nil];
That line of code does several things, one of which is that (for reasons to be explained more fully in Chapter 19) it causes the nib named @"ViewController" (i.e., the nib file compiled from ViewController.xib, the nib file we’ve been editing) to be loaded, and the resulting views to be put into our app’s interface — which is how we were able to obtain the outcome shown in Figure 7.4.
So a nib is not loaded until the app runs and our code decides, at some point in the life of the app, that that nib is needed. This architecture is a source of great efficiency. For example, imagine our app has two complete sets of interface, and the user might never ask to see the second one. It makes obvious sense not to load a nib containing the second set of interface until the user does ask to see it. By this strategy, a nib is loaded when its instances are needed, and those instances are destroyed when they are no longer needed. Thus memory usage is kept to a minimum, which is important because memory is at a premium in a mobile device. Also, loading a nib takes time, so loading fewer nibs at launch time makes launching faster.
In order to use nibs (or storyboards, since a storyboard is like a collection of multiple nibs), it is crucial that you understand what happens when a nib loads.
When a nib loads, some already existing instance is designated its owner. A nib cannot load without an owner, and the owner must exist before the nib can load. The nib owner can be an instance of any class; it will often, though not necessarily, be a UIViewController instance, because a UIViewController already knows how to load a nib and manage a view that it contains (Chapter 19).
The three most common ways of telling a nib to load are:
-
initWithNibName:bundle: - This is UIViewController’s designated initializer. It tells the UIViewController to which it is sent to prepare to load the named nib with itself as owner. (That’s what’s happening in the line of code from AppDelegate.m that I quoted just a moment ago.) The moment of actual loading is automatically postponed until the nib is needed. I’ll talk much more about this in Chapter 19.
-
loadNibNamed:owner:options: -
An NSBundle instance method. Usually, you’ll direct it to
[NSBundle mainBundle]. Observe that the owner is one of the parameters. I’ll show an example in the next section of this chapter. -
instantiateWithOwner:options: - A UINib instance method. The nib in question was specified when UINib was instantiated. Again, the owner is one of the parameters. An example appears in Chapter 21.
When a nib loads, its nib objects are instantiated, meaning its top-level nib objects and all deeper-level nib objects hierarchically dependent on them. (Proxy objects, by definition, exist before the nib loads; nib loading does not instantiate them.) For example, in our nib, the view is instantiated when the nib loads, bringing with it the button inside it. (Again, see Nib-Based Instantiation; make very sure you understand this point!) This is what nibs are for — to instantiate objects when they load. To put it another way, that is what nib loading is — it is the instantiation of the nib objects described in the nib. At that point, having loaded, the nib’s work is done; the nib does not, for example, have to be “unloaded.”
Note
The same nib can be loaded multiple times, generating an entirely new set of instances each time. A frequent beginner question is, “I have a view in a nib; how do I make multiple copies of this view?” The simple solution is to load that nib multiple times. This is common practice. For example, consider table view cells. Every “row” of a table view is a table view cell. Let’s say there’s a certain look and behavior you want each “row” to have. You design the cell in a nib of its own as a UITableViewCell. If the table has to display ten rows, you load that nib ten times (Chapter 21).
Let’s create our own nib-loading code, illustrating at the same time the fact that any instance can be a nib’s owner. To do so, we’ll need a second nib file in our project.
- Choose File → New → File. The “Choose a template” dialog for files appears.
- At the left of the dialog, under iOS (not Mac OS X!), choose User Interface, and select View in the main part of the dialog. Click Next.
- For the Device Family pop-up menu, specify iPhone. Click Next.
- In the Save dialog, name the file MyNib. Make sure you’re saving into the Empty Window project folder, that the group is Empty Window, and that the target is Empty Window (and checked); all those things should be true by default. Click Create.
We’ve now created a nib file, MyNib.xib, containing a single top-level nib object, a UIView. Look at MyNib.xib in the editor to see that this is true.
We’ll also need an instance to act as the nib’s owner. By the time our code will run, we will already have at least one instance we could use (the AppDelegate instance), but to illustrate the procedure fully, we’ll create our own class whose sole purpose is to be instantiated so that this instance can act as the owner of the nib file as it loads:
- In the Empty Window project in Xcode, choose File → New → File. The “Choose a template” dialog for files appears.
- At the left of the dialog, under iOS (not Mac OS X!), select Cocoa Touch, and select Objective-C Class in the main part of the dialog. Click Next.
- Name the file MyClass. The dialog also offers you a chance to specify what superclass the new class should be a subclass of. Make sure this is NSObject. Click Next.
- In the Save dialog be sure that you’re saving into the Empty Window project folder, that the group is Empty Window, and that the target is Empty Window (and checked); all those things should be true by default. Click Create.
We’ve now created files MyClass.h and MyClass.m declaring a class called MyClass.
Next, we’ll write code that will load our new nib when the app runs. We need a place in our little app where our code is guaranteed to run: we’ll use the AppDelegate instance method application:didFinishLaunchingWithOptions: in the file AppDelegate.m. Just before or after the call to makeKeyAndVisible, insert this code to instantiate MyClass and load MyNib.nib with that instance as its owner:
MyClass* mc = [MyClass new];
[[NSBundle mainBundle] loadNibNamed:@"MyNib" owner:mc options:nil];
Xcode will complain about this, because you can’t speak of MyClass without importing its declaration, so after the existing #import at the start of this file, add this line:
#import "MyClass.h"
Now build and run the project. Our new MyNib.nib file loads, and its UIView top-level nib object is instantiated. Unfortunately, you can’t see that this is true! That’s because we haven’t done anything to obtain the UIView instance that came into existence from the nib loading; in fact, what really happened is that the UIView instance popped into existence and popped right back out again, like a virtual particle in quantum field theory. The next section corrects this, and shows how to obtain visible proof that our nib is loading and that its top-level nib objects are being instantiated.
You know how to load a nib file, thus instantiating its top-level nib objects. But those instances are useless to you if you don’t know how to get a reference to any of them in your code! Doing things with an object such as a label or a button or a text field or whatever (such as setting or getting the text it displays) is easy; but you have to be able to talk to the object in the first place, meaning that you need a reference to it, a variable that points to that instance (Chapter 3). Getting a reference to an instance that you created in code is trivial, because you assigned it to a variable at the time you created it (Chapter 5). But there’s no such assignment when you load a nib; you just load it and that’s the end of that:
[[NSBundle mainBundle] loadNibNamed:@"MyNib" owner:mc options:nil];
// no assignment??!! dude, where are my nib-created instances?
To refer in code to instances generated from nib objects when the nib loads, you need to have previously set up an outlet connection from a proxy object in the same nib.
A connection is a named unidirectional linkage from one object in a nib file (the connection’s source) to another object in the same nib file (the connection’s target). An outlet is a connection whose name corresponds to an instance variable in the source object. When the nib loads, and the target object is instantiated, the nib-loading mechanism assigns the value of the instance variable to be the target object. Thus the source object winds up with a reference to the target object as the value of one of its instance variables.
Connections can link any two objects in a nib file, but a proxy object as the source of a connection is special because it represents an object that exists before the nib loads. Thus an outlet from a proxy object causes an object that exists before the nib loads to end up with a reference to an object that doesn’t exist until after the nib loads — an object that is in fact instantiated by the loading of the nib.
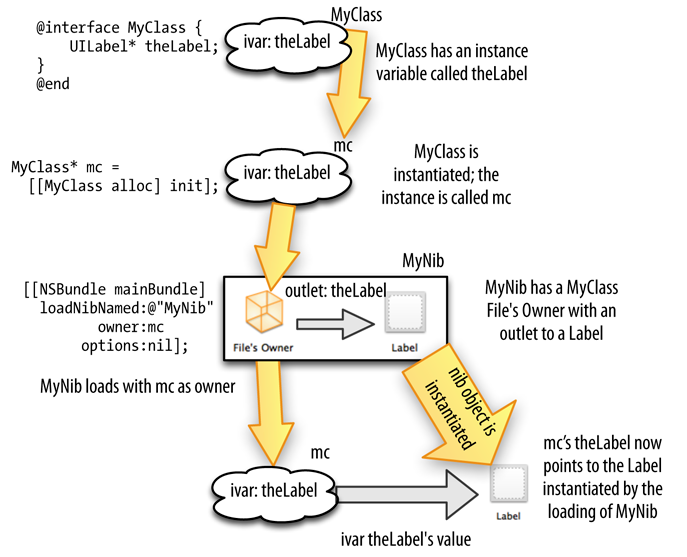
In the most typical configuration, the proxy object will be the File’s Owner. The idea is that the instance that owns the nib has an instance variable, and the File’s Owner in the nib has a corresponding outlet to a nib object; the nib loads, and the owner instance ends up with an instance variable that refers to the instance generated from the nib object (Figure 7.5).
The File’s Owner top-level object in a nib file is a proxy for the instance that will be the nib’s owner when the nib loads. To form a successful connection between this proxy object and a nib object, the nib needs to know the class of that instance. In the nib editor, you must set the File’s Owner’s class to match the nib owner’s class. Obviously this means that you must know in advance, while editing the nib, what the class of the nib owner will be when the nib loads. But you do know this, because you (i.e. your code) is what’s going to load the nib.
To demonstrate the use of an outlet connection, we’ll implement exactly the schema illustrated in Figure 7.5, by making an outlet from the File’s Owner to a nib object in MyNib.xib.
The nib owner is going to be a MyClass instance when the nib loads. As I’ve just said, we must tell the nib that this is the case. Let’s do that first:
- In Xcode, click MyNib.xib to edit it.
- In the dock, select the File’s Owner proxy object.
- Show the Identity inspector (Command-Option-3). The Class, under Custom Class, is NSObject. Change this to MyClass. (If you type “My,” the word “MyClass” should just appear, as it’s the only class Xcode knows about whose name starts with “My.” Accept this by pressing Return.)
Next, we need a nib object in MyNib.xib to make an outlet to. We already have one — the nib’s existing top-level UIView. But this lacks visual impact, so we’ll replace the UIView with a top-level UILabel, which will draw some text:
- In Xcode, click MyNib.xib to edit it.
- In the dock, select the View object and delete it.
- Drag a Label object (UILabel) from the Object library into the canvas to become a new top-level object. Its graphical representation appears in the canvas.
- Double-click the word “Label” in the label’s graphical representation in the canvas and type “Hello, world!” Hit Return to stop editing; the label resizes to match the size of its text.
Now comes the really crucial part. We need two things, in two different places:
- The instance variable
- In its code, MyClass needs an instance variable.
- The outlet
- In the nib, the File’s Owner proxy, representing a MyClass instance, needs an outlet pointing at the label — an outlet with the same name as the instance variable.
When the app runs and MyNib.nib is loaded with a MyClass instance as its owner, as we arranged in the code we’ve already written, those two pairs of things will be effectively equated:
- The MyClass instance will be equated with the File’s Owner proxy in the nib, because it will be the nib’s owner as it loads.
- MyClass’s instance variable will be equated with the File’s Owner outlet pointing at the label, because they have the same name.
Note
I’m simplifying. It isn’t really the identity of an instance variable’s name with that of the outlet that makes the match. It’s more complicated than that; the match is made using key–value coding. The rigorous details appear in Chapter 12.
You thus need to work in two places at once: the nib, and MyClass’s code. Before Xcode 4, this required working separately in two different places, Xcode (where the code was edited) and Interface Builder (where the nib was edited). Nowadays, Xcode itself edits both the code and the nib, and furthermore you can see the code and the nib at the same time, all of which will make creating this pair of things, the instance variable and the outlet, much easier than it once was.
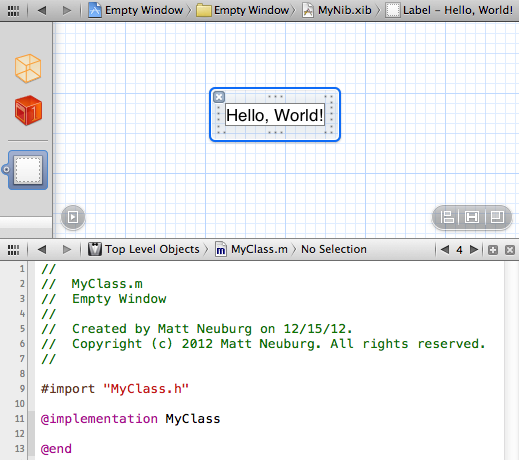
I want you now to arrange to see two things at once: MyClass.m (the MyClass implementation file, where we’ll declare the instance variable) and MyNib.xib (where we’ll create the outlet). You could use two project windows if you wanted, but for simplicity, let’s use an assistant: while editing MyNib.xib, switch to Assistant view (View → Assistant Editor → Show Assistant Editor) as in Figure 7.6. If, when you showed the assistant pane, it didn’t appear with MyClass’s implementation file showing, use the jump bar in the assistant pane to make the assistant pane show MyClass.m: for example, in the first path component choose Manual → Top Level Objects → MyClass.m. If the assistant pane is beside the nib editor pane rather than below it, choose View → Assistant Editor → All Editors Stacked Vertically.
In MyClass.m in the assistant pane, at the start of the implementation section, create curly braces and declare a UILabel instance variable (and save):
@implementation MyClass
{
    IBOutlet UILabel* theLabel;
}
@end
The term IBOutlet is linguistically meaningless; it is #defined as an empty string, so it is deleted by the preprocessor before the compiler ever sees it. It’s purely a hint to Xcode to make it easy for you to create the outlet. Xcode responds by displaying an empty circle in the gutter to the left of the IBOutlet line; this indicates that although we’re speaking of an outlet in our code, no corresponding outlet connection yet exists in a nib. We’ll fix that in a moment.
We have typed the instance variable as a UILabel*, because we happen to know that this is the type of object that this instance variable will be pointing to; we could also use id, or any superclass of UILabel. If we do not use one of these alternatives (id, UILabel, or a superclass of UILabel), we will not be able to form the connection to a UILabel in the nib.
We have accomplished half our task: we’ve made the instance variable. Now we’re ready for the other half, namely, to make the outlet connection. There are several ways to do this, so I’ll just pick one for now and demonstrate the others later:
-
Select File’s Owner in the nib (which, you remember, represents a MyClass instance) and switch to the Connections inspector (Command-Option-6). Lo and behold, the name of our instance variable,
theLabel, is listed here! This is the work of theIBOutlethint we created earlier. -
Click in the empty circle to the right of
theLabelin the Connections inspector, drag to the Label object in the canvas (Figure 7.7), and release the mouse. (A kind of elastic line follows the mouse as you drag from the circle to show that you’re creating a connection.)
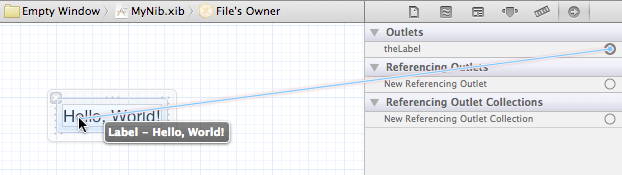
With the File’s Owner object selected, look again at the Connections inspector; it shows that theLabel is connected to the Label nib object, and if you hover the mouse over the filled circle at the right, the label object in the nib is highlighted. And look at the IBOutlet line in MyClass.m; the circle in the gutter is now filled in, and if you click that filled circle, the label is specified in a pop-up menu next to the circle, and the label object in the nib is highlighted. Mission accomplished! We have made an outlet connection in the nib from the File’s Owner proxy (representing a MyClass instance) to the Label object, and this outlet connection has the same name as the instance variable theLabel in MyClass’s code.
Therefore, when the nib loads and a MyClass instance is the nib’s owner, its theLabel instance variable will be set to the UILabel object that will be instantiated through the loading of the nib. To prove that this is indeed the case, we’ll use that instance variable in our code to do something dramatic. In particular, we’ll stick the UILabel into our window, thus making it visible. Its visibility will prove that the nib is loading and that the instance variable is being set by the outlet.
Return to AppDelegate.m and modify the nib-loading code like this (you added the first two lines earlier):
MyClass* mc = [MyClass new];
[[NSBundle mainBundle] loadNibNamed:@"MyNib" owner:mc options:nil];
UILabel* lab = [mc valueForKey: @"theLabel"];
[self.window.rootViewController.view addSubview: lab];
lab.center = CGPointMake(100,100);
lab.frame = CGRectIntegral(lab.frame);
(We haven’t written an accessor method in MyClass for theLabel, so to save time I used key–value coding.) Build and run the app. The words “Hello, world!” appear! This proves that our outlet worked. We loaded a nib and, using an outlet, we obtained a reference to a nib object and were able to manipulate that object, putting it into our interface.
Warning
Making an instance variable and giving it an IBOutlet hint, but forgetting to connect the outlet to anything in the nib, is an unbelievably common beginner (and not-so-beginner) mistake. Had we made this mistake, our code would have run without error, but “Hello, world!” would not appear in the interface because lab would be nil. The unfilled circle that appears in the gutter next to an IBOutlet line for which no corresponding nib connection exists is your only clue that something’s amiss, so watch for it.
I said a moment ago that there were other ways to create the outlet. Let’s try some of them. Return to our assistant-paned nib editor, select the File’s Owner, switch to the Connections inspector, and delete the outlet by clicking the little X to its left. We’re going to make this outlet again, a different way:
- Select the File’s Owner in the dock.
- Hold down the Control key and drag from the File’s Owner to the label. An elastic line follows the mouse. Release the mouse.
-
A little window (called a HUD, for “heads-up display”) appears, titled Outlets, listing
theLabelas a possibility (Figure 7.8). ClicktheLabel.

Once again, look at the Connections inspector with the File’s Owner selected to confirm that this worked. You can even build and run the project again, to prove it to yourself if you’re in any doubt. Now delete the outlet again; we’re going to make this outlet in yet a different way:
- Select the File’s Owner in the dock.
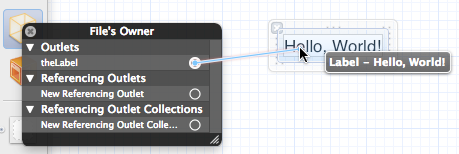
- Control-click the File’s Owner in the dock. A HUD appears, looking a lot like the Connections inspector.
-
Drag from the circle to the right of
theLabelto the label (Figure 7.9). Release the mouse.
Now delete the outlet again; we’re going to make this outlet in another way. This time, we’re going to operate from the point of view of the label. The Connections inspector shows all connections emanating from the selected object; it also shows all connections linking to the selected object. So, select the label and look at the Connections inspector. It lists “New Referencing Outlet.” This means an outlet from something else to the thing we’re inspecting, the label. So:
- From the circle at the right of “New Referencing Outlet,” drag to the File’s Owner. An elastic line follows the mouse. Release the mouse.
-
A HUD saying
theLabelappears. Click it.
Confirm that, once again, we’ve made an outlet from the File’s Owner to the label. (And we could also have done the same thing by Control-clicking the label to start with, to show its Connections HUD.) Now delete the outlet again; we’re going to make this outlet in another way. This time, we’re going to start with the label, but (hold onto your hat) we’re going to connect directly to the code which is sitting in the assistant pane:
- Select the label.
-
Make sure that MyClass.m is showing in the assistant pane and that you can see the
IBOutletline declaring the instance variabletheLabel. - Hold down the Control key and drag from the label in the nib across the barrier between panes to that line of code. An elastic line follows the mouse. When you’ve got the mouse positioned correctly, the words Connect Outlet will appear. Release the mouse.
Yet again, confirm that we’ve successfully made the desired outlet. And you could also have done the same thing in reverse; starting with the circle at the left of the IBOutlet line in the code, you can drag (without holding Control) to the label in the nib.
Now delete the outlet one last time, and (get this) delete the line of code declaring the instance variable (but leave the curly braces). We’re going to create the outlet and the instance variable declaration, all in a single amazing move:
- Select the label.
- Make sure MyClass.m is showing in the assistant pane.
- Hold down the Control key and drag from the label in the nib to the area within the curly braces in the code. An elastic line follows the mouse. The words Insert Outlet or Outlet Collection appear. Release the mouse.
-
A little HUD appears, asking for the name of the instance variable that’s about to be created. Call it
theLabel(and make sure the type is UILabel), and press Return. TheIBOutletline declaring the instance variable is created, and the outlet is formed to match it.
All our examples so far have involved a proxy object, but an outlet connection can connect any two objects in the nib. The only requirement is that the source object be of a class that has an instance variable whose type matches the class of the target object. This class might be your own custom class with an ivar that you gave it, as in our earlier examples, or it might be a built-in Cocoa class with a built-in instance variable that can be used as an outlet.
Warning
Nothing in the documentation for a built-in Cocoa class tells you which of its instance variables are available as outlets. In general, the only way to learn what outlets a built-in class provides is to examine a representative of that class in a nib.
It is also possible to create an outlet collection. This is an NSArray instance variable matched by multiple connections to objects of the same type. For example, suppose a class contains this instance variable declaration:
IBOutletCollection(UILabel) NSArray* labels;
Then it is possible to form multiple labels outlets from an instance of that class in a nib, each one to a different UILabel in that nib. When the nib loads, those UILabel instances become the elements of the NSArray labels. The order in which the outlets are formed is the order of the elements in the array. This turns out to be particularly useful when forming outlets to autolayout constraints; examples will appear in Chapter 20 and Chapter 23.
Having explored outlet connections, we should also discuss the other kind of connection, action connections.
An action is a message emitted automatically by a Cocoa UIControl interface object (a control) when the user does something to it, such as tapping the control. The various user behaviors that will cause a control to emit an action message are called events. To see a list of possible events, look at the UIControl class documentation, under “Control Events.” For example, in the case of a UIButton, the user tapping the button corresponds to the UIControlEventTouchUpInside event. In the case of a UITextField, the user typing or deleting or cutting or pasting corresponds to the UIControlEventEditingChanged event. A complete list of UIControls and what events they report is provided in Chapter 11, and each type of control is thoroughly dealt with in later chapters, especially Chapter 25.
An action message, then, is a way for your code to respond when the user does something to a control in the interface, such as tapping a button. But your code will not receive an action message from a control unless you explicitly make prior arrangements with that control. You must tell the control what event should trigger an action message, what instance to send the action message to, and what the action message’s name should be. There are two ways to make this arrangement: in code, or in a nib.
Either way, we’re going to need a method for the action message to call. There are three standard signatures for a method that is to be called through an action message; the most commonly used one takes a single parameter, which will be a reference to the object that emitted the action message. (For full details, see Chapter 11.) So, for example, you could have a method like this (let’s agree to put it in the implementation section for ViewController, in ViewController.m):
- (void) buttonPressed: (id) sender {
    UIAlertView* av = [[UIAlertView alloc] initWithTitle:@"Howdy!"
                                                 message:@"You tapped me."
                                                delegate:nil
                                       cancelButtonTitle:@"Cool"
                                       otherButtonTitles:nil];
    [av show];
}
Now, as I mentioned a moment ago, it is possible to arrange in code for buttonPressed: to be called when the user taps a button. In particular, if b is a reference to the button, then some ViewController code could say:
[b addTarget:self action:@selector(buttonPressed:)
        forControlEvents:UIControlEventTouchUpInside];
That code means: “Hey there, button! When the user taps on you (UIControlEventTouchUpInside), send me (self) a buttonPressed: message.” (See Chapter 3 if you’ve forgotten about the @selector directive.) Of course, such an instruction assumes that this object (self) really does implement a buttonPressed: method. (If it doesn’t, then when the user taps the button, the app will crash.)
However, instead of doing that, we’re going to use the existing button in ViewController.xib and arrange in the nib for its action message to be buttonPressed: and to be sent to a ViewController instance. We’re going to form an action connection in the nib. We can do this because, as I’ve already mentioned, a ViewController instance is the owner of ViewController.nib when it loads. The template has already set the File’s Owner proxy in ViewController.xib to be of the ViewController class (look at it and see!). So we can create an action connection in the nib from the button to the File’s Owner, as a way of communicating between the button and the ViewController instance that loads the nib when the app runs.
As with outlets, there are several ways to do this; I’ll just show you the main ones and leave you to discover the rest. (They are all directly comparable to the many ways of creating an outlet connection.)
-
We need a hint, in our code, that a method with the expected signature exists. This hint involves substituting
IBActionfor the method’svoidreturn type. (The substitution is legal becauseIBActionis#defined asvoid; Xcode can see the hint in your code, but the preprocessor will turnIBActionback tovoidbefore the compiler ever sees it.) So, in ViewController.m, change the first line of ourbuttonPressed:method implementation to look like this (and save the file):- (IBAction) buttonPressed: (id) sender {This causes an empty circle to appear in the gutter next to the
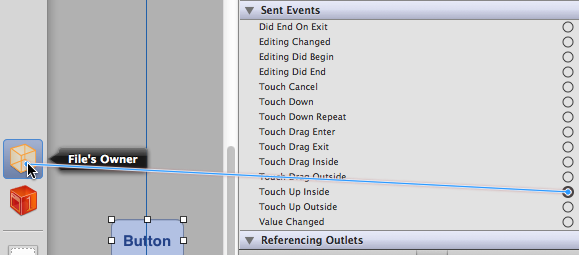
IBActionline. - Now edit ViewController.xib, select the button in the window, and look at the Connections inspector. The event for which we’d like to send the action message is Touch Up Inside. Drag from its circle to the File’s Owner nib object in the dock, which is to receive the message (Figure 7.10). Release the mouse.
-
A little window listing possible ViewController action methods appears; in this case, it lists only
buttonPressed:. Click onbuttonPressed:to form the connection.
To see that the action connection has been formed, look at the Connections inspector. If you select the button, the Connections inspector reports that the button’s Touch Up Inside event is connected to the File’s Owner’s buttonPressed: method. If you select the File’s Owner object, the Connections inspector reports a Received Action where buttonPressed: is called by the Rounded Rect Button’s Touch Up Inside event. Finally, look at the code in ViewController.m; the circle next to the IBAction line is filled, and you can click it to reveal that the connection is from the button.
Finally, to make assurance doubly sure, you can also build and run the project to confirm that the action connection is working. In the running app, the button inside the window now actually does something when the user taps it! It summons an alert.
As with outlets, we could have formed the action connection by Control-dragging from the button directly to the File’s Owner, instead of involving the Connections inspector. If you just Control-drag, Interface Builder assumes a default event for you (in this case, it would assume Touch Up Inside). If that isn’t what you want, start by Control-clicking on the button to summon a HUD version of the Connections inspector, and drag from the desired event’s circle just as you would do from the real Connections inspector.
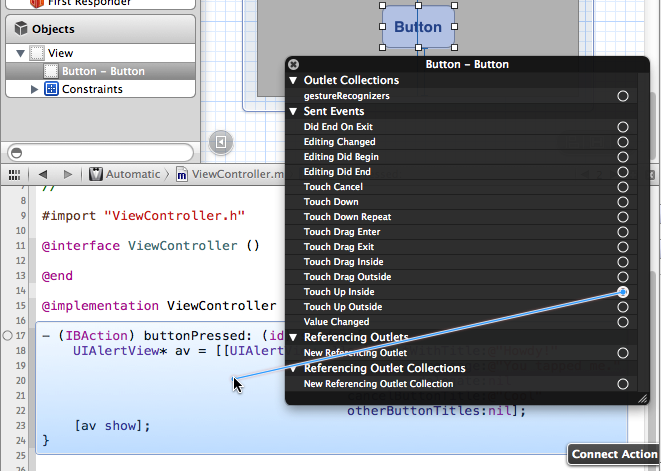
As with outlets, you can also form the action connection directly from nib to code. (But please reread Connecting to Code is an Illusion; that warning applies equally to action connections.) In Figure 7.11, we’ve Control-clicked the button in the nib to summon its Connections HUD, and dragged from the Touch Up Inside circle to the buttonPressed: implementation in code. And we could equally have gone the other way, dragging from the unfilled circle next to the IBAction line in the code to the button in the nib.
But wait, there’s more! Instead of writing the action method ahead of time, you can ask Xcode to stub it out for you. To do so, Control-drag from the nib to an empty spot in ViewController’s implementation section; the words Insert Action appear, and when you release the mouse, a dialog appears, letting you specify the name of the action method, the number of arguments it should take, and the control event to be used as a trigger. Xcode inserts the method implementation, but doesn’t put any code between the curly braces; it’s smart, but not smart enough to guess what you want the method to do!
By the time a nib finishes loading, its instances are fully fledged; they have been initialized and configured with all the attributes dictated through the Attributes and Size inspectors, and their outlets have been used to set the values of the corresponding instance variables. Nevertheless, you might want to append your own code to the initialization process as an object is instantiated from a loading nib. Most commonly, to do this, you’ll implement awakeFromNib (possibly subclassing a Cocoa class in order to do so). The awakeFromNib message is sent to all nib-instantiated objects just after they are instantiated by the loading of the nib: at the point where this happens, the object has been initialized and configured and its connections are operational.
For example, our Empty Window app is loading MyNib.xib, extracting a UILabel from it, and inserting that label into our interface; the result is that the words “Hello, world!” appear in our window. Let’s modify the behavior of this UILabel so that it does some additional self-initialization in code. To do that, we will need a class of our own to which our UILabel will belong. Clearly, this needs to be a UILabel subclass. So:
- In Xcode, choose File → New → File and specify that you want a Cocoa Touch Objective-C class. Click Next.
- Call the new class MyLabel. Make it a subclass of UILabel. Click Next.
- Make sure you’re saving into the project folder, with the Empty Window group and the Empty Window target (this should be right by default). Click Create.
-
In MyLabel.m, somewhere in the implementation section, implement
awakeFromNib:- (void) awakeFromNib { [super awakeFromNib]; self.text = @"I initialized myself!"; [self sizeToFit]; } - That code won’t apply to the label in MyNib.xib unless that label is a MyLabel, so edit MyNib.xib and change the label’s class to MyLabel in the Identity inspector.
Now build and run the project. Instead of “Hello, world!” we now see “I initialized myself!” in the window.
Mac OS X Programmer Alert
If you’re an experienced Mac OS X programmer, you may be accustomed to rarely or never calling super from awakeFromNib; doing so used to raise an exception, in fact. In iOS, you must always call super in awakeFromNib. Another major difference is that in Mac OS X, a nib owner’s awakeFromNib is called when the nib loads, so it’s possible for an object to be sent awakeFromNib multiple times; in iOS, awakeFromNib is sent to an object only when that object is itself instantiated from a nib, so it can be sent to an object a maximum of once.
Sometimes, you might need to interfere with a nib object’s initialization at an even earlier stage. If this object is a UIView or UIViewController (or a subclass of either), you can implement initWithCoder:. In your implementation, be sure to call super and return self as you would do in any initializer. Your purpose here would typically be to initialize additional instance variables that your subclass has declared, as with any initializer.
Here, for example, is an implementation of MyLabel that declares an instance variable that is an int called _num and manipulates it first in initWithCoder: and then in awakeFromNib, thus proving that the two are called in that order:
@implementation MyLabel
{
    int _num;
}

- (id) initWithCoder:(NSCoder *)aDecoder {
    self = [super initWithCoder:aDecoder];
    if (self) {
        self->_num = 42;
    }
    return self;
}

- (void) awakeFromNib {
    [super awakeFromNib];
    self.text = [NSString stringWithFormat: @"The answer is %i", self->_num];
    [self sizeToFit];
}
@end
That’s trivial and unnecessary, but it illustrates the principle.