An iOS app’s interface is dynamic, and with good reason. On the desktop, an application’s windows can be big, and there can be more than one of them, so there’s room for lots of interface. With iOS, everything needs to fit on a single display consisting of a single window, which in the case of the iPhone is almost forbiddingly tiny. The iOS solution to this is to swap out interface and replace it with other interface, as needed. Thus, entire regions of interface material — often the entire contents of the screen — must come and go in an agile fashion that is understandable to the user. Animation is often used to emphasize and clarify the replacement of one view by another.
Management of this task resides in a view controller, an instance of UIViewController. Actually, a view controller is most likely to be an instance of a UIViewController subclass. The UIViewController class is designed to be subclassed. You are very unlikely to use a plain vanilla UIViewController object. You might write your own UIViewController subclass; you might use a built-in UIViewController subclass such as UINavigationController or UITabBarController; or you might subclass a built-in UIViewController subclass such as UITableViewController (Chapter 21).
(You are less likely to subclass other built-in UIViewController subclasses such as UINavigationController or UITabBarController — except for very specific and limited purposes, such as to customize rotation settings.)
A view controller manages a single view (which can, of course, have subviews); its view property points to the view it manages. The view has no explicit pointer to the view controller that manages it, but a view controller is a UIResponder and is in the responder chain just above its view (Chapter 11), so it is the view’s nextResponder.
The chief concepts involved in the use of view controllers are as follows:
- Rotation
- The user can rotate the device, and you might like the interface to rotate in response, to compensate. A window is effectively pinned to the physical display (window bounds are screen bounds and do not change), but a view can be given a transform so that its top moves to the current top of the display. A UIViewController responds to device rotation by applying this transform.
- Root view controller
-
Every real-life iOS app should have a single view controller that acts as the root view controller for the whole app. Its job is to supply the view that covers the entire window and acts as the superview for all other interface (Chapter 7, Chapter 14). The user will never see the window (except, perhaps, in a glimpse as view controllers are swapped along with animation of their views). The user may never see or be conscious of the root view, either, as it may be completely covered by its subviews, but it still has an important function: it is automatically sized for the app’s orientation and the position of the status bar, and allows the entire interface to rotate in response to device rotation.
Prior to iOS 5 it was theoretically possible for an iOS app to lack a root view controller. It’s still theoretically possible, but it’s strongly discouraged; the runtime issues a warning if the app launches without a root view controller (“Applications are expected to have a root view controller at the end of application launch”). That is why our Empty Window project (Chapter 6 and following) was based on the Single View Application project template: this is the minimal current template that supplies a root view controller along with a nib containing its view.
- Parentage
-
A view controller can contain another view controller. The containing view controller is the parent of the contained view controller; the contained view controller is a child of the containing view controller. This containment relationship of the view controllers is reflected in their views: the child view controller’s view is a subview of the parent view controller’s view. (“Subview” here may mean “subview at some depth,” but most often it means a direct subview.)
Replacement of one view with another often involves a parent view controller managing its children. For example, Figure 19.1 shows the TidBITS News app displaying a typical iPhone interface, consisting of a list of story headlines and summaries; if the user taps an entry in the list, the whole list will slide away to the left and the text of the actual story will slide in from the right. This is done by a parent view controller (a UINavigationController) adding a new child view controller; the parent view controller, meanwhile, stays put (as the app’s root view controller, in this case).
In iOS 4 and before, only built-in view controllers such as UITabBarController, UINavigationController, and UISplitViewController could act as parent view controllers. Nowadays, you are free to write your own view controller subclasses that act as parent view controllers (and the support for doing this is even better in iOS 6 than it was in iOS 5).

- Presentation
-
In iOS 4 and before, there was a notion of a modal view controller, whose view effectively replaced the entire interface. In iOS 5 and later, this has evolved into the notion of a presented view controller. One view controller presents another view controller; this means that the first view controller, the presenting view controller, remains in place, but the presented view controller’s view has replaced the presenting view controller’s view.
This relationship between view controllers is different from the parent–child relationship. A presenting view controller is not the parent view controller of the view controller it presents — it is its presenting view controller.
- Animation
- The act of swapping views by manipulating child view controllers or presenting a view controller is very frequently accompanied by animation. Certain animation types are built-in and conventional. For example, as I mentioned a moment ago, in Figure 19.1, tapping a story listing will cause the list to slide out to the left while the new view slides in from the right; this is the default behavior of a UINavigationController when it adds a new view controller and makes its view appear. Similarly, as a view controller is presented, the new view can slide in from below, flip into place like a piece of paper being flipped over, and so forth.
- Customization
-
A view controller has properties and methods that are used to customize the interface and its behavior when its view is showing. For example, when a UINavigationController substitutes another view controller’s view into its interface (by adding the view controller as a child), it also seeks that view controller’s
navigationItem.titleViewproperty, which is yet another view; if it finds it, it puts that view into the navigation bar at the top of the interface. That is how the TidBITS logo in Figure 19.1 appears in the navigation bar — it’s because it is a view controller’snavigationItem.titleView. Similarly, if a view controller is to be presented, it has properties that allow it to dictate the style of animation that should be used as its view appears. - State saving
- View controllers can work together to save state automatically. By taking advantage of this feature (new in iOS 6), you can ensure that if your app is terminated in the background and subsequently relaunched, it will quickly resume displaying the same interface that was showing when the user last saw it.
Because of containment and presentation, there is a hierarchy of view controllers. In a properly constructed iOS app, there should be exactly one root view controller, and it is the only view controller that has neither a parent view controller nor a presenting view controller. Any other view controller, if its view is to appear in the interface, must be a child view controller (of some parent view controller) or a presented view controller (of some presenting view controller).
At the same time, at any given moment, the actual views of the interface form a hierarchy dictated by and parallel to some portion of the view controller hierarchy. Every view visible in the interface owes its presence either to the fact that it is a view controller’s view or to the fact that it is, at some depth, a subview of a view controller’s view. Moreover, a child view controller’s view is, at some depth, its parent view controller’s view’s subview.
The place of a view controller’s view in the view hierarchy will most often be automatic, by virtue of the view controller’s place in the view controller hierarchy. You might never need to put a UIViewController’s view into the view hierarchy manually (and it would be wrong to do so, except in specialized circumstances that I’ll talk about in a moment).
For example, in Figure 19.1, we see three interface elements (from top to bottom):
- The navigation bar, containing the TidBITS logo.
- Some text, which is actually a UILabel, stating when the list of stories was last updated.
- The list of stories, which is actually a UITableView.
I will describe how all of this comes to appear on the screen through the view controller hierarchy and the view hierarchy (Figure 19.2). The app’s root view controller is a UINavigationController; the UINavigationController’s view, which is never seen in isolation, is the window’s sole immediate subview (the root view), and the navigation bar is a subview of that view. The UINavigationController contains a second UIViewController — a parent–child relationship. The child is a custom UIViewController subclass; its view is what occupies the rest of the window, as another subview of the UINavigationController’s view. That view contains the UILabel and the UITableView as subviews. This architecture means that when the user taps a story listing in the UITableView, the whole label-and-table complex will slide out, to be replaced by the view of a different UIViewController, while the navigation bar stays.
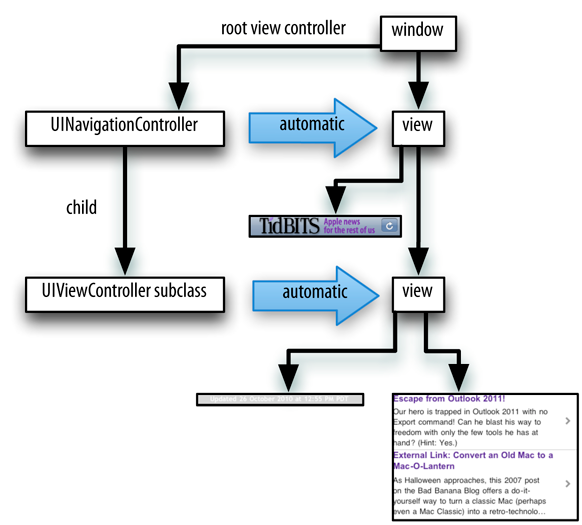
In Figure 19.2, notice the word “automatic” in the two large right-pointing arrows associating a view controller with its view. This is intended to tell you how the view controller’s view became part of the view hierarchy. The UINavigationController’s view became the window’s subview automatically, by virtue of the UINavigationController being the window’s rootViewController. The custom UIViewController’s view became the UINavigationController’s view’s second subview automatically, by virtue of the UIViewController being the UINavigationController’s child.
Now, as I said a moment ago, there is an exception to this rule about views taking their place in the view hierarchy automatically — namely, when you write your own parent view controller class. In that case, you will need to put a child view controller’s view into the interface manually, as a subview (at some level) of the parent view controller’s view, if you want it to appear in the interface. (Conversely, you should not put a view controller’s view into the interface manually under any other circumstances.)
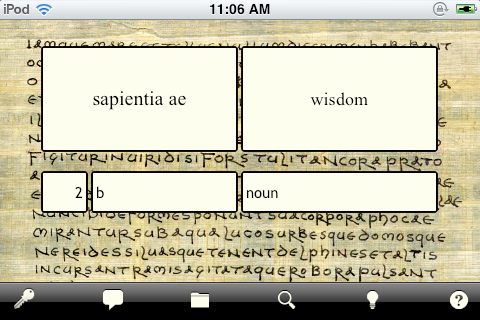
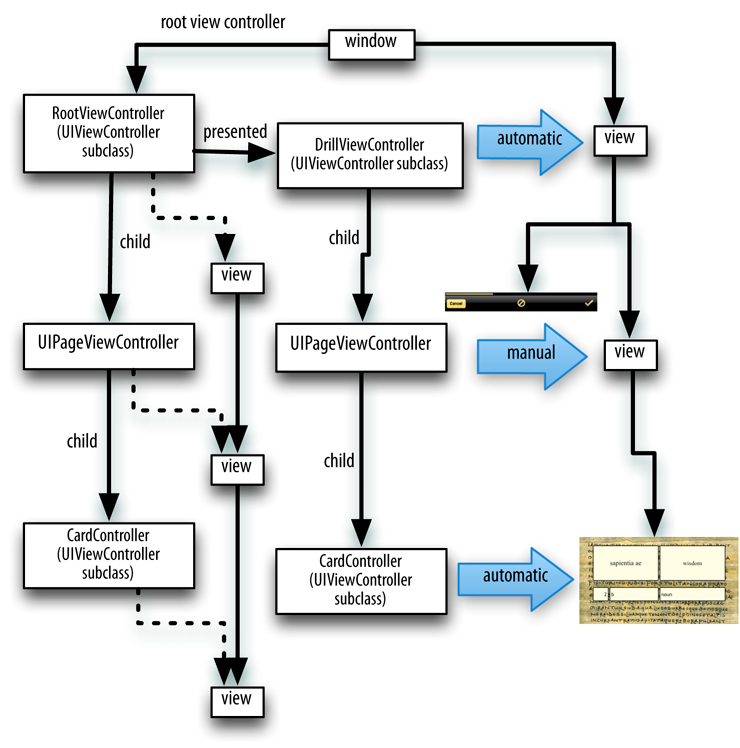
I’ll illustrate with another app of mine (Figure 19.3). The interface displays a flashcard containing information about a Latin word, along with a toolbar (the black area at the bottom) where the user can tap an icon to choose additional functionality.
Again, I will describe how the interface shown in Figure 19.3 comes to appear on the screen through the view controller hierarchy and the view hierarchy (Figure 19.4). The app actually contains over a thousand of these Latin words, and I want the user to be able to navigate between flashcards to see the next or previous word; there is an excellent built-in view controller for this purpose, the UIPageViewController. However, that’s just for the card; the toolbar at the bottom stays there, so it can’t be inside the UIPageViewController’s view. Therefore the app’s root view controller is my own UIViewController subclass, which I call RootViewController; its view contains the toolbar and the UIPageViewController’s view. In accordance with the rules I’ve just enunciated, this means that I must make the UIPageViewController a child view controller of RootViewController, and I must put the UIPageViewController’s view manually into the interface as a subview of the RootViewController’s view.
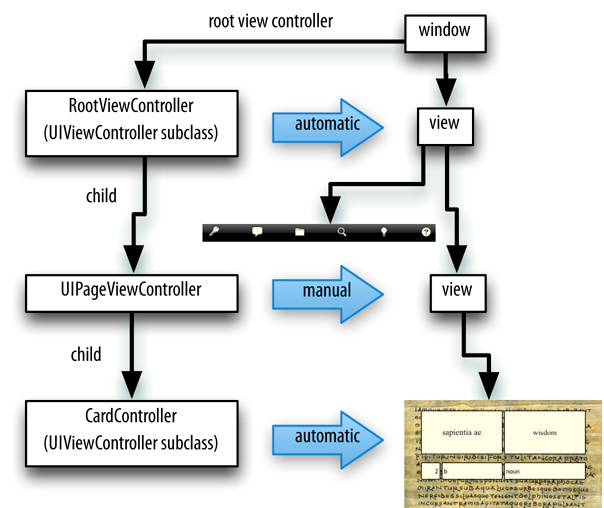
In Figure 19.4, then, my RootViewController’s view becomes the window’s subview (the root view) automatically, by virtue of the RootViewController’s being the window’s rootViewController. But then, because I want to put a UIPageViewController’s view into my RootViewController’s view, it is up to me to make RootViewController function as a parent view controller; I must make the UIPageViewController the RootViewController’s child, and I must put the UIPageViewController’s view manually into my RootViewController’s view. Finally, the way UIPageViewController works as it replaces one view with another is by swapping out a child view controller; so I hand the UIPageViewController an instance of my CardController class (another UIViewController subclass) as its child, and the UIPageViewController displays the CardController’s view automatically.
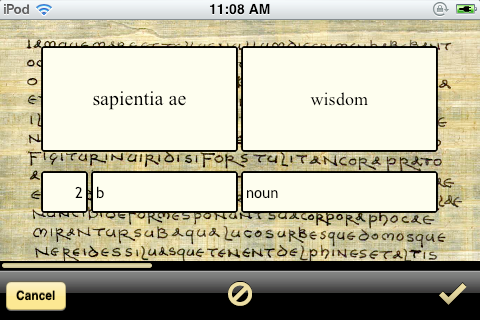
Finally, here’s an example of a presented view controller. My Latin flashcard app has a second mode, where the user is drilled on a subset of the cards in random order; the interface looks very much like the first mode’s interface (Figure 19.5), but it behaves completely differently.
To implement this, I have another UIViewController subclass, DrillViewController; it is structured very much like RootViewController. When the user is in drill mode, a DrillViewController is being presented by the RootViewController, meaning that the DrillViewController’s interface takes over the screen automatically: the DrillViewController’s view, and its whole subview hierarchy, replaces the RootViewController’s view and its whole subview hierarchy. The RootViewController and its hierarchy of child view controllers remains in place, but the corresponding view hierarchy is not in the interface; it will be returned to the interface automatically when we leave drill mode (because the presented DrillViewController is dismissed), and the situation will look like Figure 19.4 once again.
For any app that you write, you should be able to construct a diagram showing the hierarchy of view controllers and charting how each view controller’s view fits into the view hierarchy. The diagram should be similar to mine! The view hierarchy should run neatly parallel with the view controller hierarchy; there should be no crossed wires or orphan views. And every view controller’s view should be placed automatically into the view hierarchy, unless (and only unless) you have written your own parent view controller.
On the whole, a view controller is created exactly like any other object. A view controller instance comes into existence because you instantiate a view controller class, either in code or by loading a nib (Chapter 5). But the instantiation of a view controller introduces some additional considerations:
- How will the view controller persist?
- How will the view controller’s view get into the interface?
- Where will the view controller’s view come from?
We begin with the issue of persistence. Even if you’re using ARC, memory must be managed somehow (Chapter 12). A view controller instance, once brought into existence, can eventually go right back out of existence if it is not retained; indeed, under ARC this danger is greater, because ARC won’t permit an object to leak accidentally. The distinction between a view controller and its view can add to the confusion. It is possible, if things are mismanaged, for a view controller’s view to get into the interface while the view controller itself is allowed to go out of existence. This must not be permitted. If it does, at the very least the view will apparently misbehave, failing to perform its intended functionality, because that functionality is embodied by the view controller, which no longer exists. (I’ve made this mistake, so I speak from experience here.)
Fortunately, Cocoa follows a simple rule: if you hand a view controller to some other object whose job is to use that view controller somehow, the other object retains the view controller. For example, assigning a view controller to a window’s rootViewController property retains it. Making a view controller another view controller’s child, or presenting a view controller from another view controller, retains it. Passing a view controller as the argument to UIPopoverController’s initWithContentViewController: retains it. (There is then the problem of who will retain the UIPopoverController; this will cause much gnashing of teeth in Chapter 22.) And so on.
This means that if you construct the view controller hierarchy correctly, the persistence problem will be largely solved.
Now let’s talk about how the view controller’s view will get into the interface. As I’ve already said in the preceding section, and emphasized in the diagrams there, this will nearly always happen automatically, and for the very same reason I just gave: if you hand a view controller to some other object whose job is to use that view controller somehow, the other object manages its view. The other object is already managing a view of its own, and it puts the view controller’s view into its own view, and otherwise manages it in relation to its own view, automatically.
Thus, when a view controller is assigned to the window’s rootViewController property, the view controller’s view is made the window’s subview (the root view), with a correctly maintained frame, automatically. Similarly, built-in view controllers are responsible for displaying the views of their child view controllers in their own views; in Figure 19.2, the UINavigationController puts its child view controller’s view into its own view, displaying that view and its subviews (the label and the table view). And a presented view controller’s view automatically replaces in the interface the view of the presenting view controller, as in Figure 19.6.
The exceptional case, as I’ve already mentioned, is when your custom UIViewController subclass is acting as a parent view controller. In that case, it will be up to your code, in the custom UIViewController subclass, to perform that management manually (and in a highly prescribed manner), putting a child view controller’s view into its own view, as appropriate. I’ll return to this issue and demonstrate with actual code later in this chapter.
Finally, we have the issue of where a view controller’s view comes from. For a built-in view controller class that you don’t subclass, this is not a problem; in fact, you may not even be particularly conscious of the view controller’s view. In Figure 19.1 and Figure 19.2, the UINavigationController’s view is barely a player. Even though it is in fact the app’s root view, it is never seen in the interface as a distinct entity, and there is never any need to speak of it in code. You assign the UINavigationController to the window’s rootViewController property, and you assign a child view controller to the UINavigationController, and the child view controller’s view appears in the interface — and that’s the end of that. The UINavigationController created its own view automatically and put both the navigation bar and its child’s view into it automatically, and the window put the UINavigationController’s view into the interface automatically; the UINavigationController’s view functions as a kind of intermediary that you aren’t concerned with, containing the interface that you are concerned with. The question of its origin never even arises.
When you write a UIViewController subclass, however, the question of where its view is to come from is an extremely important question. It is crucial that you understand the answer to this question, which quite possibly causes more confusion to beginners than any other matter connected with iOS programming. The answer is rather involved, though, because there are several different options. The rest of this section treats those options one by one. To anticipate, the alternatives are as follows:
- The view may be created in code, manually.
- The view may be created as an empty generic view, automatically.
- The view may be created in its own separate nib.
- The view may be created in a nib, which is the same nib from which the view controller itself is instantiated.
Before we proceed, here’s a caveat: distinguish between creating a view and populating that view. With a view controller, these are very clearly two different operations. Once the view controller has its view, your UIViewController subclass code will get plenty of further opportunities to customize what’s in that view. I’ll talk about that, of course, but the primary question with which we’re concerned just now is how the UIViewController instance obtains its actual view in the first place, the view that can be accessed as its view property.
To supply a UIViewController’s view manually, in code, implement its loadView method. Your job here is to obtain an instance of UIView (or a subclass of UIView) and assign it to self.view. You must not call super (for reasons that I’ll make clear later on).
Let’s try it. Start with a project made from the Empty Application project template (not the Single View Application template; our purpose here is to do all the work ourselves):
- We need a UIViewController subclass, so choose File → New → File; specify an iOS Cocoa Touch Objective-C class. Click Next.
- Name the class RootViewController, and specify that it is to be a UIViewController subclass. Uncheck both checkboxes. Click Next.
- Confirm that we’re saving into the appropriate folder and group, as part of the target. Click Create.
We now have a RootViewController class, and we proceed to edit its code. In RootViewController.m, we’ll implement loadView. To convince ourselves that the example is working correctly, we’ll give the view an identifiable color, and we’ll put some interface inside it, namely a “Hello, World” label:
- (void) loadView {
    UIView* v = [UIView new];
    v.backgroundColor = [UIColor greenColor];
    self.view = v;
    UILabel* label = [UILabel new];
    [v addSubview:label];
    label.text = @"Hello, World!";
    label.autoresizingMask = (
                              UIViewAutoresizingFlexibleTopMargin |
                              UIViewAutoresizingFlexibleLeftMargin |
                              UIViewAutoresizingFlexibleBottomMargin |
                              UIViewAutoresizingFlexibleRightMargin
                              );
    [label sizeToFit];
    label.center = CGPointMake(CGRectGetMidX(v.bounds),
                               CGRectGetMidY(v.bounds));
    label.frame = CGRectIntegral(label.frame);
}
We have not yet given a RootViewController instance a place in our view controller hierarchy — in fact, we have no RootViewController instance (and no view controller hierarchy). Let’s make one. To do so, we turn to AppDelegate.m. (It’s a little frustrating having to set things up in two different places before our labors can bear any visible fruit, but such is life.)
In AppDelegate.m, add the line #import "RootViewController.h" at the start, so that our code can speak of the RootViewController class. Then modify the implementation of application:didFinishLaunchingWithOptions: to create a RootViewController instance and make it the window’s rootViewController. Observe that we must do this after our window property actually has a UIWindow as its value! That’s why the template’s comment, “Override point for customization after application launch,” comes after the line that creates the UIWindow:
self.window = [[UIWindow alloc] initWithFrame:[[UIScreen mainScreen] bounds]];
// Override point for customization after application launch.
RootViewController* theRVC = [RootViewController new];
self.window.rootViewController = theRVC;
// ... and the rest is as in the template
Build and run the app. Sure enough, there’s our green background and our “Hello, world” label!
We have proved that we can create a view controller and get its view into the interface. But perhaps you’re not persuaded that the view controller is managing that view in an interesting way. To prove this, let’s rotate our interface. (Our app is automatically rotatable, with no need for any code; this is a major change in iOS 6 from iOS 5. I’ll talk more about rotation later in this chapter.) While our app is running in the simulator, choose Hardware → Rotate Left or Hardware → Rotate Right. Observe that both the app, as indicated by the orientation of the status bar, and the view, as indicated by the orientation of the “Hello, World” label, automatically rotate to compensate; that’s the work of the view controller. We were careful to give the label an appropriate autoresizingMask, to keep it centered in the view even when the view’s bounds are changed to fit the rotated window.
Perhaps you would prefer that we had used constraints (autolayout, Chapter 14) instead of an autoresizing mask to position the label. Here’s a rewrite of loadView that does that:
UIView* v = [UIView new];
v.backgroundColor = [UIColor greenColor];
self.view = v;
UILabel* label = [UILabel new];
[v addSubview:label];
label.text = @"Hello, World!";

label.translatesAutoresizingMaskIntoConstraints = NO;
[self.view addConstraint:
 [NSLayoutConstraint
  constraintWithItem:label attribute:NSLayoutAttributeCenterX
  relatedBy:0
  toItem:self.view attribute:NSLayoutAttributeCenterX
  multiplier:1 constant:0]];
[self.view addConstraint:
 [NSLayoutConstraint
  constraintWithItem:label attribute:NSLayoutAttributeCenterY
  relatedBy:0
  toItem:self.view attribute:NSLayoutAttributeCenterY
  multiplier:1 constant:0]];
We have not bothered to give our view (self.view) a reasonable frame. This is because we are relying on someone else to frame the view appropriately. In this case, the “someone else” is the window, which responds to having its rootViewController property set to a view controller by framing the view controller’s view appropriately as the root view before putting it into the window as a subview. To be precise, the root view’s frame as it goes into the window in an iPhone app is {{0, 20}, {320, 460}} — that is, the root view fills the part of the window not covered by the status bar. The window easily accomplishes this magic by setting the root view’s frame to [[UIScreen mainScreen] applicationFrame].
If there is no status bar — for example, if “Status bar is initially hidden” is YES in our Info.plist, a possibility that I mentioned in Chapter 9 — the call to [[UIScreen mainScreen] applicationFrame] will return the entire bounds of the window, and our root view will fill the screen, which is still a correct result.
If the status bar is present but its status bar style is set to “Transparent black style,” then by default our root view’s frame fills only the part of the window not covered by the status bar. If you want the root view to underlap the transparent status bar, you’ll set the view controller’s wantsFullScreenLayout to YES. You could do that in the app delegate:
RootViewController* theRVC = [RootViewController new];
theRVC.wantsFullScreenLayout = YES;
self.window.rootViewController = theRVC;
Alternatively, if you feel that it is the view controller’s job to know that its view should underlap the status bar, you could do the same thing at some early point in the life of the view controller, such as loadView:
- (void) loadView {
    self.wantsFullScreenLayout = YES;
    // ... and so on ...
Earlier, I said that we should distinguish between creating a view and populating it. The preceding example fails to draw this distinction. The lines that create our RootViewController’s view are merely these:
UIView* v = [UIView new];
self.view = v;
Everything else configures and populates the view, turning it green and putting a label in it. A more appropriate place to populate a view controller’s view is in its viewDidLoad implementation, which is called after the view exists (so that it can be referred to as self.view). We could therefore rewrite the preceding example like this:
- (void) loadView {
    UIView* v = [UIView new];
    self.view = v;
}

- (void)viewDidLoad {
    [super viewDidLoad];
    UIView* v = self.view;
    v.backgroundColor = [UIColor greenColor];
    UILabel* label = [UILabel new];
    [v addSubview:label];
    label.text = @"Hello, World!";
    label.autoresizingMask = (
                              UIViewAutoresizingFlexibleTopMargin |
                              UIViewAutoresizingFlexibleLeftMargin |
                              UIViewAutoresizingFlexibleBottomMargin |
                              UIViewAutoresizingFlexibleRightMargin
                              );
    [label sizeToFit];
    label.center = CGPointMake(CGRectGetMidX(v.bounds),
                               CGRectGetMidY(v.bounds));
    label.frame = CGRectIntegral(label.frame);
}
But if we’re going to do that, we can go even further and remove our implementation of loadView altogether! If you don’t implement loadView, and if no view is supplied in any other way, then UIViewController’s implementation of loadView will do exactly what we are already doing in code: it creates a generic UIView object and assigns it to self.view. If we needed our view controller’s view to be a particular UIView subclass, that wouldn’t be acceptable; but in this case, our view controller’s view is a generic UIView object, so it is acceptable. Comment out or delete the loadView implementation from the preceding code, and build and run the app; our example still works!
A view controller’s view can be supplied from a nib file. This approach gives you the convenience of configuring and populating the view through the nib editor interface (Chapter 7). For this to work, it is necessary to prepare the nib file, as follows:
- The File’s Owner class must be set to the appropriate view controller class.
-
Performing the preceding step causes the File’s Owner proxy in the nib to have a
viewoutlet, corresponding to a UIViewController’sviewproperty. This outlet must be connected to the view.
Do you see where this is heading? We will then load the nib file with the view controller instance as its owner. The view controller’s class matches the File’s Owner class, the view controller’s view property is set via the view outlet in the nib to the view object, and presto, our view controller has a view. (If you don’t understand what I just said, reread Chapter 7! It is crucial that you comprehend how this technique works.)
Now let’s try it. We can start with the example we’ve already developed, with our RootViewController class. Begin by deleting the implementation of loadView and viewDidLoad from RootViewController.m, because we want the view to come from a nib and we’re going to populate it in the nib. Then:
- Choose File → New → File and specify an iOS User Interface View nib file. Click Next.
- In the Device Family pop-up menu, choose iPhone. Click Next.
- Name the file MyNib. Confirm the appropriate folder, group, and target membership. Click Create.
-
Edit MyNib.xib in the way I described a moment ago: set the File’s Owner class to RootViewController (in the Identity inspector), and connect the File’s Owner
viewoutlet to the View object. - Design the view. To make it clear that this is not the same view we were creating previously, perhaps you should give the view a red background color (in the Attributes inspector). Drag a UILabel into the middle of the view and give it some text, such as “Hello, World!”
Back in AppDelegate.m, where we create our RootViewController instance, we must load MyNib.xib with the RootViewController instance as its owner. It is, in fact, possible to do this using the technique described back in Chapter 7, though one shouldn’t:
// shouldn't do this!
RootViewController* theRVC = [RootViewController new];
[[NSBundle mainBundle] loadNibNamed:@"MyNib" owner:theRVC options:nil];
self.window.rootViewController = theRVC;
The correct approach is to instantiate the view controller and tell it what nib it is eventually to load as owner, but let it load the nib when it needs to. The view controller then manages the loading of the nib and all the associated housekeeping correctly. This technique involves initializing the view controller using initWithNibName:bundle: (which is actually UIViewController’s designated initializer), like this:
RootViewController* theRVC =
    [[RootViewController alloc] initWithNibName:@"MyNib" bundle:nil];
self.window.rootViewController = theRVC;
That works, and you can run the project to prove it. (The nil argument to the bundle: parameter specifies the main bundle, which is almost certainly what you want.)
Now I’m going to show you a shortcut. It turns out that if the nib name passed to initWithNibName:bundle: is nil, a nib will be sought automatically with the same name as the view controller’s class. This means, in effect, that we can return to using init (or new) to initialize the view controller; the designated initializer is initWithNibName:bundle:, so UIViewController’s init actually calls initWithNibName:bundle:, passing nil for both arguments.
Let’s try it. Rename MyNib.xib to RootViewController.xib, and change the code that instantiates and initializes our RootViewController back to what it was before, like this:
RootViewController* theRVC = [RootViewController new];
self.window.rootViewController = theRVC;
The project still works!
Note
Recall from Chapter 9 that when an image file is sought by name in the app’s bundle, naming conventions allow different files to be loaded under different runtime conditions. The same is true for nib files. A nib file named RootViewController~ipad will be loaded on an iPad when the name @"RootViewController" is specified, regardless of whether it is specified explicitly (as the first argument to initWithNibName:bundle:) or implicitly (because the view controller class is RootViewController, and the first argument to initWithNibName:bundle: is nil). This principle will greatly simplify your life when you’re writing a universal app.
But wait, there’s more! It seems ridiculous that we should end up with a nib that has “Controller” in its name merely because our view controller, as is so often the case, has “Controller” in its name. A nib, after all, is not a controller. Well, there’s an additional aspect to the shortcut: the runtime, in looking for a view controller’s corresponding nib, will in fact try stripping “Controller” off the end of the view controller class’s name. (This feature is undocumented, but it works reliably and I can’t believe it would ever be retracted.) Thus, we can name our nib file RootView.xib instead of RootViewController.xib, and it will still be properly associated with our RootViewController instance when we initialize that instance using init (or new).
When you create the files for a UIViewController subclass, the Xcode dialog has a checkbox (which we unchecked earlier) offering to create an eponymous .xib file at the same time (“With XIB for user interface”). If you accept that option, the nib is created with the File’s Owner’s class already set to the view controller’s class and with its view outlet already hooked up to the view. This automatically created .xib file does not have “Controller” stripped off the end of its name; you can rename it manually later (I generally do) if the default name bothers you.
You are now in a position to understand how the built-in Xcode project templates work! Take, for example, the Single View Application template.
You already know that, using this template, you can design the initial interface in a nib file and have it appear in the running app. And now you also know why. In addition to the AppDelegate class, there’s a ViewController class along with a nib file called ViewController.xib. The app delegate’s application:didFinishLaunchingWithOptions: instantiates ViewController, associating it with its nib, and makes that instance the window’s rootViewController:
self.window = [[UIWindow alloc] initWithFrame:[[UIScreen mainScreen] bounds]];
// Override point for customization after application launch.
self.viewController =
    [[ViewController alloc] initWithNibName:@"ViewController" bundle:nil];
self.window.rootViewController = self.viewController;
That code can be considerably abbreviated. There is no need to assign the view controller instance to a property, as it will be retained and available through the window’s rootViewController property. And there is no need to specify the nibName: argument, because the nib file has the same name as the view controller. So we could have said this:
self.window = [[UIWindow alloc] initWithFrame:[[UIScreen mainScreen] bounds]];
// Override point for customization after application launch.
self.window.rootViewController = [ViewController new];
In addition, that code works even if we change the name of the nib file to View.xib.
A moment ago, I had you delete viewDidLoad from RootViewController’s code. This was because I wanted you to see clearly that the view was being created and configured in the nib. In real life, however, it is perfectly acceptable, and quite common, to load a view controller’s view from a nib file and proceed to further configurations and initializations in viewDidLoad. By the time viewDidLoad is called, we are guaranteed that the view has been loaded from the nib and that we can access it via self.view.
On the other hand, if a view controller’s view is to come from a nib, you should not implement loadView. You’ll just confuse yourself if you do. The truth is that loadView is always called when the view controller first decides that it needs its view. If we override loadView, we supply and set the view in code. If we don’t override loadView, the default implementation is to load the view controller’s associated nib, whose job is to set the view through an outlet. (That is why, if we do override loadView, we must not call super — that would cause us to get both behaviors.) If we don’t override loadView and there is no associated nib (because the nib name was nil in initWithNibName:bundle: and there is no nib whose name matches the name of the view controller class), the default implementation of loadView creates a generic UIView as discussed in the previous section.
Like any other object, a view controller can be represented by a nib object, to be instantiated through the loading of the nib. In the nib editor, the Object library contains a View Controller (UIViewController) as well as several built-in UIViewController subclasses. Any of these can be dragged into the nib. This way of creating a view controller is particularly useful when what’s being created are multiple related view controllers, such as a UINavigationController and its initial child view controller, or a UITabBarController and its multiple child view controllers; it is also the basis of how storyboards work.
To illustrate, let’s modify our existing example so as to instantiate RootViewController from a nib. Our first step will be to create an extra nib for no other purpose than to instantiate RootViewController:
- Choose File → New → File and specify an iOS User Interface Empty nib file. Click Next.
- In the Device Family pop-up menu, specify iPhone.
- Name the nib file RVC and create it in the usual fashion.
- Edit the newly created RVC.xib. Drag a View Controller into the canvas. In the Attributes inspector, specify that this is a RootViewController instance.
- We’ll need an appropriate File’s Owner object with an outlet pointing to our RootViewController instance. At the earliest stage of our application’s launch process, there’s really only one candidate — the app delegate. So select the File’s Owner proxy and specify in the Attributes inspector that this is an AppDelegate.
-
We still need that outlet, and we can’t make it without a corresponding instance variable in AppDelegate. Option-click AppDelegate.m in the Project navigator so that RVC.xib is being edited in the main pane of the editor and AppDelegate.m is being edited in the assistant pane. Create a place to put an instance variable by adding curly braces after the
@implementationline:@implementation AppDelegate { }Control-drag from the Root View Controller object in the nib into the curly braces. You’re offered the chance to create an outlet; call it
vcand change the type (class) to UIViewController. The result is this line of code:IBOutlet UIViewController *vc;
Now we’re ready to tell AppDelegate to load RVC.xib with itself as owner and extract the RootViewController instance and use it as the window’s rootViewController. Return to AppDelegate.m and change the start of application:didFinishLaunchingWithOptions: to look like this:
self.window = [[UIWindow alloc] initWithFrame:[[UIScreen mainScreen] bounds]];
// Override point for customization after application launch.
[[NSBundle mainBundle] loadNibNamed:@"RVC" owner:self options:nil];
self.window.rootViewController = self->vc;
Build and run the app. It works, displaying the interface from RootViewController.xib (or RootView.xib, if you renamed it)! Do you see why? Nothing has changed from our examples in the previous section except the way we instantiated RootViewController. It comes into existence from the loading of the nib RVC.xib, but the runtime then performs the very same search as before for a nib with the same name as the view controller class — and finds it.
But what if the nib had a different name? How would we tell this RootViewController instance about that? We can’t call initWithNibName:bundle:, because we aren’t creating the RootViewController instance in code. Edit RVC.xib, select the Root View Controller, and examine its Attributes inspector. You’ll find there’s a NIB Name field. At the moment it’s empty, signifying the equivalent of a nil nibName: argument in the initializer. But you could type (or use the combo box to choose) the name of a different nib file, just as you could supply a string argument in a call to initWithNibName:bundle:. Thus, everything that was possible in the previous sections, where we instantiated the view controller in code, remains possible now that we’re instantiating it from a nib file.
When I say “everything remains possible,” I mean it. We can supply this view controller’s view in any of the ways discussed earlier in this section. The mere fact that this view controller is instantiated from a nib, rather than using code, changes nothing. You can associate a nib file explicitly with this view controller, to set its view through the loading of that nib; you can associate a same-named nib file implicitly with this view controller, to set its view through the loading of that nib; you can implement loadView in this view controller’s class, to create its view and set self.view in code; or you can do none of those things, and permit a generic view to be created automatically. Moreover, no matter where the view comes from, you can configure it further or do any other initial tasks in the view controller class’s viewDidLoad.
Additionally, there’s a completely new alternative: we can supply the view and design the interface right here in the same nib file as the view controller (that is, in RVC.xib). In fact, we can design the interface in the view controller itself. Notice that the canvas representation of the view controller is the size of an iPhone screen, even though a view controller is not a view object. That’s so that the view controller can accommodate a screen-sized view object, to serve as its view.
Let’s try it! Drag a generic View object from the Object library right into the Root View Controller object in the nib editor canvas. This will now be the view controller’s view, and you can now proceed to design the interface within this view. For example, you can make its background color yellow (to distinguish it from all the other interfaces we’ve been designing) and drag a different label into it (perhaps you could make it say “Howdy, Universe” for a change).
Build and run the project. The yellow background and the “Howdy, Universe” label appear! The view inside the view controller in the nib has become the view controller’s view. This way of supplying a view controller’s view takes priority, so our RootViewController.xib (or RootView.xib) is ignored.
A view controller’s Attributes inspector provides ways to set some further options that would otherwise be set in code. For example, the Wants Full Screen checkbox is our friend the wantsFullScreenLayout property, and the Resize View From NIB checkbox sets the view controller’s view’s frame to applicationFrame. The meanings of the other options will become evident as this chapter proceeds.
Note
Like any other nib object, when a view controller is instantiated from a nib or storyboard, its designated initializer in your code (initWithNibName:bundle:) is not called. If your UIViewController subclass needs very early access in code to the view controller instance, it can override initWithCoder: or awakeFromNib (Chapter 7, Chapter 11).
A storyboard is, in effect, a single file representing a collection of things that are rather like nib files, where each nib file contains a view controller nib object (similar to RVC.xib in the preceding section). Thus we can also regard a storyboard as a collection of potential view controllers. Unlike an actual nib file containing multiple view controllers, a storyboard is not a nib and its view controllers are not nib objects, so they are not all instantiated when the storyboard is loaded. Instead, the view controllers inside a storyboard are instantiated individually, when needed.
A storyboard might contain just one view controller. It might contain several unrelated view controllers. Typically, it will contain several related view controllers, such as a UINavigationController and its initial child view controller. Even more typically, it will contain several related view controllers that won’t all be needed simultaneously, such as a UINavigationController and all the child view controllers it will ever have over the course of the app’s lifetime. In fact, it isn’t uncommon for a single storyboard to be the source of every view controller that your app will ever instantiate.
The mechanism for instantiating a view controller from a storyboard is different from the nib-loading mechanism. Before I talk about that, however, I want to stress once again that what I’m about to say about where the view controller comes from changes nothing about where the view comes from. A view controller instantiated from a storyboard is just like a view controller instantiated from a nib, as regards the source of its view. You can give the view controller a view right there in the storyboard, and design that view using the nib editor interface (actually the storyboard editor interface); most often, that’s probably what you’ll do. But you could equally well let the runtime find the nib based on the view controller class’s name, or implement loadView in the view controller’s class and create the view in code, or not implement loadView and let a generic view be created. And no matter where the view comes from, you can configure it further or do any other initial tasks in the view controller class’s viewDidLoad.
Warning
I didn’t say you could specify a nib name associated with a view controller by means of the NIB Name field in the view controller’s Attributes inspector. That’s because this field, present in the nib editor, is missing from the storyboard editor.
A storyboard, like a nib, is an actual file in your project (a .storyboard file); it is compiled into your app’s bundle. In code, a running app can refer to a storyboard by calling the UIStoryboard class method storyboardWithName:bundle:. Once we have a reference to a storyboard, a view controller can be instantiated from that storyboard in one of four ways:
-
At most one view controller in the storyboard is designated the storyboard’s initial view controller. Typically, this will be the view controller to be used as the app’s root view controller at launch. The storyboard is sent
instantiateInitialViewController, and returns an instance of the initial view controller’s class, configured in accordance with your edits in the storyboard. If your app has a main storyboard, this happens automatically. -
A view controller in a storyboard can be assigned an arbitrary string identifier using the storyboard editor. It is then possible to instantiate that view controller by sending
instantiateViewControllerWithIdentifier:to the storyboard; an instance of the view controller’s class is returned, configured in accordance with your edits in the storyboard. - If a parent view controller in a storyboard has immediate children, such as a UINavigationController and its initial child view controller, then when the parent is instantiated, the initial children are instantiated automatically.
-
If a view controller in a storyboard has a future child view controller or a future presented view controller, then that child/presented view controller may be instantiated through a segue. A segue is an actual object in the storyboard connecting two view controllers, and when triggered, it takes charge of instantiating the new view controller and handing that instance over to the parent/presenting view controller as its child/presented view controller.
A key feature of segues is that they can be triggered automatically. Thus, if your app has a main storyboard, all the view controllers the app will ever need can be instantiated, as needed, automatically: the initial view controller (and any immediate children) are instantiated as the app launches through an automatic call to
instantiateInitialViewController, and view controllers needed after that are instantiated when a segue is triggered.
Let’s rewrite our example app so as to generate its initial view controller and its view through a storyboard. It’s not worth trying to recast the existing project; we’ll use a completely new project. This project should be based on the Single View application template, with Use Storyboard checked. The resulting project consists of an AppDelegate class and a ViewController class, and a storyboard (called MainStoryboard.storyboard) instead of a nib.
Look in AppDelegate.m and you’ll discover that application:didFinishLaunchingWithOptions: contains no code at all — not to load the storyboard file, nor even to generate the window and display it. That’s because UIApplicationMain does all the work behind the scenes. Here’s how:
-
As I explained in Chapter 6, MainStoryboard.storyboard is designated the main storyboard file in our Info.plist, using the key “Main storyboard file base name” (
UIMainStoryboardFile). So nowUIApplicationMaincan callstoryboardWithName:bundle:to get a reference to that storyboard. -
As I explained in Chapter 14,
UIApplicationMaininstantiates the app delegate class, and now it needs a window instance. It asks the app delegate for the value of itswindowproperty. If the app delegate returns a UIWindow (or subclass) instance, that’s the window instance; otherwise, if thewindowproperty was nil,UIApplicationMainitself creates an instance of UIWindow (and assigns it to the app delegate’swindowproperty). -
As I explained earlier in this section,
UIApplicationMainnow sendsinstantiateInitialViewControllerto the main storyboard. The result is a view controller instance, which is to serve as the app’s root view controller. -
UIApplicationMainassigns that view controller instance to the window’srootViewControllerproperty — which, as you know, means that that view controller’s view will become the window’s sole subview, the app’s root view. -
Finally,
UIApplicationMaincallsmakeKeyAndVisibleon the window. Therefore, at the next redraw moment, the app’s interface appears.
To prove that this works, edit MainStoryboard.storyboard. It contains a single view controller object, with several important features already configured:
- It is already designated as the storyboard’s initial view controller.
- Its class is already specified as ViewController.
-
It already contains a view that will function as its
view.
So now you can give this view a background color, put a label into it, and build and run the project — and your view appears. Be sure you understand why. Storyboards are not magic, and a view controller instantiated from a storyboard is just a normal view controller, and gets its view in normal ways.
Take a moment to study the storyboard editing interface a little. In the expanded dock, a view controller is wrapped in a “scene.” The scene contains the view controller object itself, along with its view and any subviews, and two top-level proxy objects associated with it: the First Responder proxy object, which is also present in a nib file (Chapter 11), and the Exit proxy object, which is used for creating unwind segues (discussed later in this chapter). You can add further top-level objects; for example, you could add a gesture recognizer (Chapter 18). Any top-level objects in a scene are also displayed in a black bar in the canvas, below the view controller. There’s no File’s Owner because this isn’t a nib and it doesn’t have an owner; the storyboard is loaded without an owner, and when a view controller is instantiated, that instance is returned directly through the call that performed the instantiation.
A major part of a view controller’s job is to know how to rotate the view. The user will experience this as rotation of the app itself: the top of the app shifts so that it is oriented against a different side of the device’s display. There are two complementary uses for rotation:
- Compensatory rotation
- The app rotates to compensate for the orientation of the device, so that the app appears right way up with respect to how the user is holding the device. The challenge of compensatory rotation stems, quite simply, from the fact that the screen is not square. This means that if the app rotates 90 degrees, the interface no longer fits the screen, and must be changed to compensate.
- Forced rotation
- The app rotates when a particular view appears in the interface, or when the app launches, to indicate that the user needs to rotate the device in order to view the app the right way up. This is typically because the interface has been specifically designed, in the face of the fact that the screen is not square, to appear in one particular mode (portrait or landscape).
In the case of the iPhone, no law says that your app has to perform compensatory rotation. Most of my iPhone apps do not do so; indeed, I have no compunction about doing just the opposite, forcing the user to rotate the device differently depending on what view is being displayed. The iPhone is small and easily reoriented with a twist of the user’s wrist, and it has a natural right way up, especially because it’s a phone. (The iPod touch isn’t a phone, but the same argument works by analogy.) On the other hand, Apple would prefer iPad apps to rotate to at least two opposed orientations (such as landscape with the button on the right and landscape with the button on the left), and preferably to all four possible orientations, so that the user isn’t restricted in how the device is held.
It’s fairly trivial to let your app rotate to two opposed orientations, because once the app is set up to work in one of them, it can work with no change in the other. But allowing a single interface to rotate between two orientations that are 90 degrees apart is trickier, because its dimensions must change — roughly speaking, its height and width are swapped — and this may require a change of layout and might even call for more substantial alterations, such as removal or addition of part of the interface. A good example is the behavior of Apple’s Mail app on the iPad: in landscape mode, the master pane and the detail pane appear side by side, but in portrait mode, the detail pane is removed and must be summoned using a button or by swiping, at which point the user can work only in the detail pane until the detail pane is dismissed.
In iOS 5 and before, coordinating view controllers to support rotation could be quite tricky. Each view controller in the view controller hierarchy could submit its own preference as to how the interface should be permitted to rotate, and these preferences could conflict. Built-in parent view controller classes, such as UINavigationController, might consult the rotation preferences of their children and attempt to mediate among them. Each view controller was forced to submit its rotation preference once and for all; that preference could not readily be dynamically revised, based on the current situation.
In iOS 6, the architecture of view controller rotation support has been completely overhauled. This is one of the most radical and far-reaching API changes Apple has ever instituted in iOS, and may well create serious challenges for a developer whose app is to support both iOS 6 and some earlier system. On the other hand, the new rotation support architecture is extremely simple and sensible, and one could argue that Apple has merely recognized the fact that the earlier rotation architecture, which gave developers so much trouble, was wrong all along.
The iOS 6 architecture for view controller support is top-down, starting with the app itself, and stopping with the top-level view controller. It works like this:
-
The app itself, in its Info.plist, may declare once and for all every orientation the interface will ever be permitted to assume. It does this under the “Supported interface orientations” key,
UISupportedInterfaceOrientations(supplemented, for a universal app, by “Supported interface orientations (iPad)”,UISupportedInterfaceOrientations~ipad). You don’t usually have to meddle directly with the Info.plist file, though; these keys are set through the graphical interface when you edit the target, in the Summary tab. -
The app delegate may implement
application:supportedInterfaceOrientationsForWindow:, returning a bitmask listing every orientation the interface is permitted to assume. This list overrides the Info.plist settings. Thus, the app delegate can do dynamically what the Info.plist can do only statically.application:supportedInterfaceOrientationsForWindow:is called at least once every time the device rotates. -
The top-level view controller may implement
supportedInterfaceOrientations, returning a bitmask listing a set of orientations that intersects the set of orientations permitted by the app or the app delegate. The resulting intersection will then be the set of permitted orientations. The resulting intersection must not be empty; if it is, your app will crash.supportedInterfaceOrientationsis called at least once every time the device rotates.The top-level view controller has a second way to interfere with the app’s permitted orientations: it can implement
shouldAutorotate. This method returns a BOOL, and the default is YES.shouldAutorotateis called at least once every time the device rotates; if it returns NO, the interface will not rotate to compensate for this device orientation. This can be a simpler way thansupportedInterfaceOrientationsto veto the app’s rotation. IfshouldAutorotateis implemented and returns NO,supportedInterfaceOrientationsis not called.
A UIViewController class method attemptRotationToDeviceOrientation (introduced in iOS 5) prompts the runtime to do immediately what it would do if the user were to rotate the device, namely to walk the three levels I’ve just described and, if the results permit rotation of the interface to match the current device orientation, to rotate the interface. This would be useful if, say, your top-level view controller had returned NO from shouldAutorotate, so that the interface does not match the current device orientation, but is now for some reason prepared to return YES and wants to be asked again, immediately.
The bitmask you return from application:supportedInterfaceOrientationsForWindow: or supportedInterfaceOrientations may be one of these values, or multiple values combined with logical-or (Chapter 1):
-
UIInterfaceOrientationMaskPortrait -
UIInterfaceOrientationMaskLandscapeLeft -
UIInterfaceOrientationMaskLandscapeRight -
UIInterfaceOrientationMaskPortraitUpsideDown -
UIInterfaceOrientationMaskLandscape(a convenient combination ofLeftandRight) -
UIInterfaceOrientationMaskAll(a convenient combination ofPortrait,UpsideDown,Left, andRight) -
UIInterfaceOrientationMaskAllButUpsideDown(a convenient combination ofPortrait,Left, andRight)
If nobody declares or implements anything — no supported interface orientations listed in the Info.plist and no implementation of application:supportedInterfaceOrientationsForWindow: or supportedInterfaceOrientations — then the defaults are UIInterfaceOrientationMaskAllButUpsideDown on the iPhone and UIInterfaceOrientationMaskAll on the iPad. But that’s an edge case; it’s probably not something you should actually do.
On the iPhone, UIInterfaceOrientationMaskPortraitUpsideDown is frowned on. The runtime enforces this at the application level; you can approve all four orientations in the app’s Info.plist or the app delegate’s application:supportedInterfaceOrientationsForWindow:, but the interface will not rotate to compensate when the iPhone is held upside down. However, if you then also return from the top-level view controller’s supportedInterfaceOrientations a value whose meaning includes UIInterfaceOrientationMaskPortraitUpsideDown, the interface will rotate to compensate when the iPhone is held upside down.
We can now see why the test project we created at the start of this chapter was able to rotate its interface. We started with the Empty Application project template. In that template, the app’s Info.plist is set to permit rotation to portrait, landscape left, and landscape right. We didn’t change that, and we never added any code to contradict it, so the app was permitted to rotate to those orientations.
If your code needs to know the current orientation of the device, it can ask the device, by calling [UIDevice currentDevice].orientation. Possible results are UIDeviceOrientationUnknown, UIDeviceOrientationPortrait, and so on. Convenience macros UIDeviceOrientationIsPortrait and UIDeviceOrientationIsLandscape let you test a given orientation for whether it falls into that category. By the time you get a rotation-related query event — application:supportedInterfaceOrientationsForWindow:, supportedInterfaceOrientations, or shouldAutorotate — the device’s orientation has already changed.
The current orientation of the interface is available as a view controller’s interfaceOrientation property. Never ask for this value if the device’s orientation is UIDeviceOrientationUnknown.
Warning
The interface orientation mask values that you return from application:supportedInterfaceOrientationsForWindow: or supportedInterfaceOrientations are not the same as the orientation values used by UIDevice to report the current device orientation and by UIViewController to report the current interface orientation. Do not accidentally return a device orientation or interface orientation value where an interface orientation mask value is expected!
Your UIViewController subclass can override any of the following methods (which are called in the order shown) to be alerted in connection with interface rotation:
-
willRotateToInterfaceOrientation:duration: -
The first parameter is the new orientation;
self.interfaceOrientationis the old orientation, and the view’s bounds are the old bounds. -
willAnimateRotationToInterfaceOrientation:duration: -
The first parameter is the new orientation;
self.interfaceOrientationis the new orientation, and the view’s bounds are the new bounds. The call is wrapped by an animation block, so changes to animatable view properties are animated. -
didRotateFromInterfaceOrientation: -
The parameter is the old orientation;
self.interfaceOrientationis the new orientation, and the view’s bounds are the new bounds.
You might take advantage of these events to perform manual layout in response to interface rotation. Imagine, for example, that our app displays a black rectangle at the left side of the screen if the device is in landscape orientation, but not if the device is in portrait orientation. We could implement that as follows:
- (UIView*) blackRect { // property getter
    if (!self->_blackRect) {
        if (UIInterfaceOrientationIsPortrait(self.interfaceOrientation))
            return nil;
        CGRect f = self.view.bounds;
        f.size.width /= 3.0;
        f.origin.x = -f.size.width;
        UIView* br = [[UIView alloc] initWithFrame:f];
        br.backgroundColor = [UIColor blackColor];
        self.blackRect = br;
    }
    return self->_blackRect;
}

-(void)willAnimateRotationToInterfaceOrientation:(UIInterfaceOrientation)io
                                        duration:(NSTimeInterval)duration {
    UIView* v = self.blackRect;
    if (UIInterfaceOrientationIsLandscape(io)) {
        if (!v.superview) {
            [self.view addSubview:v];
            CGRect f = v.frame;
            f.origin.x = 0;
            v.frame = f;
        }
    } else {
        if (v.superview) {
            CGRect f = v.frame;
            f.origin.x -= f.size.width;
            v.frame = f;
        }
    }
}

- (void) didRotateFromInterfaceOrientation:(UIInterfaceOrientation)io {
    if (UIInterfaceOrientationIsPortrait(self.interfaceOrientation))
        [self.blackRect removeFromSuperview];
}
We have a UIView property, blackRect, to retain the black rectangle; we implement its getter to create the black rectangle if it hasn’t been created already, but only if we are in landscape orientation, since otherwise we cannot set the rectangle’s dimensions properly. The implementation of willAnimateRotationToInterfaceOrientation:duration: slides the black rectangle in from the left as part of the rotation animation if we have ended up in a landscape orientation, but only if it isn’t in the interface already; after all, the user might rotate the device 180 degrees, from one landscape orientation to the other. Similarly, it slides the black rectangle out to the left if we have ended up in a portrait orientation, but only if it is in the interface already. Finally, didRotateFromInterfaceOrientation:, called after the rotation animation is over, makes sure the rectangle is removed from its superview if we have ended up in a portrait orientation.
However, we can do this in a better way. Recall from Chapter 14 that when a view’s bounds change, it is asked to update its constraints (if necessary) with a call to updateConstraints, and then to perform layout with a call to layoutSubviews. Well, when the interface rotates, the top-level UIViewController’s view’s bounds do change. Moreover, the UIViewController itself is notified just before the view’s constraints are updated, with updateViewConstraints, and before and after view layout, with viewWillLayoutSubviews and viewDidLayoutSubviews. The sequence is:
-
willRotateToInterfaceOrientation:duration: -
updateViewConstraints(and you must callsuper!) -
updateConstraints(to the view) -
viewWillLayoutSubviews -
layoutSubviews(to the view) -
viewDidLayoutSubviews -
willAnimateRotationToInterfaceOrientation:duration: -
didRotateFromInterfaceOrientation:
These UIViewController events allow your view controller to take a hand in its view’s layout, without your having to subclass UIView and implement updateConstraints and layoutSubviews directly. Our problem is a layout problem, so it seems more elegant to implement it through layout events. Here’s a two-part solution involving constraints. I won’t bother to remove the black rectangle from the interface; I’ll add it once and for all as I configure the view, and just slide it onscreen and offscreen as needed. In viewDidLoad, then, we add the black rectangle to our interface, and then we prepare two sets of constraints, one describing the black rectangle’s position onscreen (within our view bounds) and one describing its position offscreen (to the left of our view bounds):
-(void)viewDidLoad {
    UIView* br = [UIView new];
    br.translatesAutoresizingMaskIntoConstraints = NO;
    br.backgroundColor = [UIColor blackColor];
    [self.view addSubview:br];

    // "b.r. is pinned to top and bottom of superview"
    [self.view addConstraints:
     [NSLayoutConstraint
      constraintsWithVisualFormat:@"V:|[br]|"
      options:0 metrics:nil views:@{@"br":br}]];

    // "b.r. is 1/3 the width of superview"
    [self.view addConstraint:
     [NSLayoutConstraint
      constraintWithItem:br attribute:NSLayoutAttributeWidth
      relatedBy:0
      toItem:self.view attribute:NSLayoutAttributeWidth
      multiplier:1.0/3.0 constant:0]];

    // "onscreen, b.r.'s left is pinned to superview's left"
    NSArray* marrOn =
    [NSLayoutConstraint
     constraintsWithVisualFormat:@"H:|[br]"
     options:0 metrics:nil views:@{@"br":br}];

    // "offscreen, b.r.'s right is pinned to superview's left"
    NSArray* marrOff = @[
    [NSLayoutConstraint
     constraintWithItem:br attribute:NSLayoutAttributeRight
     relatedBy:NSLayoutRelationEqual
     toItem:self.view attribute:NSLayoutAttributeLeft
     multiplier:1 constant:0]
    ];

    self.blackRectConstraintsOnscreen = marrOn;
    self.blackRectConstraintsOffscreen = marrOff;
}
That’s a lot of preparation, but the payoff is that responding to a request for layout is simple and clear; we simply swap in the constraints appropriate to the new interface orientation (self.interfaceOrientation at layout time):
-(void)updateViewConstraints {
    [self.view removeConstraints:self.blackRectConstraintsOnscreen];
    [self.view removeConstraints:self.blackRectConstraintsOffscreen];
    if (UIInterfaceOrientationIsLandscape(self.interfaceOrientation))
        [self.view addConstraints:self.blackRectConstraintsOnscreen];
    else
        [self.view addConstraints:self.blackRectConstraintsOffscreen];
    [super updateViewConstraints];
}
The movement of the black rectangle is animated as the interface rotates, because any constraint-based layout performed as the interface rotates is animated. We change the constraints, and the runtime animates the act of layout as it animates the rotation of the interface.
The basic way to dictate your app’s initial orientation, as the user will see it when launching, is to use your app’s Info.plist settings. The reason is that the system can consult those settings during launch, before any of your code runs:
- On the iPhone
-
The app will launch, preferentially, into the first orientation listed in the Info.plist in the “Supported interface orientations” array (
UISupportedInterfaceOrientations). In Xcode, edit the Info.plist; the editor lets you drag the elements of the array to reorder them. - On the iPad
-
iPad apps are supposed to be more or less orientation-agnostic, so the order of orientations listed in the Info.plist in the “Supported interface orientations” array (
UISupportedInterfaceOrientations) or “Supported interface orientations (iPad)” (UISupportedInterfaceOrientations~ipad) is ignored. Instead, the app will launch into whatever permitted orientation is closest to the device’s current orientation.If you really want to, you can force an iPad app to launch into a specific orientation, even if it is permitted to adopt further orientations later on: limit the “Supported interface orientations (iPad)” array to a single orientation, and use the app delegate’s
application:supportedInterfaceOrientationsForWindow:to supply the full range of possible orientations. But this seems an unlikely thing to do.
If your initial top-level view controller (the root view controller) limits the supported interface orientations, you should probably order the “Supported interface orientations” entries to agree with it — especially on the iPhone, where this order matters. For example, suppose your app as a whole supports portrait, landscape left, and landscape right, but your initial root view controller supports only landscape left and landscape right. Then you should put “Landscape (right home button)” and “Landscape (left home button)” before “Portrait” in the Info.plist “Supported interface orientations” array. Otherwise, if “Portrait” comes first, the app will try to launch into portrait orientation, only to discover, as your code finally starts running and your root view controller’s supportedInterfaceOrientations can be called, that this is wrong.
The fact is, however, that no matter what initial orientation the user sees, all apps launch into portrait mode initially. This is because the window goes only one way, with its top at the top of the device (away from the home button) — window bounds are screen bounds (see What Rotates?). If the app’s initial visible orientation is not portrait, there must then be an initial rotation to that initial visible orientation. The user won’t necessarily see this initial rotation; it may have happened by the time the user sees the app’s actual interface. But it will happen. Thus, an app whose initial orientation is landscape mode must be configured to rotate from portrait to landscape even if it doesn’t support rotation after that.
The initial setup of such an app’s interface can be surprisingly tricky, because the interface takes on portrait dimensions before it takes on landscape dimensions. The usual way to encounter trouble in this regard is to try to work with the interface dimensions in your code too soon, before the rotation has taken place. From your point of view, it will appear that the width and height values of your interface bounds are the reverse of what you expect.
For example, let’s say that our iPhone app’s Info.plist has its “Supported interface orientations” ordered with “Landscape (right home button)” first, and our root view controller’s viewDidLoad code places a small black square at the top center of the interface, like this:
- (void) viewDidLoad {
    [super viewDidLoad];
    UIView* square = [[UIView alloc] initWithFrame:CGRectMake(0,0,10,10)];
    square.backgroundColor = [UIColor blackColor];
    square.center =
        CGPointMake(CGRectGetMidX(self.view.bounds),5); // top center?
    [self.view addSubview:square];
}
The app launches into landscape orientation; the user must hold the device with the home button at the right to see it correctly. That’s good. But where’s the little black square? Not at the top center of the screen! The square appears at the top of the screen, but only about a third of the way across. The trouble is that in order to calculate the x-coordinate of the square’s center we examined the view’s bounds too soon, at a time when the view’s x-dimension (its width dimension) was still its shorter dimension.
One solution is to use delayed performance. It suffices to wait until after your app’s first redraw moment:
- (void) viewDidLoad {
    [super viewDidLoad];
    dispatch_async(dispatch_get_main_queue(), ^{
        UIView* square = [[UIView alloc] initWithFrame:CGRectMake(0,0,10,10)];
        square.backgroundColor = [UIColor blackColor];
        square.center = CGPointMake(CGRectGetMidX(self.view.bounds),5);
        [self.view addSubview:square];
    });
}
It could be argued, though, that this is somewhat perverse. The problem is that viewDidLoad itself is too early, so a more correct solution is to find a more appropriate event to trigger our code.
In iOS 5 and before, a possible solution was to override one of the rotation events discussed in the previous section, such as didRotateFromInterfaceOrientation:, and complete the configuration of your view there. In iOS 6, however, that won’t work, because rotation events are no longer sent in conjunction with the initial rotation of your app’s interface.
On the other hand, iOS 6 does give us a splendid new layout event, viewWillLayoutSubviews. This seems perfectly appropriate, since layout is exactly what we’re doing. We must take care to run our code only once, the very first time viewWillLayoutSubviews is called; a BOOL instance variable solves that problem:
- (void) viewWillLayoutSubviews {
    if !(self->_viewInitializationDone) {
        self->_viewInitializationDone = YES;
        UIView* square = [[UIView alloc] initWithFrame:CGRectMake(0,0,10,10)];
        square.backgroundColor = [UIColor blackColor];
        square.center = CGPointMake(CGRectGetMidX(self.view.bounds),5);
        [self.view addSubview:square];
    }
}
The best solution of all, I think, is to use autolayout if at all possible, positioning our black square through constraints instead of its frame. The beauty of constraints is that you describe your layout conceptually rather than numerically; those concepts continue to apply through any future rotation. We don’t need delayed performance, we don’t need a BOOL instance variable, and we can put our code back into viewDidLoad:
- (void) viewDidLoad {
    UIView* square = [UIView new];
    square.backgroundColor = [UIColor blackColor];
    [self.view addSubview:square];
    square.translatesAutoresizingMaskIntoConstraints = NO;
    CGFloat side = 10;
    [square addConstraint:
     [NSLayoutConstraint
      constraintWithItem:square attribute:NSLayoutAttributeWidth
      relatedBy:0
      toItem:nil attribute:0
      multiplier:1 constant:side]];
    [self.view addConstraints:
     [NSLayoutConstraint
      constraintsWithVisualFormat:@"V:|[square(side)]"
      options:0 metrics:@{@"side":@(side)}
      views:@{@"square":square}]];
    [self.view addConstraint:
     [NSLayoutConstraint
      constraintWithItem:square attribute:NSLayoutAttributeCenterX
      relatedBy:0
      toItem:self.view attribute:NSLayoutAttributeCenterX
      multiplier:1 constant:0]];
}
Note
When designing in the nib, don’t be misled by the fact that you can rotate the interface. You can select a top-level view or view controller and choose Landscape in the Orientation pop-up menu in the Simulated Metrics section of the Attributes inspector. But you aren’t causing the app’s interface to rotate; you’re merely swapping a view’s apparent height and width values, for convenience while editing the nib. The rotation of the interface is still up to your app and the top-level view controller, and the final disposition of your subviews will still probably be decided through autoresizing or autolayout.
The chief purpose of view controllers is to make views come and go coherently in the interface. The simplest way of making a view come and go is through a presented view controller. Most often, the view that comes and goes will be fullscreen; while present, it will take over the entire interface. (On the iPhone, this is always the case.)
There is a temptation to think of a presented view controller as secondary or temporary. This is often true, but such a conception misses the full power of a presented view controller, which is, quite simply, that it changes the interface. A presented view controller’s view may have a complex interface; it might have child view controllers (Figure 19.6); it might present yet another view controller; it might take over the interface permanently. You, the programmer, may be conscious that the presented view controller’s view is in some sense covering the previous interface; but the user might or might not experience the interface that way.
For example, in Apple’s Music app, the two alternating views that appear when you view the currently playing song are equal partners (Figure 19.7); there’s no implication that one is secondary to the other. Yet it’s likely that one of them (probably the second one) is a presented view controller.
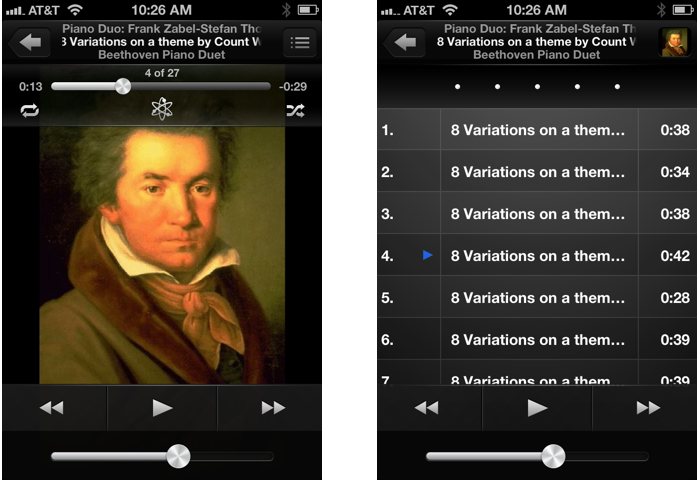
To make a view controller present another view controller, you send the first view controller presentViewController:animated:completion:, handing it the second view controller, which you will probably instantiate for this very purpose. (The first view controller is very typically self.) We now have two view controllers that stand in the relationship of presentingViewController and presentedViewController, and the latter is retained. The presented view controller’s view effectively replaces (or covers) the presenting view controller’s view in the interface.
This state of affairs persists until the presenting view controller is sent dismissViewControllerAnimated:completion:. The presented view controller’s view is then removed from the interface, and the presented view controller is released; it will thereupon typically go out of existence together with its view, its child view controllers and their views, and so on.
As the view of the presented view controller appears, and again when it is dismissed, there’s an option for animation as the transition takes place (the animated: argument). The completion: parameter lets you supply a block of code to be run after the transition (including the animation) has occurred.
The presenting view controller (the presented view controller’s presentingViewController) is not necessarily the view controller to which you sent presentViewController:animated:completion:. It will help if we distinguish three roles that view controllers can play in presenting a view controller:
-
The view controller to which
presentViewController:animated:completion:was sent. I will call this the original presenter. -
The second view controller, the one specified as the first argument to
presentViewController:animated:completion:. This is the presented view controller.The presented view controller is set as the original presenter’s
presentedViewController. -
The view controller whose view is replaced (or covered) by the presented view controller’s view. This is the presenting view controller. It might be the same as the original presenter, but often it won’t be. By default on the iPad, and always on the iPhone, the presenting view controller is the view controller whose view is the entire interface — namely, either the root view controller or an already existing presented view controller.
The presenting view controller is set as the presented view controller’s
presentingViewController, and the presented view controller is set as the presenting view controller’spresentedViewController. (Yes, this means that the presented view controller might be thepresentedViewControllerof two different view controllers.)
The receiver of dismissViewControllerAnimated:completion: may be any of those three objects; the runtime will use the linkages between them to transmit the necessary messages up the chain on your behalf to the presentingViewController.
A view controller can have at most one presentedViewController. If you send presentViewController:animated:completion: to a view controller whose presentedViewController isn’t nil, nothing will happen (and you’ll get a warning from the runtime). However, a presented view controller can itself present a view controller, so there can be a chain of presented view controllers.
Conversely, you can test for a nil presentedViewController or presentingViewController to learn whether view presentation is occurring. For example, a view controller whose presentingViewController is nil is not a presented view controller at this moment.
Let’s make one view controller present another. We already have an example project, from earlier in this chapter, containing an AppDelegate class and a RootViewController class. Let’s modify it to add a second view controller class, and make RootViewController present it (don’t use the project containing a storyboard; I’ll talk about storyboards and presented view controllers later):
- Choose File → New → File and make a new iOS Cocoa Touch Objective-C class. Click Next.
- Name the class SecondViewController, make sure it is a subclass of UIViewController, and check the checkbox “With XIB for user interface” so that we can design this view controller’s view quickly and easily in a nib. Click Next.
- Confirm the folder, group, and target membership, and click Create.
- Edit SecondViewController.xib, and do something there to make the view distinctive, so that you’ll recognize it when it appears.
-
We need a way to trigger the presentation of SecondViewController. In RootViewController’s view’s interface, add a button. Connect that button to an action method in RootViewController.m; let’s call it
doPresent:.
Now we’ll write the code for doPresent:. First, import "SecondViewController.h" at the top of RootViewController.m, so that we can speak of SecondViewController. Here’s the code:
- (IBAction)doPresent:(id)sender {
    [self presentViewController:[SecondViewController new]
                       animated:YES completion:nil];
}
Run the project. In RootViewController’s view, tap the button. SecondViewController’s view slides into place over RootViewController’s view.
In our lust for instant gratification, we have neglected to provide a way to dismiss the presented view controller. If you’d like to do that, put a button into SecondViewController’s view and connect it to an action method in SecondViewController.m:
- (IBAction)doDismiss:(id)sender {
    [self.presentingViewController dismissViewControllerAnimated:YES
                                                      completion:nil];
}
Run the project. You can now alternate between RootViewController’s view and SecondViewController’s view.
In real life, it is quite probable that both presentation and dismissal will be a little more involved. Someone, typically the original presenter, will very likely have additional information to impart to the presented view controller as the latter is created and presented. Here’s a typical example from one of my apps (this is in fact the transition that engenders Figure 19.6):
DrillViewController* dvc =
    [[DrillViewController alloc] initWithData:drillTerms];
[self presentViewController:dvc animated:YES completion:nil];
I’ve given DrillViewController a designated initializer initWithData: precisely so that whoever creates it can pass it the data it will need to do its job while it exists.
The presented view controller, too, will very likely have additional information to pass back to the original presenter. The user is interacting with the presented view controller’s view, so it is the presented view controller that knows when it should be dismissed and what happened while it was in existence. To tell the original presenter about this, handing it any needed data and so forth, the presented view controller may need to call some method in the original presenter, before it itself goes out of existence. The presented view controller may thus need a reference to the original presenter and a knowledge of some of its methods.
A standard architecture that solves this problem is for the presented view controller to define a protocol to which the original presenter conforms. The original presenter then hands the presented view controller a (weak!) reference to itself as it creates the presented view controller; we can call this the presented view controller’s delegate. In this way the presented view controller is the one that specifies what the communication callbacks will be, and it remains agnostic about the actual class of its delegate. This is the architecture, exemplified by the Utility Application project template, that I discussed in Chapter 10.
To implement this architecture in our existing example with RootViewController and SecondViewController, you’d modify SecondViewController to look like this:
// SecondViewController.h:
@protocol SecondViewControllerDelegate
- (void) dismissSecondViewControllerWithData: (id) data;
@end
@interface SecondViewController : UIViewController
@property (nonatomic, weak) id<SecondViewControllerDelegate> delegate;
@end

// SecondViewController.m:
- (IBAction)doDismiss:(id)sender {
    [self.delegate dismissSecondViewControllerWithData:nil];
}
RootViewController will need to declare itself as adopting SecondViewControllerDelegate; I like to do this with a class extension in the implementation file (RootViewController.m):
@interface RootViewController () <SecondViewControllerDelegate>
@end
RootViewController could then present and dismiss SecondViewController like this:
- (IBAction)doPresent:(id)sender {
    SecondViewController* svc = [SecondViewController new];
    svc.delegate = self;
    // ... provide any needed data here ...
    [self presentViewController:svc animated:YES completion:nil];
}
- (void)dismissSecondViewControllerWithData:(id)data {
    // ... do something with the data here ...
    [self dismissViewControllerAnimated:YES completion:nil];
}
Configuring this architecture involves considerable work, and I know from experience that there is a strong temptation to be lazy and avoid it. It may indeed be possible to get by with a simplified solution. For example, SecondViewController might know that it will be presented only by a RootViewController, and can thus import "RootViewController.h", cast its presentingViewController to a RootViewController, and call any RootViewController method. Or SecondViewController could post a notification for which RootViewController has registered. Nevertheless, a protocol is the fullest and most correct architecture for a presented view controller to communicate back to its original presenter.
(I am not saying that another solution would never be possible or justifiable. Perhaps there is a chain of presented view controllers, where different user actions should cause dismissal at different levels up the chain; a notification might then be perfectly reasonable. This is all part of the larger topic of getting a reference, discussed in Chapter 13. No one size fits all.)
When a view is presented and later when it is dismissed, an animation can be performed, according to whether the animated: parameter of the corresponding method is YES. The possible animation styles (whose names preserve the legacy “modal” designation) are:
-
UIModalTransitionStyleCoverVertical(the default) - The presented view slides up from the bottom to cover the presenting view on presentation and down to reveal the presenting view on dismissal. (“Bottom” is defined differently depending on the orientation of the device and the orientations the view controllers support.)
-
UIModalTransitionStyleFlipHorizontal - The view flips on the vertical axis as if the two views were the front and back of a piece of paper. (The “vertical axis” is the device’s long axis, regardless of the app’s orientation.)
-
UIModalTransitionStyleCrossDissolve - The views remain stationary, and one fades into the other.
-
UIModalTransitionStylePartialCurl - The first view curls up like a page in a notepad to expose most of the second view, but remains covering the top-left region of the second view. Thus there must not be any important interface in that region, as the user will not be able to see or touch it.
You do not pass the animation style as a parameter when presenting or dismissing a view controller; rather, it is attached beforehand to a view controller as its modalTransitionStyle property. (It is legal, but not common, for the modalTransitionStyle value to differ at the time of dismissal from its value at the time of presentation. Reversing on dismissal with the same animation style that was used on presentation is a subtle cue to the user that we’re returning to a previous state.) The view controller that should have this modalTransitionStyle property set will generally be the presented view controller (I’ll talk about the exception to this rule in a moment). There are three typical ways in which this happens:
-
The original presenter sets the presented view controller’s
modalTransitionStyleproperty. -
The presented view controller sets its own
modalTransitionStyleproperty early in its lifetime; for example, it might overrideinitWithNibName:bundle:. - The presented view controller is instantiated in a nib; there’s a Transition Style pop-up menu in the nib editor.
On the iPhone, the presented view controller’s view always occupies the entire interface. On the iPad, there are additional options. These options are expressed through the presented view controller’s modalPresentationStyle property. Your choices (which display more legacy “modal” names) are:
-
UIModalPresentationFullScreen -
The default. The presenting view controller is the root view controller (or a fullscreen presented view controller), and its view — meaning the entire interface — is replaced.
On the iPhone, although it is not illegal to set the
modalPresentationStyleto another value, a presented view controller will always behave as if it wereUIModalPresentationFullScreen.(This is the only mode in which
UIModalTransitionStylePartialCurlis legal.) -
UIModalPresentationPageSheet - In a portrait orientation, basically indistinguishable from fullscreen mode. But in a landscape orientation, the presented view has the width of the portrait-oriented screen, so the previous interface remains partially visible behind the presented view, but dimmed so that the user can’t interact with it. Thus this mode is very like a modal dialog on Mac OS X.
-
UIModalPresentationFormSheet -
Similar to
UIModalPresentationPageSheet, but the presented view is smaller. As the name implies, this is intended to allow the user to fill out a form (Apple describes this as “gathering structured information from the user”). -
UIModalPresentationCurrentContext - The presented view replaces a view which, although it is a view controller’s view, does not occupy the whole screen. The replaced view might be contained in a popover, for instance (see Chapter 22), or it might be a child view controller’s view that occupies only a portion of the screen.
On the iPad, when the presented view controller’s modalPresentationStyle is UIModalPresentationCurrentContext, a decision has to be made as to what view controller should be the presented view controller’s presentingViewController. This will determine what view will be replaced by the presented view controller’s view. This decision involves another UIViewController property, definesPresentationContext (a BOOL). Starting with the view controller to which presentViewController:animated:completion: was sent, we walk up the chain of parent view controllers, looking for one whose definesPresentationContext property is YES. If we find one, that’s the one; it will be the presentingViewController, and its view will be replaced by the presented view controller’s view. If we don’t find one, things work as if the presented view controller’s modalPresentationStyle had been UIModalPresentationFullScreen.
Moreover, if, during the search just described, we do find a view controller whose definesPresentationContext property is YES, we look to see if that view controller’s providesPresentationContextTransitionStyle property is also YES. If so, that view controller’s modalTransitionStyle is used for this transition animation, instead of using the presented view controller’s modalTransitionStyle.
To illustrate, I need a parent–child view controller arrangement to work with. This chapter hasn’t yet discussed any parent view controllers in detail, but the simplest is UITabBarController, which I discuss in the next section, and it’s easy to create a working app with a UITabBarController-based interface, so that’s the example I’ll use.
Start with an iPad version of the Tabbed Application project template (not using a storyboard). Make a new view controller class and an accompanying nib file to use as a presented view controller; let’s call it ExtraViewController. Put a button in the first view controller’s view (in FirstViewController.xib) and connect it to an action method in the first view controller (FirstViewController.m) that summons the new view controller as a presented view controller:
- (IBAction)doPresent:(id)sender {
    UIViewController* vc = [ExtraViewController new];
    [self presentViewController:vc animated:YES completion:nil];
}
You’ll also need to import "ExtraViewController.h" at the top of that file, obviously. Run the project and tap the button. Observe that the presented view controller’s view occupies the entire interface, covering even the tab bar; it replaces the root view.
Now change the code to look like this:
- (IBAction)doPresent:(id)sender {
    UIViewController* vc = [ExtraViewController new];
    self.definesPresentationContext = YES;
    vc.modalPresentationStyle = UIModalPresentationCurrentContext;
    [self presentViewController:vc animated:YES completion:nil];
}
Run the project and tap the button. This time, the presented view controller replaces only the first view controller’s view; the tab bar remains. That’s because the presented view controller’s modalPresentationStyle is UIModalPresentationCurrentContext, and when presentViewController:animated:completion: is sent to self, the definesPresentationContext property of self is YES. The search for a context stops, and the presented view replaces the first view controller’s view instead of the root view.
The difference is even more dramatic if we change the transition animation. We can do this through the modalTransitionStyle property of the presenting view controller, self. Add two more lines, like this:
- (IBAction)doPresent:(id)sender {
    UIViewController* vc = [ExtraViewController new];
    self.definesPresentationContext = YES;
    self.providesPresentationContextTransitionStyle = YES;
    self.modalTransitionStyle = UIModalTransitionStyleFlipHorizontal;
    vc.modalPresentationStyle = UIModalPresentationCurrentContext;
    [self presentViewController:vc animated:YES completion:nil];
}
Now the transition uses the flip horizontal animation; the presenting view controller is able to override the transition animation of the presented view controller.
Observe also that you can still switch between the first and second tabbed views, even while the presented view is occupying the place of the first tabbed view. Clearly, very powerful and interesting interfaces can be constructed using this technique.
It’s helpful to experiment with the above code, commenting out individual lines to see what effect they have on the overall result. Also, set up a parallel iPhone project, and observe that none of this works; the presented view takes over the whole screen. The UIModalPresentationCurrentContext presentation style, on which this entire behavior depends, is an iPad-only feature.
No law requires that every “scene” of your interface should appear in the same orientation. On the iPhone especially, where the user can easily rotate the device while working with an app, it is reasonable and common for one scene to appear in portrait orientation and another to appear in landscape orientation.
One easy way to achieve this is to implement supportedInterfaceOrientations differently for a presented view controller.
In iOS 6, a simple rule is followed (indeed, the simplicity of this rule is one of the benefits of the overhauled rotation architecture I alluded to earlier): if a presented view controller’s view takes over the whole screen, then its supportedInterfaceOrientations is consulted and honored.
For example, in my flashcard app pictured in Figure 19.3, the flashcards are viewed only in landscape orientation. But there is also an option to display a list (a UITableView) of all flashcards, a total vocabulary list. This list is far better viewed in portrait orientation, so as to accommodate the greatest possible number of items on the screen at once; therefore, it is permitted to assume portrait orientation only. The user must rotate the device with the hand holding the iPhone, but this is not objectionable; in fact, it quickly becomes automatic and subconscious.
Here’s how this is achieved. The app as a whole, as dictated by its Info.plist, supports three orientations, in this order: “Landscape (right home button),” “Landscape (left home button),” and “Portrait.” My app’s RootViewController implements supportedInterfaceOrientations to return UIInterfaceOrientationMaskLandscape; a card, as shown in Figure 19.3, appears only in landscape. But the view controller whose view contains the total vocabulary list implements supportedInterfaceOrientations to return UIInterfaceOrientationMaskPortrait; when the total vocabulary list is presented, the app rotates to portrait orientation (and the user must rotate the device to match), and when it is dismissed, the app rotates to landscape orientation (and the user must rotate the device to match).
In addition, iOS 6 introduces a new view controller instance method, preferredInterfaceOrientationForPresentation. For a presented view controller, this method is called before supportedInterfaceOrientations: to learn which orientation it would like to appear in initially. A single interface orientation (not a mask) should be returned. For example:
-(UIInterfaceOrientation)preferredInterfaceOrientationForPresentation {
    return UIInterfaceOrientationPortrait;
}

-(NSUInteger)supportedInterfaceOrientations {
    return UIInterfaceOrientationMaskAll;
}
That says, “When I am summoned initially as a presented view controller, the app should be rotated to portrait orientation. After that, the app can rotate to compensate for any orientation of the device.”
The presented view controller’s supportedInterfaceOrientations (preceded by its preferredInterfaceOrientationForPresentation if implemented) is consulted when the presented view controller is first summoned. Subsequently, both the presenting and presented view controllers’ supportedInterfaceOrientations are called on each rotation of the device, and the presenting view controller’s supportedInterfaceOrientations is called when the presented view controller is dismissed. Both view controllers get layout events both when the presented view controller is summoned and when it is dismissed.
An interesting alternative to performing complex layout on rotation, as in Rotation and Layout Events, might be to summon a presented view controller instead. We detect the rotation of the device directly, and replace our view with a presented view suited to the new orientation. To give the proper illusion of rotation, we call the UIApplication instance method setStatusBarOrientation:animated:. In iOS 6, that call doesn’t give us any actual animation unless supportedInterfaceOrientations returns a largely undocumented value, 0. This value forbids automatic rotation of the interface and leaves management of the app’s orientation entirely up to us.
In this example, we have two view controllers, RootViewController and LandscapeViewController. In LandscapeViewController, supportedInterfaceOrientations allows the interface to rotate automatically if the user switches from one landscape orientation to the other, but returns 0 if we’re rotating back to portrait:
-(NSUInteger)supportedInterfaceOrientations {
    if ([UIDevice currentDevice].orientation == UIDeviceOrientationPortrait)
        return 0;
    return UIInterfaceOrientationMaskLandscape;
}
And here’s RootViewController:
-(NSUInteger)supportedInterfaceOrientations {
    return 0;
}

- (void) viewDidLoad {
    [super viewDidLoad];
    [[UIDevice currentDevice] beginGeneratingDeviceOrientationNotifications];
    [[NSNotificationCenter defaultCenter]
        addObserver:self selector:@selector(screenRotated:)
        name:UIDeviceOrientationDidChangeNotification object:nil];
}

- (void)screenRotated:(NSNotification *)n {
    UIDeviceOrientation rot = [UIDevice currentDevice].orientation;
    if (UIDeviceOrientationIsLandscape(rot) & !self.presentedViewController) {
        [[UIApplication sharedApplication]
         setStatusBarOrientation:rot animated:YES];
        UIViewController* vc = [LandscapeViewController new];
        vc.modalTransitionStyle = UIModalTransitionStyleCrossDissolve;
        [self presentViewController:vc animated:YES completion:nil];
    } else if (UIDeviceOrientationPortrait == rot) {
        [[UIApplication sharedApplication]
         setStatusBarOrientation:rot animated:YES];
        [self dismissViewControllerAnimated:YES completion:nil];
    }
}
A tab bar (UITabBar, see also Chapter 25) is a horizontal bar containing items. Each item (a UITabBarItem) displays, by default, an image and a title. At all times, exactly one of these items is selected (highlighted); when the user taps an item, it becomes the selected item.
If there are too many items to fit on a tab bar, the excess items are automatically subsumed into a final More item. When the user taps the More item, a list of the excess items appears, and the user can select one; the user can also be permitted to edit the tab bar, determining which items appear in the tab bar itself and which ones spill over into the More list.
A tab bar is an independent interface object, but it is most commonly used in conjunction with a tab bar controller (UITabBarController, a subclass of UIViewController) to form a tab bar interface. The tab bar controller displays the tab bar at the bottom of its own view. From the user’s standpoint, the tab bar items correspond to views; when the user selects a tab bar item, the corresponding view appears. The user is thus employing the tab bar to choose an entire area of your app’s functionality. In reality, the UITabBarController is a parent view controller; you give it child view controllers, which the tab bar controller then contains, and the views summoned by tapping the tab bar items are the views of those child view controllers.
Familiar examples of a tab bar interface on the iPhone are Apple’s Clock app, which has four tab bar items, and Apple’s Music app, which has four tab bar items plus a More item that reveals a list of five more.
You can get a reference to the tab bar controller’s tab bar through its tabBar property. In general, you won’t need this. When using a tab bar interface by way of a UITabBarController, you do not interact (as a programmer) with the tab bar itself; you don’t create it or set its delegate. You provide the UITabBarController with children, and it does the rest; when the UITabBarController’s view is displayed, there’s the tab bar along with the view of the selected item. You can, however, customize the look of the tab bar (see Chapter 25 for details).
As discussed earlier in this chapter, your app’s automatic rotation depends on the interplay between the app (represented by the Info.plist and the app delegate) and the top-level view controller. If a UITabBarController is the top-level view controller, it will help determine your app’s automatic rotation, through its implementation of supportedInterfaceOrientations. By default, a UITabBarController does not implement supportedInterfaceOrientations, so your interface will be free to rotate to any orientation permitted by the app as a whole. If that isn’t what you want, you’ll have to subclass UITabBarController for the sole purpose of implementing supportedInterfaceOrientations. (This seems very silly; why doesn’t the API embody this functionality in a settable property?)
For each view controller you assign as a tab bar controller’s child, you’re going to need a tab bar item, which will appear in the tab bar. This tab bar item will be your child view controller’s tabBarItem. A tab bar item is a UITabBarItem; this is a subclass of UIBarItem, an abstract class that provides some of its most important properties, such as title, image, and enabled.
There are two ways to make a tab bar item:
- By borrowing it from the system
-
Instantiate UITabBarItem using
initWithTabBarSystemItem:tag:, and assign the instance to your child view controller’stabBarItem. Consult the documentation for the list of available system items. Unfortunately you can’t customize a system tab bar item’s title; you must accept the title the system hands you. (You can’t work around this annoying restriction by somehow copying a system tab bar item’s image.) - By making your own
-
Instantiate UITabBarItem using
initWithTitle:image:tag:and assign the instance to your child view controller’stabBarItem. Alternatively, use the view controller’s existingtabBarItemand set itsimageandtitle. Instead of setting thetitleof thetabBarItem, you can set thetitleproperty of the view controller itself; setting a view controller’stitleautomatically sets thetitleof its currenttabBarItem(unless the tab bar item is a system tab bar item), but the converse is not true.
The image for a tab bar item should be a 30×30 PNG; if it is larger, it will be scaled down as needed. It should be a transparency mask; that is, it should consist of transparent pixels and opaque pixels (possibly including semiopaque pixels). Color is of no consequence and will be ignored; all that matters is the degree of transparency of each pixel. The runtime itself will tint the image, adding a shine effect.
Alternatively, you can provide a normal image by calling setFinishedSelectedImage:withFinishedUnselectedImage:; the runtime will not modify this image in any way, and getting the size right is up to you. The selected and unselected image can be the same, but the runtime will not tint the selected image (as it does for an image), so you’ll probably want two different images, to differentiate the two states. (You can use Core Image, discussed in Chapter 15, to tint or desaturate an image.)
You can also give a tab bar item a badge (see the documentation on the badgeValue property). Other ways in which you can customize the look of a tab bar item are discussed in Chapter 25. For example, you can control the font and style of the title, or you can give it an empty title and offset the image.
As I’ve already said, you configure a tab bar controller by handing it the view controllers that will be its children. To do so, collect those view controllers into an array and set the UITabBarController’s viewControllers property to that array. The view controllers in the array are now the tab bar controller’s child view controllers; the tab bar controller is the parentViewController of the view controllers in the array. The tab bar controller is also the tabBarController of the view controllers in the array and of all their children; thus a child view controller at any depth can learn that it is contained by a tab bar controller and can get a reference to that tab bar controller. The tab bar controller retains the array, and the array retains the child view controllers.
The tab bar controller’s tab bar will automatically display the tabBarItem of each child view controller. The order of the tab bar items is the order of the view controllers in the tab bar controller’s viewControllers array. Thus, the child view controllers will probably want to configure their tabBarItem property very early in their lifetime, so that the tabBarItem is ready by the time the view controller is handed as a child to the tab bar controller. It is common to override initWithNibName:bundle: for this purpose.
Here’s a simple example excerpted from the app delegate’s application:didFinishLaunchingWithOptions: of one of my apps, in which I construct a tab bar interface and display it:
UITabBarController* tbc = [UITabBarController new];
// create tabs
UIViewController* b = [GameBoardController new];
// some code omitted here... never mind what "s" is in the next line
UINavigationController* n =
    [[UINavigationController alloc] initWithRootViewController:s];
// load up with tab views
tbc.viewControllers = @[b, n];
// configure window
self.window.rootViewController = tbc;
You’ll notice that I don’t configure the contained view controllers’ tab bar items. That’s because those view controllers configure themselves early in their lifetimes. For example:
// GameBoardController.m:

- (id) initWithNibName:(NSString *)nibName bundle:(NSBundle *)nibBundle {
    self = [super initWithNibName:nibName bundle:nibBundle];
    if (self) {
        // we will be embedded in a tab bar interface, configure
        self.tabBarItem.image = [UIImage imageNamed:@"game.png"];
        self.title = @"Game";
    }
    return self;
}
If you change the tab bar controller’s view controllers array later in its lifetime and you want the corresponding change in the tab bar items to be animated, call setViewControllers:animated:.
When a child view controller’s view is displayed, it is resized to fit the region of the tab bar controller’s view above the tab bar. Keep that fact in mind when designing your view. Autoresizing settings or constraints can help here, if you don’t want an interface object near the bottom of your view to be left behind and disappear from the interface when the view is resized. Also, when editing your view in the nib editor, you can shrink the view to the size at which it will be displayed in the tab bar interface, thus helping you judiciously situate your interface items; to do so, choose Tab Bar in the Bottom Bar pop-up menu of the Simulated Metrics section of the Attributes inspector.
Initially, by default, the first child view controller’s tab bar item is selected and its view is displayed. To tell the tab bar controller which tab bar item should be selected, you can couch your choice in terms of the contained view controller, by setting the selectedViewController property, or by index number in the array, by setting the selectedIndex property. The same properties also tell you what view controller’s view the user has displayed by tapping in the tab bar.
You can also set the UITabBarController’s delegate; the delegate should adopt the UITabBarControllerDelegate protocol. The delegate gets messages allowing it to prevent a given tab bar item from being selected, and notifying it when a tab bar item is selected and when the user is customizing the tab bar from the More item.
If the tab bar contains few enough items that it doesn’t need a More item, there won’t be one and the tab bar won’t be user-customizable.
If there is a More item, you can exclude some tab bar items from being customizable by setting the customizableViewControllers property to an array that lacks them; setting this property to nil means that the user can see the More list but can’t rearrange the items. Setting the viewControllers property sets the customizableViewControllers property to the same value, so if you’re going to set the customizableViewControllers property, do it after setting the viewControllers property. The moreNavigationController property can be compared with the selectedViewController property to learn whether the user is currently viewing the More list; apart from this, the More interface is mostly out of your control, but I’ll discuss some sneaky ways of customizing it in Chapter 25.
(If you allow the user to rearrange items, you would presumably want to save the new arrangement and restore it the next time the app runs. You might use NSUserDefaults for this; alternatively, you could take advantage of iOS 6’s new automatic state saving and restoration facilities, discussed later in this chapter.)
You can also configure a UITabBarController in a nib or storyboard. The nib editor interface is quite clever about this. The UITabBarController’s contained view controllers can be set directly in the nib or storyboard, and are instantiated together with the tab bar controller. Moreover, each contained view controller contains a Tab Bar Item; you can select this and set its title and image directly in the nib. (If a view controller in a nib doesn’t have a Tab Bar Item and you want to configure this view controller for use in a tab bar interface, drag a Tab Bar Item from the Object library onto the view controller.) The UITabBarController itself has a delegate outlet. Thus, it is possible to create a fully configured tab bar interface with essentially no code at all.
A navigation bar (UINavigationBar, see also Chapter 25) is a horizontal bar displaying, at its simplest, a center title and a right button. When the user taps the right button, the navigation bar animates, sliding its interface out to the left and replacing it with a new interface that enters from the right, displaying a back button at the left side, and a new center title — and possibly a new right button. Thus the user can now either go further forward (to the right), tapping the right button to proceed to yet another center title, or else go back (to the left), tapping the back button to return to the first center title and the first right button.
There’s a computer science name for the architecture I’m describing — a stack. Conceptually, a navigation bar represents a stack. Under the hood, a navigation bar really is a stack. A navigation bar holds an internal stack of navigation items (UINavigationItem). It starts out with one navigation item (the root or bottom item); you can then push another navigation item onto the stack, and from there you can either pop that navigation item to remove it from the stack or push yet another navigation item onto the stack.
At any moment, therefore, some navigation item is the top item on the stack, the most recently pushed item still present on the stack (the topItem). Furthermore, unless the top item is also the root item (because it is the only item in the stack), some navigation item is the back item (the backItem), the item that would be top item if we were now to pop the top item.
The state of the stack is reflected in the navigation bar’s interface. The navigation bar’s center title comes automatically from the top item, and its back button comes from the back item. (See Chapter 25 for a complete description.) Thus, typically, the center shows the user what item is current, and the left side is a button telling the user what item we would return to if the user were to tap that button. The animations reinforce this notion of directionality, giving the user a sense of position within a chain of items. When a navigation item is pushed onto the stack, the new interface slides in from the right; when an item is popped from the stack, the new interface slides in from the left.
A navigation bar is an independent interface object, but it is most commonly used in conjunction with a navigation controller (UINavigationController, a subclass of UIViewController) to form a navigation interface. Just as there is a stack of navigation items in the navigation bar, there is a stack of view controllers in the navigation controller. These view controllers are the navigation controller’s children, and the navigation items each belong a view controller; each navigation item is, in fact, a view controller’s navigationItem. Whatever view controller is at the top of the navigation controller’s stack, that is the view controller whose navigationItem is displayed in the navigation bar, and whose view is displayed in the interface. The animation in the navigation bar is matched by an animation of the interface as a whole: a view controller’s view slides into the main interface from the left or right just as its navigation item slides into the navigation bar from the left or right.
Your code can control the overall navigation, so in real life, the user may well navigate to the right, not by tapping the right button in the navigation bar, but by tapping something inside the main interface, such as a listing in a table view. (Figure 19.1 is a navigation interface that works this way.) In this situation, your code is deciding in real time what the next view should be; typically, you won’t even create the next view controller until the user asks to navigate to the right. The navigation interface thus becomes a master–detail interface.
Conversely, you might put a view controller inside a navigation controller just to get the convenience of the navigation bar, with its title and buttons, even when no actual push-and-pop navigation is going to take place. This has always been common practice on the iPhone, and Apple has started adopting it on the iPad as well: for example, by default, the child views of a split view controller now work this way (see Chapter 22).
You can get a reference to the navigation controller’s navigation bar through its navigationBar property. In general, you won’t need this. When using a navigation interface by way of a UINavigationController, you do not interact (as a programmer) with the navigation bar itself; you don’t create it or set its delegate. You provide the UINavigationController with children, and it does the rest, handing each child view controller’s navigationItem to the navigation bar for display and showing the child view controller’s view each time navigation occurs. You can, however, customize the look of the navigation bar (see Chapter 25 for details) — and on the iPhone, in iOS 6, this will affect the color of the status bar.
A navigation interface may also optionally display a toolbar at the bottom. A toolbar (UIToolbar) is a horizontal view displaying a row of items, any of which the user can tap. The tapped item may highlight momentarily but is not selected; it represents the initiation of an action, not a state or a mode, and should be thought of as (and may in fact look like) a button. You can get a reference to a UINavigationController’s toolbar through its toolbar property. The look of the toolbar can be customized (Chapter 25).
Note
A UIToolbar can be used independently, and often is. It then typically appears at the bottom on an iPhone — Figure 19.3 has a toolbar at the bottom — but often appears at the top on an iPad, where it plays something of the role that the menu bar plays on the desktop. When a toolbar is displayed by a navigation controller, though, it always appears at the bottom.
In a navigation interface, the contents of the toolbar are linked to the view controller that is currently the top item in the stack: they are its toolbarItems. The toolbar can also readily be hidden or shown as a certain view controller becomes the top item.
A familiar example of a navigation interface is Apple’s Mail app (Figure 19.8), a master–detail interface with the navigation bar at the top and the toolbar displaying additional options and information at the bottom.
As discussed earlier in this chapter, your app’s automatic rotation depends on the interplay between the app (represented by the Info.plist and the app delegate) and the top-level view controller. If a UINavigationController is the top-level view controller, it will help determine your app’s automatic rotation, through its implementation of supportedInterfaceOrientations. By default, a UINavigationController does not implement supportedInterfaceOrientations, so your interface will be free to rotate to any orientation permitted by the app as a whole. If that isn’t what you want, you’ll have to subclass UINavigationController for the sole purpose of implementing supportedInterfaceOrientations.
The buttons in a UIToolbar or a UINavigationBar are bar button items (UIBarButtonItem, a subclass of UIBarItem). A bar button item comes in one of two broadly different flavors:
- Basic bar button item
- The bar button item looks and behaves like a simple button. A bar button item is not, however, the same as a UIButton; it has some button-like qualities, but it does not inherit from UIButton, from UIControl, or even from UIView. (It doesn’t even have a frame.)
- Custom view
-
The bar button item is assigned, and appears as, a
customView. ThecustomViewis a UIView — any kind of UIView. Thus, a bar button item can put any sort of view into a toolbar or navigation bar, including a real UIButton or anything else (and implementing any button behavior would then be the responsibility of that view).
Let’s start with the basic bar button item (no custom view). A bar button item, like a tab bar item, inherits from UIBarItem the title, image, and enabled properties. A basic bar button item can have a title or an image, but generally not both; assigning an image removes the title if the bar button item is used in a navigation bar, but in a toolbar the title appears below the image. The image should usually be quite small (20×20 pixels is a good size).
A bar button item also has target and action properties. These give it its button-like behavior: tapping a bar button item can trigger an action method elsewhere (Chapter 11).
The overall look of a basic bar button item is determined by its style property; the choices are:
-
UIBarButtonItemStyleBordered - Looks like a button, with a round rectangular border around the image or title.
-
UIBarButtonItemStylePlain -
In a toolbar, the bare title or image (or both) is displayed; if just a title, the text size is much larger by default than with a
UIBarButtonItemStyleBorderedbutton, but you can change that. Like a tab bar item’simage, a bar button item’simagemust be a transparency mask when used withUIBarButtonItemStylePlainin a toolbar. In a navigation bar,UIBarButtonItemStylePlainis portrayed as if it wereUIBarButtonItemStyleBordered. -
UIBarButtonItemStyleDone - Bordered, and with a blue fill. As the name implies, this is suitable for a Done button in a temporary view.
The look of a basic bar button item can be customized. It can have a tint color or a background image, and, as with a tab bar item, you can control the font and style of the title. Full details appear in Chapter 25.
There are three ways to make a bar button item:
- By borrowing it from the system
-
Instantiate UIBarButtonItem using
initWithBarButtonSystemItem:target:action:. Consult the documentation for the list of available system items; they are not the same as for a tab bar item. You can’t assign a title or change the image. (But you can change the tint color or assign a background image.) - By making your own basic bar button item
-
Instantiate UIBarButtonItem using
initWithTitle:style:target:action:orinitWithImage:style:target:action:.An additional method,
initWithImage:landscapeImagePhone:style:target:action:, lets you supply two images, one for portrait orientation, the other for landscape orientation; this is because by default the bar’s height might change when the interface is rotated. - By making a custom view bar button item
-
Instantiate UIBarButtonItem using
initWithCustomView:, supplying a UIView that the bar button item is to display. The bar button item has no action and target; the UIView itself must somehow implement button behavior if that’s what you want. For example, thecustomViewmight be a UISegmentedButton, but then it is the UISegmentedButton’s target and action that give it button behavior.
Bar button items in a toolbar are positioned automatically by the system. You can provide hints to help with this positioning. If you know that you’ll be changing an item’s title dynamically, you’ll probably want its width to accommodate the longest possible title right from the start; to arrange that, set the possibleTitles property to an NSSet of strings that includes the longest title. Alternatively, you can supply an absolute width. Also, you can incorporate spacers into the toolbar; these are created with initWithBarButtonSystemItem:target:action:, but they have no visible appearance, and cannot be tapped. The UIBarButtonSystemItemFlexibleSpace is the one most frequently used; place these between the visible items to distribute the visible items equally across the width of the toolbar. There is also a UIBarButtonSystemItemFixedSpace whose width lets you insert a space of defined size.
What appears in a navigation bar (UINavigationBar) depends upon the navigation items (UINavigationItem) in its stack. In a navigation interface, the navigation controller will manage the navigation bar’s stack for you, but you must still configure each navigation item, which you do by setting properties of the navigationItem of each child view controller.
The properties are as follows (see also Chapter 25):
-
titleortitleView -
Determines what is to appear in the center of the navigation bar when this navigation item is at the top of the stack.
The
titleis a string. Instead of settingnavigationItem.title, however, you will usually set the view controller’stitleproperty instead; setting this property sets thetitleof thenavigationItemautomatically.The
titleViewcan be any kind of UIView; if set, it will be displayed instead of thetitle. ThetitleViewcan implement further UIView functionality; for example, it can be tappable. Even if you are using atitleView, you should still give your view controller atitle, as it will be needed for the back button when a view controller is pushed onto the stack on top of this one.Figure 19.1 shows the TidBITS News master view, with the navigation bar displaying a
titleViewwhich is a (tappable) image view; the master view’stitleis therefore not displayed. In the TidBITS News detail view controller, thetitleViewis a segmented control providing a Previous and Next button, and the back button displays the master view controller’stitle(Figure 19.9).

-
prompt - An optional string to appear centered above everything else in the navigation bar. The navigation bar’s height will be increased to accommodate it.
-
rightBarButtonItemorrightBarButtonItems -
A bar button item or, respectively, an array of bar button items to appear at the right side of the navigation bar; the first item in the array will be rightmost.
In Figure 19.1, the refresh button is a right bar button item; it has nothing to do with navigation, but is placed here merely because space is at a premium on the small iPhone screen. Similarly, in Figure 19.9, the text size button is a right bar button item, placed here for the same reason.
-
backBarButtonItem -
When a view controller is pushed on top of this view controller, the navigation bar will display at its left a button pointing to the left, whose title is this view controller’s
title. That button is this view controller’s navigation item’sbarBarButtonItem. That’s right: the back button displayed in the navigation bar belongs, not to the top item (thenavigationItemof the current view controller), but to the back item (thenavigationItemof the view controller that is one level down in the stack). In Figure 19.9, the back button in the detail view is the master view controller’s default back button, displaying itstitle.The vast majority of the time, the default behavior is the behavior you’ll want, and you’ll leave the back button alone. If you wish, though, you can customize the back button by setting a view controller’s
navigationItem.backBarButtonItemso that it contains an image, or a title differing from the view controller’stitle. The best technique is to provide a new UIBarButtonItem whose target and action are nil (its style doesn’t matter); the runtime will provide a correct target and action, so as to create a working back button:UIBarButtonItem* b = [[UIBarButtonItem alloc] initWithTitle:@"Go Back" style:UIBarButtonItemStylePlain target:nil action:nil]; self.navigationItem.backBarButtonItem = b;A BOOL property,
hidesBackButton, allows the top navigation item to suppress display of the back item’s back bar button item. Obviously, if you set this to YES, you’ll need to consider providing some other means of letting the user navigate back. -
leftBarButtonItemorleftBarButtonItems -
A bar button item or, respectively, an array of bar button items to appear at the left side of the navigation bar; the first item in the array will be leftmost. The
leftItemsSupplementBackButtonproperty, if set to YES, allows both the back button and one or more left bar button items to appear.
Here’s the view controller code that configures its navigation item to generate the navigation bar shown in Figure 19.1:
// title for back button in detail view
self.title = @"TidBITS";
// image to display in navigation bar
UIImageView* imv = [[UIImageView alloc] initWithImage:
    [UIImage imageNamed:@"tb_iphone_banner.png"]];
self.navigationItem.titleView = imv;
// reload button for navigation bar
UIBarButtonItem* b = [[UIBarButtonItem alloc]
    initWithBarButtonSystemItem:UIBarButtonSystemItemRefresh
    target:self action:@selector(doRefresh:)];
self.navigationItem.rightBarButtonItem = b;
A view controller’s navigation item can have its properties set at any time while being displayed in the navigation bar. This (and not direct manipulation of the navigation bar) is the way to change the navigation bar’s contents dynamically. For example, in one of my apps, the titleView is a progress view (UIProgressView, Chapter 25) that needs updating every second, and the right bar button should be either the system Play button or the system Pause button, depending on whether music from the library is playing, paused, or stopped (Figure 19.10). So I have a timer that periodically checks the state of the music player:
// change the progress view
if (self->_nowPlayingItem) {
    MPMediaItem* item = self->_nowPlayingItem;
    NSTimeInterval current = self.mp.currentPlaybackTime;
    NSTimeInterval total =
        [[item valueForProperty:MPMediaItemPropertyPlaybackDuration]
            doubleValue];
    self.prog.progress = current / total;
} else {
    self.prog.progress = 0;
}
// change the bar button
int whichButton = -1;
if ([self.mp playbackState] == MPMusicPlaybackStatePlaying)
    whichButton = UIBarButtonSystemItemPause;
else if ([self.mp playbackState] == MPMusicPlaybackStatePaused ||
         [self.mp playbackState] == MPMusicPlaybackStateStopped)
    whichButton = UIBarButtonSystemItemPlay;
if (whichButton == -1)
    self.navigationItem.rightBarButtonItem = nil;
else {
    UIBarButtonItem* bb =
        [[UIBarButtonItem alloc]
            initWithBarButtonSystemItem:whichButton
            target:self action:@selector(doPlayPause:)];
    self.navigationItem.rightBarButtonItem = bb;
}

Each view controller to be pushed onto the navigation controller’s stack is responsible for supplying the items to appear in the navigation interface’s toolbar, if there is one.
This is done by setting the view controller’s toolbarItems property to an array of UIBarButtonItem instances. You can change the toolbar items even while the view controller’s view and current toolbarItems are showing, optionally with animation, by sending setToolbarItems:animated: to the view controller.
A view controller has the power to specify that the navigation interface’s toolbar should be hidden whenever it (the view controller) is on the stack.
To do so, set the view controller’s hidesBottomBarWhenPushed property to YES. The trick is that you must do this early enough, namely before the view loads. (The view controller’s viewDidLoad is too late; its designated initializer is a good place.) The toolbar remains hidden from the time this view controller is pushed to the time it is popped, even if other view controllers are pushed and popped on top of it in the meantime. For more flexibility, you can call the UINavigationController’s setToolbarHidden:animated: at any time.
You configure a navigation controller by manipulating its stack of view controllers. If a view controller is in the stack, it is a child view controller of the navigation controller; the navigation controller is its parentViewController, and it is also the navigationController of this view controller and its child view controllers at any depth. Thus a child view controller at any depth can learn that it is contained by a navigation controller and can get a reference to that navigation controller. The navigation controller retains the view controller as long as the view controller is on its stack; when the view controller is removed from the stack, the navigation controller releases the view controller, which is usually permitted to go out of existence at that point.
The normal way to manipulate a navigation controller’s stack is one view controller at a time. When the navigation controller is instantiated, it is usually initialized with initWithRootViewController:; this assigns the navigation controller a single root view controller, the view controller that goes at the bottom of the stack, whose view the navigation controller will initially display:
FirstViewController* fvc = [FirstViewController new];
UINavigationController* nav =
    [[UINavigationController alloc] initWithRootViewController:fvc];
self.window.rootViewController = nav;
Later, when the user asks to navigate to the right, you obtain the next view controller (typically by creating it) and push it onto the stack by calling pushViewController:animated: on the navigation controller, and the navigation controller displays its view:
// FirstViewController.m:
SecondViewController* svc = [SecondViewController new];
[self.navigationController pushViewController:svc animated:YES];
Typically, that’s all there is to it! When the user taps the back button to navigate back to the left, the runtime will call popViewControllerAnimated: for you.
Instead of initWithRootViewController:, you might choose to create the navigation controller with initWithNavigationBarClass:toolbarClass:, in which case you’ll have to set its root view controller in a subsequent line of code. The reason for wanting to set the navigation bar and toolbar class has to do with customization of the appearance of the navigation bar and toolbar; sometimes you’ll create, say, a UIToolbar subclass for no other reason than to mark this kind of toolbar as needing a certain appearance. I’ll explain about that in Chapter 25.
You can also set the UINavigationController’s delegate; the delegate should adopt the UINavigationControllerDelegate protocol. The delegate receives an event before and after the navigation controller changes what view controller’s view is displayed.
You can manipulate the stack more directly if you wish. You can call popViewControllerAnimated: yourself; to pop multiple items so as to leave a particular view controller at the top of the stack, call popToViewController:animated:, or to pop all the items down to the root view controller, call popToRootViewControllerAnimated:. All of these methods return the popped view controller (or view controllers, as an array), in case you want to do something with them.
To set the entire stack at once, call setViewControllers:animated:. You can access the stack through the viewControllers property. Manipulating the stack directly is the only way, for instance, to delete or insert a view controller in the middle of the stack.
The view controller at the top of the stack is the topViewController; the view controller whose view is displayed is the visibleViewController. Those will normally be the same view controller, but they needn’t be, as the top view controller might be presenting a view controller. Other view controllers can be accessed through the viewControllers array by index number. The root item is at index 0; if the array’s count is c, the back item is at index c-2.
You’ll notice that in the preceding code examples I didn’t configure a view controller’s navigationItem as I pushed it onto the stack. Sometimes, the code that creates a view controller may configure that view controller’s navigationItem, but it is most common for a view controller to configure its own navigationItem. A view controller will be concerned to do this sufficiently early in its own lifetime. The earliest such point is an override of the designated initializer. Other possibilities are:
-
The view controller’s
awakeFromNib - Obviously, this choice is possible only in cases where the view controller instance comes from a nib.
-
The view controller’s
viewDidLoad(orloadView) -
This seems an obvious choice, but Apple warns (in the UIViewController class reference, under
navigationItem) that configuring a view controller’s navigation item in conjunction with the creation of its view is not a good idea, because the circumstances under which the view is needed are not identical to the circumstances under which the navigation item is needed. However, Apple’s own code examples often violate this warning.
When a child view controller’s view is displayed, it is resized to fit the display area. The size of this area will depend on whether the navigation controller is showing a navigation bar or a toolbar or both (or neither). You should design your view in such a way as to be prepared for such resizing. Autoresizing settings or constraints can help here. Also, when editing your view in the nib editor, you can shrink the view to the size at which it will be displayed in the navigation interface, thus helping you judiciously situate your interface items; to do so, choose appropriately from the Top Bar and Bottom Bar pop-up menus of the Simulated Metrics section of the Attributes inspector.
A navigation controller’s navigation bar can be hidden and shown with setNavigationBarHidden:animated:, and the toolbar can be hidden and shown with setToolbarHidden:animated:.
The current view controller’s view will be resized then and there; be sure to design your view to accommodate such dynamic resizing, if needed.
You can also configure a UINavigationController or any view controller that is to serve in a navigation interface in a nib or storyboard. In the Attributes inspector, use a navigation controller’s Bar Visibility checkboxes to determine the presence of the navigation bar and toolbar. The navigation bar and toolbar are themselves subviews of the navigation controller, and you can configure them with the Attributes inspector as well. The root view controller can be specified; in a storyboard, it will be instantiated together with the navigation controller. Moreover, a view controller has a Navigation Item where you can specify its title, its prompt, and the text of its back button. (If a view controller in a nib or storyboard doesn’t have a Navigation Item and you want to configure this view controller for use in a navigation interface, drag a Navigation Item from the Object library onto the view controller.) You can drag Bar Button Items into a view controller navigation bar in the canvas to set the left button and right button of its navigationItem. Moreover, the Navigation Item has outlets, one of which permits you to set its titleView. Plus, you can give a view controller Bar Button Items that will appear in the toolbar. Thus the configuration of a navigation view controller, its root view controller, and any other view controllers that will be pushed onto its stack can be performed to a certain degree in a nib or storyboard. (There are some things you can’t do in a nib or storyboard, however; for example, you can’t assign a navigation item multiple rightBarButtonItems or leftBarButtonItems.)
A page view controller (UIPageViewController) has one or two child view controllers whose view(s) it displays within its own view. The user can then make a gesture (such as dragging) to navigate, revealing the view of a different view controller or pair of view controllers, analogously to the pages of a book.
Page view controllers were introduced in iOS 5, and are a great addition to the repertoire of built-in view controllers. Before iOS 5, I was accomplishing the same sort of thing in my flashcard apps by means of a scroll view (Chapter 20); the code was complex and tricky. With a page view controller, I was able to make my app’s code far simpler.
To create a UIPageViewController, initialize it with initWithTransitionStyle:navigationOrientation:options:. Here’s what the parameters mean:
-
transitionStyle: -
Your choices are:
-
UIPageViewControllerTransitionStylePageCurl(the old page curls off of, or onto, the new page) -
UIPageViewControllerTransitionStyleScroll(the new page slides into view while the old page slides out).
-
-
navigationOrientation: -
Your choices are:
-
UIPageViewControllerNavigationOrientationHorizontal -
UIPageViewControllerNavigationOrientationVertical
-
-
options: -
A dictionary. Possible keys are:
-
UIPageViewControllerOptionSpineLocationKey -
The position of the spine (the pivot line around which page curl transitions rotate); relevant only if you’re using the page curl transition. The value is an NSNumber wrapping one of the following:
-
UIPageViewControllerSpineLocationMin(left or top) -
UIPageViewControllerSpineLocationMid(middle; two pages are shown at once) -
UIPageViewControllerSpineLocationMax(right or bottom)
-
-
UIPageViewControllerOptionInterPageSpacingKey - The spacing between successive pages; relevant only if you’re using the scroll transition. The value is an NSNumber wrapping a float.
-
You then assign the page view controller a dataSource, which should conform to the UIPageViewControllerDataSource protocol, and configure the page view controller’s initial content by handing it its initial child view controller(s). You do that by calling setViewControllers:direction:animated:completion:. Here are the parameters:
-
The view controllers are an array of one or two view controllers — one if you’re using the scroll transition or if the spine is
minormax, two if the spine ismid. -
The direction can be
UIPageViewControllerNavigationDirectionForwardorUIPageViewControllerNavigationDirectionBackward; which you specify probably won’t matter when you’re assigning the page view controller its initial content. - When you’re assigning the page view controller its initial content, you probably won’t want any animation.
Here’s a minimal example. First I need to explain where my pages come from. I’ve got a UIViewController subclass called Pep and a data model consisting of an array (self.pep) of the names of the Pep Boys, along with eponymous image files in my app bundle portraying each Pep Boy. I initialize a Pep object by calling initWithPepBoy:nib:bundle:, supplying the name of a Pep Boy from the array; Pep’s viewDidLoad then fetches the corresponding image from the app bundle and assigns it as the image to a UIImageView within its own view. Thus, a page in the page view controller portrays an image of a named Pep Boy.
Here, then, is how I create the page view controller, in the app delegate’s application:didFinishLaunchingWithOptions::
// make a page view controller
UIPageViewController* pvc =
    [[UIPageViewController alloc]
    initWithTransitionStyle: UIPageViewControllerTransitionStylePageCurl
    navigationOrientation: UIPageViewControllerNavigationOrientationHorizontal
    options: nil];
// give it an initial page
Pep* page = [[Pep alloc] initWithPepBoy: self.pep[0]  nib: nil bundle: nil];
[pvc setViewControllers: @[page]
              direction: UIPageViewControllerNavigationDirectionForward
               animated: NO completion: nil];
// give it a data source
pvc.dataSource = self;
// stick it in the window, retain the page view controller
self.window.rootViewController = pvc;
Just as with a navigation controller, you don’t supply (or even create) the next page until the user tries to navigate to it. When that happens, the data source’s pageViewController:viewControllerAfterViewController: or pageViewController:viewControllerBeforeViewController: will be called; its job is to return the requested view controller. You’ll need a strategy for doing that; the strategy you devise will depend on your model, that is, on how you’re maintaining your data.
My data is an array of unique strings, so all I have to do is find the previous name or the next name in the array. Here’s one of my data source methods:
-(UIViewController *)pageViewController:(UIPageViewController *)pvc
        viewControllerAfterViewController:(UIViewController *)viewController {
    NSString* boy = [(Pep*)viewController boy]; // string name of this Pep Boy
    NSUInteger ix = [self.pep indexOfObject:boy]; // find it in the data model
    ix++;
    if (ix >= [self.pep count])
        return nil; // there is no next page
    return [[Pep alloc] initWithPepBoy: self.pep[ix] nib: nil bundle: nil];
} // and "before" is similar
You can also call setViewControllers:direction:animated:completion: to change programmatically what page is being displayed, possibly with animation. I do so in my Latin flashcard app during drill mode (Figure 19.5), to advance to the next term in the current drill:
[self.terms shuffle];
Term* whichTerm = self.terms[0];
CardController* cdc = [[CardController alloc] initWithTerm:whichTerm];
[self.pvc setViewControllers:@[cdc]
                   direction:UIPageViewControllerNavigationDirectionForward
                    animated:YES completion:nil];
If you refer to self in the completion block of setViewControllers:direction:animated:completion:, ARC will warn of a possible retain cycle. I don’t know why there would be a retain cycle, but I take no chances: I do the weak–strong dance described in Chapter 13.
As of this writing, the scroll transition style has a bug that the page curl transition style doesn’t have. In order to be ready with the next or previous page as the user starts to scroll, the page view controller caches the next or previous view controller in the sequence. If you navigate manually with setViewControllers:direction:animated:completion: to a view controller that isn’t the next or previous in the sequence, and if animated: is YES, this cache is not refreshed, and so if the user now navigates with a scroll gesture, the wrong view controller is shown. I have developed a gut-wrenchingly horrible workaround: in the completion: handler, perform the same navigation again without animation. This requires doing the weak–strong dance and using delayed performance:
__weak UIPageViewController* pvcw = pvc;
[pvc setViewControllers:@[page]
    direction:UIPageViewControllerNavigationDirectionForward
    animated:YES completion:^(BOOL finished) {
        UIPageViewController* pvcs = pvcw;
        if (!pvcs) return;
        dispatch_async(dispatch_get_main_queue(), ^{
            [pvcs setViewControllers:@[page]
                direction:UIPageViewControllerNavigationDirectionForward
                animated:NO completion:nil];
        });
    }];
If you’re using the scroll style, the page view controller will optionally display a page indicator (a UIPageControl, see Chapter 25). The user can look at this to get a sense of what page we’re on, and can tap to the left or right of it to navigate. To get the page indicator, you must implement two more data source methods; they are consulted once in response to setViewControllers:direction:animated:completion:, which we called initially to configure the page view controller, but if we never call it again, these data source methods won’t be called again either, as the page view controller can keep track of the current index on its own. Here’s my implementation for the Pep Boy example:
-(NSInteger)presentationCountForPageViewController:(UIPageViewController*)pvc {
    return [self.pep count];
}

-(NSInteger)presentationIndexForPageViewController:(UIPageViewController*)pvc {
    Pep* page = [pvc viewControllers][0];
    NSString* boy = page.boy;
    return [self.pep indexOfObject:boy];
}
It is also possible to assign a page view controller a delegate, which adopts the UIPageViewControllerDelegate protocol. You get an event when the user starts turning the page and when the user finishes turning the page, and you get a chance to change the spine location dynamically in response to a change in device orientation.
If you’ve assigned the page view controller the page curl transition, the user can ask for navigation by tapping at either edge of the view or by dragging across the view. These gestures are detected through two gesture recognizers, which you can access through the page view controller’s gestureRecognizers property. The documentation suggests that you might change where the user can tap or drag by attaching them to a different view, and other customizations are possible as well. In this code, I change the page view controller’s behavior so that the user must double tap to request navigation:
for (UIGestureRecognizer* g in pvc.gestureRecognizers)
    if ([g isKindOfClass: [UITapGestureRecognizer class]])
        ((UITapGestureRecognizer*)g).numberOfTapsRequired = 2;
Of course you are also free to add to the user’s stock of gestures for requesting navigation. You can supply any controls or gesture recognizers that make sense for your app, and respond by calling setViewControllers:direction:animated:completion:. For example, if you’re using the scroll transition style, there’s no tap gesture recognizer, so the user can’t tap at either edge of the page view controller’s view to request navigation. Let’s change that. I’ve added invisible views at either edge of my Pep view controller’s view, with tap gesture recognizers attached. When the user taps, the tap gesture recognizer fires, and the action handler posts a notification whose object is the tap gesture recognizer. I receive this notification, use the tap gesture recognizer’s view’s tag to learn which view it is, and navigate accordingly:
[[NSNotificationCenter defaultCenter] addObserverForName:@"tap"
        object:nil queue:nil usingBlock:^(NSNotification *note) {
    UIGestureRecognizer* g = note.object;
    int which = g.view.tag;
    UIViewController* vc =
        which == 0 ?
        [self pageViewController:pvc
            viewControllerBeforeViewController:pvc.viewControllers[0]] :
        [self pageViewController:pvc
            viewControllerAfterViewController:pvc.viewControllers[0]];
    if (!vc) return;
    UIPageViewControllerNavigationDirection dir =
        which == 0 ?
        UIPageViewControllerNavigationDirectionReverse :
        UIPageViewControllerNavigationDirectionForward;
    [pvc setViewControllers:@[vc] direction:dir animated:YES completion:nil];
}];
One further bit of configuration, if you’re using the page curl transition, is performed through the doubleSided property. If it is YES, the next page occupies the back of the previous page. The default is NO, unless the spine is in the middle, in which case it’s YES and can’t be changed. Your only option here, therefore, is to set it to YES when the spine isn’t in the middle, and in that case the back of each page would be a sort of throwaway page, glimpsed by the user during the page curl animation. For example, you might make every other page a solid white view.
Built-in view controller subclasses such as UITabBarController, UINavigationController, and UIPageViewController are parent view controllers: they accept and maintain child view controllers and manage swapping their views into and out of the interface. Such abilities and behaviors are formalized and generalized into the notion of a container view controller, so that your own custom UIViewController subclasses can do the same thing.
A UIViewController has a childViewControllers array, which is maintained for you. To act as a parent view controller, your UIViewController subclass must fulfill certain responsibilities.
When a view controller is to become your view controller’s child, your view controller must do these things, in this order:
-
Send
addChildViewController:to itself, with the child as argument. The child is automatically added to yourchildViewControllersarray and is retained. - Get the child view controller’s view into the interface (as a subview of your view controller’s view), if that’s what adding a child view controller means.
-
Send
didMoveToParentViewController:to the child with your view controller as its argument.
When a view controller is to cease being your view controller’s child, your view controller must do these things, in this order:
-
Send
willMoveToParentViewController:to the child with a nil argument. - Remove the child view controller’s view from your interface.
-
Send
removeFromParentViewControllerto the child. The child is automatically removed from yourchildViewControllersarray and is released.
This is a clumsy and rather poorly designed dance. The underlying reason for it is that a child view controller must always receive willMoveToParentViewController: followed by didMoveToParentViewController: (and your own child view controllers can take advantage of these events however you like). Well, it turns out that addChildViewController: sends willMoveToParentViewController: for you, and that removeFromParentViewController sends didMoveToParentViewController: for you; so in each case you must send manually the other message, the one that adding or removing a child view controller doesn’t send for you — and of course you must send it so that everything happens in the correct order, as dictated by the rules I just listed.
I’ll illustrate two versions of the dance. First, we’ll simply obtain a new child view controller and put its view into the interface, where no child view controller’s view was previously:
UIViewController* vc = // whatever; this the initial child view controller
[self addChildViewController:vc]; // "will" is called for us
[self.view addSubview: vc.view];
// when we call "add", we must call "did" afterwards
[vc didMoveToParentViewController:self];
vc.view.frame = // whatever, or use constraints
This could very well be all you need to do. For example, consider Figure 19.3 and Figure 19.4. My view controller’s view contains a UIPageViewController’s view as one of its subviews. The only to achieve this legally and coherently is for my view controller — in this case, it’s the app’s root view controller — to act as the UIPageViewController’s parent view controller. Here’s the actual code as the root view controller configures its interface:
// create the page view controller
UIPageViewController* pvc =
[[UIPageViewController alloc]
 initWithTransitionStyle:UIPageViewControllerTransitionStylePageCurl
 navigationOrientation:UIPageViewControllerNavigationOrientationHorizontal
 options: @{UIPageViewControllerOptionSpineLocationKey:
            @(UIPageViewControllerSpineLocationMin)}
];
self.pvc = pvc;
pvc.delegate = self;
pvc.dataSource = self;

// add its view to the interface
[self addChildViewController:pvc];
[self.view addSubview:pvc.view];
[pvc didMoveToParentViewController:self];

// configure the view
pvc.view.translatesAutoresizingMaskIntoConstraints = NO;
[self.view addConstraints:
 [NSLayoutConstraint
  constraintsWithVisualFormat:@"|[pvc]|"
  options:0 metrics:nil views:@{@"pvc":pvc.view}]];
[self.view addConstraints:
 [NSLayoutConstraint
  constraintsWithVisualFormat:@"V:|[pvc]|"
  options:0 metrics:nil views:@{@"pvc":pvc.view}]];
Next, we’ll replace one child view controller’s view with another. The key is that the parent view controller sends itself transitionFromViewController:toViewController:duration:options:animations:completion:. The options: argument is a bitmask comprising the same possible options that apply to any block-based view transition (see Block-Based View Animation; these are the options whose names start with UIViewAnimationOption...). The animations: block is for additional view animations, as with any transition.
The completion: block will be important if this transition is part of removing or adding a child view controller. At the time transitionFromViewController:... is called, both view controllers involved must be children of the parent view controller; so if you’re going to remove one of the view controllers as a child, you’ll do it in the completion: block. Similarly, if you owe a new child view controller a didMoveToParentViewController: call, you’ll use the completion: block to fulfill that debt.
To keep things simple, suppose that our view controller has one child view controller at a time, and displays the view of that child view controller within its own view. And let’s say that when our view controller is handed a new child view controller, it substitutes that new child view controller for the old child view controller and replaces the old child view controller’s view with the new child view controller’s view. The two view controllers are called fromvc and tovc:
// set up the new view controller's view's frame
tovc.view.frame = // ... whatever
// must have both as children before we can transition between them
[self addChildViewController:tovc]; // "will" is called for us
// when we call "remove", we must call "will" (with nil) beforehand
[fromvc willMoveToParentViewController:nil];
[self transitionFromViewController:fromvc
                  toViewController:tovc
                          duration:0.4
                           options:UIViewAnimationOptionTransitionFlipFromLeft
                        animations:nil
                        completion:^(BOOL done){
                            // we called "add"; we must call "did" afterwards
                            [tovc didMoveToParentViewController:self];
                            [fromvc removeFromParentViewController];
                            // "did" is called for us
                        }];
If we’re using constraints to position the new child view controller’s view, where will we set up those constraints? Before transitionFromViewController:... is too soon, as the new child view controller’s view is not yet in the interface. The completion: block is too late, as the animation has already taken place; unless we also want to set up the view’s frame beforehand, the view will be added with no constraints and will have no size or position, so the animation will be performed and then the view will suddenly seem to pop into existence as we provide its constraints. The animations: block turns out to be a very good place:
tovc.view.translatesAutoresizingMaskIntoConstraints = NO;
// must have both as children before we can transition between them
[self addChildViewController:tovc]; // "will" called for us
// when we call remove, we must call "will" (with nil) beforehand
[fromvc willMoveToParentViewController:nil];
[self transitionFromViewController:fromvc
                  toViewController:tovc
                          duration:0.4
                           options:UIViewAnimationOptionTransitionFlipFromLeft
                        animations:^{
                            [self.panel addConstraints:
                             [NSLayoutConstraint
                              constraintsWithVisualFormat:@"H:|[v]|"
                              options:0 metrics:nil views:@{@"v":tovc.view}]];
                            [self.panel addConstraints:
                             [NSLayoutConstraint
                              constraintsWithVisualFormat:@"V:|[v]|"
                              options:0 metrics:nil views:@{@"v":tovc.view}]];
                        }
                        completion:^(BOOL done){
                            // when we call add, we must call "did" afterwards
                            [tovc didMoveToParentViewController:self];
                            [fromvc removeFromParentViewController];
                            // "did" is called for us
                        }];
A storyboard (see Storyboard-Instantiated View Controller) collects, in a single file, multiple view controllers — both parent and children, both presenter and presented. Each view controller is part of a scene, analogous to a nib containing that view controller and any related top-level objects. Special connections are drawn between view controllers; these are of two kinds:
- Relationship
-
If view controller A has view controller B as its child from the outset (as with a navigation controller and its root view controller, or a tab bar controller and its child view controllers), the connection is a relationship emanating from view controller A. View controllers connected by a relationship are instantiated together: when view controller A is instantiated, view controller B is instantiated along with it, because it is needed immediately.
To draw a relationship in a storyboard, Control-drag from a parent view controller to another view controller. If this is a built-in parent view controller type, the little HUD that appears lets you specify a “Relationship segue.” (This name is misleading, as a parent–child relationship is in no sense a segue.)
- Segue
-
If view controller B’s view is to be replaced by view controller C’s view at some future time (as with an original presenter and a presented view controller, or a navigation controller’s child and a view controller that will later be pushed onto the stack on top of it), the connection is a segue. View controller C won’t be instantiated until the segue is triggered; at that time, view controller C will be handed over to the appropriate view controller as its child, just as you would have done if you had created it in code.
The segue may emanate from view controller B itself, in which case it will be up to your code to trigger the segue. Often, though, you’ll take advantage of a shortcut and have the segue emanate from some interface object in view controller B’s view; the idea of the shortcut is that the segue can be triggered automatically when the user taps that interface object.
A segue is directional; it has a source view controller and a destination view controller (view controllers B and C in our hypothetical example). A segue in a storyboard is a full-fledged object, an instance of UIStoryboardSegue (or your custom subclass thereof). It can be assigned a string identifier (in its Attributes inspector); you will just about always want to do this.
To draw a segue in a storyboard, Control-drag from a view controller or a triggering interface object in its view to another view controller. The little HUD calls a segue an “Action segue,” and lets you specify a style, which you can change later; I’ll explain about segue styles in a moment.
A view controller instantiated from a storyboard has a non-nil storyboard property pointing to the storyboard that it comes from; this provides an additional way (besides storyboardWithName:bundle:) of getting a reference to a storyboard.
A storyboard might very well contain all the view controller instances your app will ever need over the course of its lifetime. Not only that: the storyboard effectively maps out or diagrams the way those instances will relate, and thus tells the story (hence the name!) of how your app’s interface will evolve. It is this concentration of all view controller creation into a single diagrammatic locus that makes storyboards so attractive — and not, I hasten to stress, that a storyboard reduces the amount of code you’ll have to write, which might not be the case at all.
Here are the primary concerns in using and configuring segues in a storyboard:
- How to trigger a segue
-
Wherever possible, you’ll probably draw the segue as a connection from the interface object that is to trigger it. The segue will then be triggered automatically. For example, when a button is to trigger the segue, you draw the connection from the button to the destination view controller; the runtime assumes that you want the segue to be triggered in response to the button’s Touch Up Inside event. When a table view cell is to trigger the segue, you draw the connection from the cell to the destination view controller; the runtime assumes that you want the segue to be triggered in response to the user selecting the cell.
If that sort of behavior doesn’t cover your needs, you can trigger the segue yourself, in code, by calling
performSegueWithIdentifier:sender:on the source view controller.New in iOS 6, the source view controller can also prevent a segue from being triggered automatically by a user action. Implement
shouldPerformSegueWithIdentifier:sender:and return NO if you don’t want this segue triggered on this occasion. - How to customize the transition performed by a segue
-
A segue is a nib object with an Attributes inspector. Here, the Style pop-up menu lets you specify the segue as a navigation controller (“Push”) segue or as a presenting (“Modal”) segue. (It’s odd that the storyboard editor perpetuates the term “Modal” just when the rest of Cocoa is trying to deprecate it.) If you choose “Modal,” you can use the Transition pop-up menu to specify the transition type. A checkbox (new in iOS 6) lets you turn off transition animation altogether.
If the default transitions don’t cover your needs, you can make a custom UIStoryboardSegue subclass. In the storyboard editor, you’ll set the segue’s Style pop-up menu to “Custom” and type the name of your UIStoryboardSegue subclass in the Segue Class field. In your UIStoryboardSegue subclass, you’ll implement
perform, calling the appropriate transition method, just as you would have done if you weren’t using a storyboard. For example, for a custom transition when presenting a view controller, you’d implementperformto callpresentViewController:animated:completion:. Your code can work out what segue is being triggered by examining the segue’sidentifier,sourceViewController, anddestinationViewControllerproperties.
- How to configure a view controller before a segue to it
-
Before a segue is performed, the source view controller is sent
prepareForSegue:sender:. The view controller can work out what segue is being triggered by examining the segue’sidentifieranddestinationViewControllerproperties, and thesenderis the interface object that was tapped to trigger to the segue (or, ifperformSegueWithIdentifier:sender:was called in code, whatever object was supplied as thesender:argument). This is the moment when the source view controller and the destination view controller meet; the source view controller can thus perform configurations on the destination view controller, hand it data, and so forth.The obvious example is a presented view controller. As I said earlier in this chapter, you’ll very likely have data to pass along to a presented view controller as you create it; I gave the example of my Latin’s app’s DrillViewController, which has an
initWithData:method exactly so that it can be handed the data it needs in order to operate. With a storyboard, where you’re not in charge of instantiating the presented view controller, you’ll need to hand it its data in some other way and at some other time. That’s whatprepareForSegue:sender:lets you do.This is the part of storyboard usage that I like least.
prepareForSegue:sender:feels like a blunt instrument: thedestinationViewControllerarrives typed as a genericid, and it is up to your code to cast it to its actual type and configure it. Moreover, if more than one segue emanates from a view controller, they are all bottlenecked through the sameprepareForSegue:sender:implementation, which thus devolves into a series of conditions in order to distinguish them. - How to reverse the transition performed by a segue
- In broadest terms, this is easy, because the involvement of the storyboard makes no difference whatever. A pushed view controller in a navigation interface, of course, might be popped automatically through its back button. But to pop a pushed view controller in code, or to dismiss a presented view controller, you can just do in code whatever you would have done without the storyboard. However, this seems inelegant and clumsy, so iOS 6 introduces the notion of an unwind segue, which is the subject of the next section.
As I explained earlier in this chapter, a storyboard invites you to design a view controller’s view directly inside the view controller’s representation in the canvas (though this is not the only way a view controller can get its view, as you know). You can easily construct most of the view controller architectures discussed so far in this chapter, especially if you start with the storyboard version of an Xcode project template:
-
Your app has a main storyboard, which is pointed to by the Info.plist and is loaded automatically by
UIApplicationMain(as discussed earlier in this chapter, Storyboard-Instantiated View Controller). A universal app typically has two main storyboards, both pointed to by the Info.plist. -
Your app’s root view controller will be the main storyboard’s initial view controller, and will automatically be instantiated and assigned to the window’s
rootViewControllerbyUIApplicationMain. The Single View Application template storyboard demonstrates; it consists of only an initial view controller. -
To signify a future transition from a view controller to a presented view controller, draw a segue from the first view controller — typically from a triggering button inside its view — to the second view controller and configure it as “Modal.” The Utility Application template storyboard for iPhone demonstrates, setting the presented view controller’s delegate in
prepareForSegue:sender:. - To configure a tab bar controller with its child view controllers, draw relationships from the tab bar controller to the other view controllers. The Tabbed Application template demonstrates.
- To configure a navigation controller with its initial root view controller, draw a relationship from the navigation controller to a view controller. To signify a future push transition, where a subsequent view controller will be pushed on top of this one in the navigation stack, draw a segue from the navigation controller’s root view controller to the new view controller and configure it as “Push.” The Master–Detail Application template for iPhone demonstrates.
- To configure a page view controller with its initial child view controller, use code. A storyboard doesn’t let you draw a relationship from a page view controller! In the Page-Based Application template, the page view controller is created and configured in code.
Custom container view controllers in a storyboard are discussed in a later section.
The purpose of an unwind segue (new in iOS 6) is to help solve the problem of reverting from the current view controller, which was summoned through a normal segue, back to an earlier view controller — at the same time possibly communicating data back to that earlier view controller.
For example, an unwind segue would be a way to communicate from a presented view controller back to its original presenter (or some other view controller) before it itself goes out of existence. Earlier in this chapter, I showed how to use a protocol and a delegate architecture to accomplish this. An unwind segue is the storyboard-based way to accomplish the same sort of backward communication linkage. Also, an unwind segue actually takes the current view controller out of existence; to take down a presented view controller without an unwind segue, you’d have to call dismissViewControllerAnimated:completion: yourself.
An unwind segue can’t possibly work like a normal segue. A normal segue emanates from its source view controller and points to its destination view controller; when the segue is triggered, the segue instantiates the destination view controller. But when we’re about to get rid of view controller B which was originally presented by a segue from view controller A, the instance of view controller A already exists. The current view controller must not create a new view controller A instance as it goes out of existence; it must go out of existence but send a message first to a certain existing view controller A instance. Thus, in order for an unwind segue to work, the storyboard needs a way to specify not merely a class of view controller but a particular already existing instance. But from the storyboard’s point of view, there aren’t yet any particular existing instances, so how can this be done?
Apple’s solution is frankly ingenious. Somewhere, in the class of a view controller that appears in the storyboard earlier in the chain of segues leading to the current view controller, you implement an unwind method; this must be a method returning an IBAction (as a hint to the storyboard editor) and taking a single parameter, a UIStoryboardSegue.
This causes the Exit proxy object in the storyboard editor to spring to life. You can now draw a segue from a triggering interface object in the current view controller’s scene (or the view controller itself) to the Exit proxy object in the same scene. The storyboard editor looks back along the chain of segues, sees the unwind method, and allows you to form a kind of action connection to the Exit proxy object. This connection is an unwind segue, whose sourceViewController is the current view controller.
That, however, is only half the story. I have not yet told you what will actually happen when the app runs and the user taps the triggering interface object in the current view controller’s interface (or if you trigger the unwind segue yourself, in code). To understand what happens, envision a view controller chain leading all the way back from the current view controller, up the view controller hierarchy, to the app’s root view controller:
-
If a view controller was instantiated by the triggering of a segue, the next view controller up the chain is the view controller from which that segue emanates, its
sourceViewController. (The runtime uses some clever record-keeping when a segue is triggered to ensure that the segue trail will be reversible.) -
If a view controller was not instantiated by the triggering of a segue, then it has either a
parentViewControlleror apresentingViewController. The next view controller up the chain is that view controller.
A little thought will show that this covers every possibility leading all the way up to the root view controller.
(In fact, it keeps working even if we run out of segues completely. The app’s entire view controller hierarchy might not come from a storyboard. The view controller hierarchy could, for example, start out with a root view controller instantiated manually in code, and then proceed to a view controller instantiated from a storyboard through instantiateInitialViewController or instantiateViewControllerWithIdentifier:. That doesn’t matter; there is still a well-defined chain and it still leads all the way up to the root view controller.)
Now we’re ready to see what happens when an unwind segue is triggered. The basic scenario is as follows:
- The runtime walks the view controller chain upward from the current view controller instance toward the root view controller, looking for a view controller that implements the unwind method named by the action connection to the Exit proxy object.
-
Let’s say that it finds one. Let’s call it the target view controller. Then the runtime completes the configuration of the unwind segue with the target view controller as its
destinationViewController. (The unwind segue’ssourceViewControlleris the current view controller, the one we started in.) -
The current view controller’s
prepareForSegue:identifier:is called (preceded by itsshouldPerformSegueWithIdentifier:sender:, which can stop the whole process dead at this point by returning NO). The two view controllers are thus already in contact, since the target view controller is the segue’sdestinationViewController. This is an opportunity for the current view controller to hand information back before it is destroyed. -
The target view controller’s unwind method is called. Its parameter is a segue which can be identified through its
identifierproperty, having the current view controller as itssourceViewController. Thus the two view controllers are in contact again. This is an opportunity for the target view controller to grab information from the current view controller before the latter is destroyed. - The entire chain from the current view controller to the target view controller is unwound: the current view controller, and all the view controllers in the chain between it and the target view controller, go out of existence! (The animation will be the reverse of the segue that brought the current view controller into existence.)
The point of this procedure is that an unwind segue can unwind as far as you like up the view controller chain. Consider, for example, the following storyboard architecture:
- A navigation controller.
- Its root view controller, connected by a relationship from the navigation controller. (This might be the master controller in a master–detail architecture.)
- A second view controller, connected by a push segue from the navigation controller’s root view controller. (This might be the detail controller in a master–detail architecture.)
- An extra view controller, connected by a modal segue from the second view controller.
Now the user summons all of these view controllers’ views in succession: in the navigation interface, the user moves from the master view to the detail view, and in the detail view, summons the extra view, which appears as a presented view covering everything. In the presented view there’s a Done button, which happens to be connected to the extra view controller’s Exit proxy object. The user taps the Done button. What happens?
The answer depends on where the unwind method is found. If the unwind method is found in the detail view controller, the presented view just goes away, and we’re left back in the detail view. But if the unwind method is found in the master view controller, the presented view goes away and the detail view is popped from the navigation interface, and we’re left in the master view.
This raises all sorts of possibilities for dictating dynamically, in code, on particular occasions, what unwind method should be executed in what view controller. Apple has thought of this, and has added some extensions and modifications to the process whereby the runtime searches for an unwind method.
A view controller that implements the unwind method we’re looking for can shrug off the runtime, during its walk up the view controller chain, by implementing canPerformUnwindSegueAction:fromViewController:withSender: to return NO. In that case, the runtime will ignore this view controller, and will continue walking up the chain of view controllers.
If a view controller was not instantiated by a segue but has a parent view controller, the runtime gives precedence to that parent. Regardless of what the child view controller implements or returns, the runtime looks to see whether the parent implements viewControllerForUnwindSegueAction:fromViewController:withSender:. The parent may do one of the following things:
- It may return itself or (more likely) one of its children as the one whose unwind method should be called.
-
It may call
superand return the result to let the runtime do what it would have done if this method hadn’t been implemented. - It may return nil to tell the runtime to proceed up the chain from here.
For example, let’s return to our architecture of a navigation controller, its master view controller child, its detail view controller child, and an extra presented view controller. Suppose that both the master view controller and the detail view controller implement the unwind method, but the detail view controller returns NO from canPerformUnwindSegueAction:.... So the runtime’s walk up the chain proceeds to the master view controller. Even if the master view controller returns YES from canPerformUnwindSegueAction:..., the runtime does not simply call the master view controller’s unwind method. The master view controller is the end of a chain of segues and has a parent, so the runtime consults the parent, the navigation controller.
If the navigation controller implements viewControllerForUnwindSegueAction:fromViewController:withSender:, it can return either the master view controller or the detail view controller. The unwind method in that controller will then be called, regardless of what that view controller returns from canPerformUnwindSegueAction:....
Alternatively, if the navigation controller calls super and returns the result, the runtime returns to where it was in the walk, namely the master view controller. If the master view controller doesn’t return NO from canPerformUnwindSegueAction:..., its unwind method is called. Otherwise, the walk continues up through the navigation controller.
(Whatever view controller is returned from viewControllerForUnwindSegueAction:fromViewController:withSender: had better implement the unwind method we’re looking for. Otherwise, we’ll crash when that message is sent to that view controller!)
In addition, a parent view controller can completely take charge of this unwind segue by substituting a different segue. It does this by implementing segueForUnwindingToViewController:fromViewController:identifier:. The idea is to return an instance of a custom segue class whose perform method dictates the entire transition.
For example, consider once again our sequence of a navigation controller, its master view controller, its detail view controller, and a presented extra view controller. By default, if we unwind directly from the presented view controller to the master view controller, we get only the reverse of the presented view controller’s original animation. That’s not very clear to the user, since in fact we’re going back two steps. To improve things, the navigation controller can substitute a different segue:
-(UIStoryboardSegue*)segueForUnwindingToViewController:(UIViewController*)tvc
        fromViewController:(UIViewController*)fvc identifier:(NSString*)ident {
    return [[MyAmazingSegue alloc] initWithIdentifier:@"amazing"
                                               source:fvc
                                          destination:self.viewControllers[0]];
}
And that segue would then perform the two-stage transition:
-(void)perform {
    UIViewController* vc1 = self.sourceViewController;
    UIViewController* vc2 = vc1.presentingViewController;
    [vc1 dismissViewControllerAnimated:YES completion:^{
        [(UINavigationController*)vc2 popToRootViewControllerAnimated:YES];
    }];
}
Another new iOS 6 storyboard feature is the ability to represent custom view controller containment. This done using a container view and an embed segue.
A container view is a view object in the Object library. Its job is to define where a child view controller’s view is to go. You drag the container view into a custom parent view controller’s view. The storyboard provides another view controller, with a segue from the container view to that view controller; the segue is automatically an embed segue. This means: “Make this other view controller a child of the first view controller, and put its view inside the container view.”
That might be all you need to do. The embed segue, unless you prevent it, is triggered automatically when the parent view controller is instantiated. It acts like a normal segue in the sense that prepareForSegue: is called on the parent view controller, and it then proceeds to instantiate the child view controller. But it does more; it makes the child view controller the parent view controller’s child, and puts its view into the interface. By default, this has already happened by the time the parent view controller’s viewDidLoad is called!
Now let’s go further. Draw a “modal” segue emanating from the child view controller to yet another view controller. Just as you would expect, this sets up the second view controller as a future presented view controller. And if this is an iPad app, you can specify that the second view controller’s modalPresentationStyle is UIModalPresentationCurrentContext — you’ll have to set that up in prepareForSegue:..., as there’s no way to do it in the storyboard — and that the embedded view controller defines the context, and sure enough, when you run the app, the presented view appears in place of the child view inside your main view!
Other configurations are more complicated — but they are possible. For example, suppose you start with the child view controller, and your goal is to cause this child view controller’s view to be replaced by another child view controller’s view. You can do it, but you’ll have to write a custom segue subclass and do all the work yourself. When the segue from the first child view controller is triggered, it will be up to you to add the second view controller as a child and call transitionFromViewController:... just as you would have done if a storyboard weren’t involved (as I described earlier in this chapter).
As views come and go, driven by view controllers and the actions of the user, events arrive that give your view controller the opportunity to respond to the various stages of its existence.
By overriding these methods, your UIViewController subclass can perform appropriate tasks. Most commonly, you’ll override viewWillAppear:, viewDidAppear:, viewWillDisappear:, or viewDidDisappear:. Note that you must call super in your override of any of these four methods.
Let’s take the case of a UIViewController pushed onto the stack of a navigation controller. It receives, in this order, the following messages:
-
willMoveToParentViewController: -
viewWillAppear: -
updateViewConstraints -
viewWillLayoutSubviews -
viewDidLayoutSubviews -
viewDidAppear: -
didMoveToParentViewController:
When this same UIViewController is popped off the stack of the navigation controller, it receives, in this order, the following messages:
-
willMoveToParentViewController:(with argument nil) -
viewWillDisappear: -
viewDidDisappear: -
didMoveToParentViewController:(with argument nil)
In these names, the notions “appear” and “disappear” reflect the view’s insertion into and removal from the interface. A view that has appeared (or has not yet disappeared) is in the window; it is part of your app’s active view hierarchy. A view that has disappeared (or has not yet appeared) is not.
Disappearance can happen because the UIViewController itself is taken out of commission, but it can also happen because another UIViewController supersedes it. For example, let’s take the case of the UIViewController functioning as the root view controller of a navigation controller. When another view controller is pushed on top of it, the root view controller gets these messages:
-
viewWillDisappear: -
viewDidDisappear:
By the same token, appearance can happen because this UIViewController has been brought into play, but it can also happen because some other UIViewController is no longer superseding it. For example, when a view controller is popped from a navigation controller, the view controller that was below it in the stack receives these events:
-
viewWillAppear: -
viewWillLayoutSubviews -
viewDidLayoutSubviews -
viewDidAppear:
You may well want a way to distinguish these cases — that is, to find out precisely why your view is appearing or disappearing. You can find out, from within the four “appear”/“disappear” methods, more about why they are being called, by calling these methods on self:
-
isBeingPresented -
isBeingDismissed -
isMovingToParentViewController -
isMovingFromParentViewController
Here are some examples of how these events are used in my own apps:
-
A certain view in a navigation controller needs the toolbar, whereas other views do not. In its
viewDidAppear:andviewWillDisappear:, the view controller calls the navigation controller to show and hide the toolbar. -
In a master–detail interface, the root view in a navigation interface displays a table. The data displayed by the root view’s table might change while the user is working in a detail view, so I reload the root view table’s data in the view controller’s
viewWillAppear:. -
A view that can be pushed onto a navigation controller’s stack contains a progress view that is periodically updated through a repeating timer. This timer needs to be in existence and running only when this view is in the interface. So I create the timer in the view controller’s
viewWillAppear:and invalidate and destroy it inviewDidDisappear:. This architecture also allows me to avoid the retain cycle that could result if I waited to invalidate the timer in adeallocthat might never come (Chapter 12). -
A certain view that can be shown by switching tab views must reflect the current state of certain user defaults. I refresh the view’s interface in its
viewWillAppear:, so that whenever it does appear, it is current. -
In a master–detail interface, the detail is a long scrollable text. Whenever the user returns to a previously read detail view, I want to scroll it to wherever it was previously scrolled to. So I save the scroll position for this detail view into the user defaults in its
viewWillDisappear:.
In the multitasking world, viewWillDisappear: and viewDidDisappear: are not called when the app is suspended into the background. Moreover, once suspended, your app might never return to life; it could be terminated in the background. Some of your functionality performed in viewWillDisappear: and viewDidDisappear: may have to be duplicated in response to an application lifetime event (Chapter 11), such as applicationDidEnterBackground:, if you are to cover every case.
A custom parent view controller, as I explained earlier, must effectively send willMoveToParentViewController: and didMoveToParentViewController: to its children manually. But other lifetime events, such as the appear events and rotation events, are normally passed along automatically. Alternatively, you can take charge of calling these events manually, by implementing these methods:
-
shouldAutomaticallyForwardRotationMethods -
If you override this method to return NO, you are responsible for calling these methods on your view controller’s children:
-
willRotateToInterfaceOrientation:duration: -
willAnimateRotationToInterfaceOrientation:duration: -
didRotateFromInterfaceOrientation:
I have no idea how common it is to take charge of sending these events manually; I’ve never done it.
-
-
shouldAutomaticallyForwardAppearanceMethods -
If you override this method to return YES, you are responsible for seeing that these methods on your view controller’s children are called:
-
viewWillAppear: -
viewDidAppear: -
viewWillDisappear: -
viewDidDisappear:
In iOS 6, however, you do not do this by calling these methods directly. The reason is that you have no access to the correct moment for sending them. Instead, you call these two methods on your child view controller:
-
beginAppearanceTransition:animated:; the first parameter is a BOOL saying whether this view controller’s view is about to appear (YES) or disappear (NO) -
endAppearanceTransition
-
Here’s an example of a parent view controller swapping one child view controller and its view for another, while taking charge of notifying the child view controllers of the appearance and disappearance of their views (I’ve put asterisks to call attention to the additional method calls):
[self addChildViewController:tovc];
[fromvc willMoveToParentViewController:nil];
[fromvc beginAppearanceTransition:NO animated:YES]; // *
[tovc beginAppearanceTransition:YES animated:YES]; // *
[UIView transitionFromView:fromvc.view
                    toView:tovc.view
                  duration:0.4
                   options:UIViewAnimationOptionTransitionFlipFromLeft
                completion:^(BOOL finished) {
                    [tovc endAppearanceTransition]; // *
                    [fromvc endAppearanceTransition]; // *
                    [tovc didMoveToParentViewController:self];
                    [fromvc removeFromParentViewController];
                }];
The key thing to notice about that code is that we do not call transitionFromViewController:toViewController:...! The reason is that it takes charge of sending the “appear”/“disappear” calls to the children itself. To work around this, we perform the transition animation directly.
Memory is at a premium on a mobile device. Thus you want to minimize your use of memory — especially when the memory-hogging objects you’re retaining are not needed at this moment. Because a view controller is the basis of so much of your application’s architecture, it is likely to be the main place where you’ll concern yourself with releasing unneeded memory.
The object of releasing memory, in the multitasking world, is partly altruistic and partly selfish. You want to keep your memory usage as low as possible so that other apps can be launched and so that the user can switch between numerous backgrounded apps, bringing each one to the front and finding it in the state in which it was suspended. You also want to prevent your app from being terminated. If your app is backgrounded and is considered a memory hog, it may be terminated when memory runs short; hence you want to reduce your memory usage at the time the app goes into the background. If your app is warned that memory is running short and it doesn’t take appropriate action to reduce its memory usage, your app may be killed even while running in the foreground!
The runtime helps you keep your view controller’s memory usage as low as possible by managing its memory for you in a special way. A view controller itself is usually lightweight, but a view is memory-intensive. A view controller can persist without its view being visible to the user — for example, because a presented view has replaced its view, or because it is in a tab interface but is not currently selected, or because it is in a navigation interface but is not at the top of the stack. In such a situation, if memory is getting short, then even though the view controller itself persists, the runtime may release its view’s backing store (the cached bitmap representing the view’s drawn contents). The view will then be redrawn when and if it is shown again later.
Note
Before iOS 6, when your view’s backing store was to be released, your view controller received an event, viewDidUnload, and was expected to respond by releasing other retained interface objects; and your view controller had to be prepared for the possibility that viewDidLoad would later be called again, and its view would have be reconfigured from scratch. In iOS 5, another event was added, viewWillUnload. In iOS 6, Apple has reversed direction completely; the entire view-releasing mechanism has been declared a failure, and your view controller will never receive viewWillUnload or viewDidUnload (and should not implement them). viewDidLoad is now called only once in your view controller’s lifetime.
In addition, if memory runs low, your view controller may be sent didReceiveMemoryWarning. This call will have been preceded by a call to the app delegate’s applicationDidReceiveMemoryWarning:, together with a UIApplicationDidReceiveMemoryWarningNotification posted to any registered objects. You are invited to respond by releasing any data that you can do without. Do not release data that you can’t readily and quickly recreate! The documentation advises that you should call super.
If you’re going to release data in didReceiveMemoryWarning, you must concern yourself with how you’re going to get it back. A simple and reliable mechanism is lazy loading — a getter that reconstructs or fetches the data if it is nil.
In this example, in didReceiveMemoryWarning we write myBigData out as a file to disk (Chapter 36) and release it from memory. At the same time, we override the synthesized accessors for myBigData (using the technique shown in Example 12.11) so that if we subsequently try to get myBigData and it’s nil, we then try to fetch it from disk and, if we succeed, we delete it from disk (to prevent stale data) and set myBigData before returning it. The result is that myBigData is released when there’s low memory, reducing our memory overhead until we actually need myBigData, at which time asking for its value (through the getter or property) restores it:
@interface ViewController ()
@property (nonatomic, strong) NSData* myBigDataAlias;
@property (nonatomic, strong) NSData* myBigData;
@end

@implementation ViewController
@synthesize myBigDataAlias = _myBigData;

- (void) setMyBigData: (NSData*) data {
    self.myBigDataAlias = data;
}

- (NSData*) myBigData {
    if (!self.myBigDataAlias) {
        NSFileManager* fm = [NSFileManager new];
        NSString* f = [NSTemporaryDirectory()
                          stringByAppendingPathComponent:@"myBigData"];
        BOOL fExists = [fm fileExistsAtPath:f];
        if (fExists) {
            NSData* data = [NSData dataWithContentsOfFile:f];
            self.myBigDataAlias = data;
            NSError* err = nil;
            BOOL ok = [fm removeItemAtPath:f error:&err];
            NSAssert(ok, @"Couldn't remove temp file");
        }
    }
    return self.myBigDataAlias;
}

- (void)didReceiveMemoryWarning {
    [super didReceiveMemoryWarning];
    if (self->_myBigData) {
        NSString* f = [NSTemporaryDirectory()
                          stringByAppendingPathComponent:@"myBigData"];
        [_myBigData writeToFile:f atomically:NO];
        self.myBigData = nil;
    }
}
@end
Xcode gives you a way to test low-memory circumstances artificially. Run your app in the Simulator; in the Simulator, choose Hardware → Simulate Memory Warning. I don’t believe this has any actual effect on memory, but a memory warning of sufficient severity is sent to your app, so you can see the results of triggering your low-memory response code, including the app delegate’s applicationDidReceiveMemoryWarning: and your view controller’s didReceiveMemoryWarning.
On the device, the equivalent is to call an undocumented method:
[[UIApplication sharedApplication]
    performSelector:@selector(_performMemoryWarning)];
That’s helpful if your app won’t run on the Simulator (because it uses device-only features), and you can use it in the Simulator as well; basically it’s the code equivalent of Hardware → Simulate Memory Warning. (And remember to remove this code when it is no longer needed, as the App Store won’t accept an app that calls an undocumented method.)
You might also wish to concern yourself with releasing memory when your app is about to be suspended.
To do so, you’ll probably want your view controller to be registered with the shared application to receive UIApplicationDidEnterBackgroundNotification. When this notification arrives, you might like to release any easily restored memory-hogging objects, so that your app won’t be terminated in the background if memory runs tight. For example, this would be another opportunity for me to write out myBigData to disk and nilify it, just as in the previous example.
Testing how your app’s memory behaves in the background isn’t easy. In a WWDC 2011 video, an interesting technique is demonstrated. The app is run under Instruments on the device, using the virtual memory instrument, and is then backgrounded by pressing the Home button, thus revealing how much memory it voluntarily relinquishes at that time. Then a special memory-hogging app is launched on the device: its interface loads and displays a very large image in a UIImageView. Even though your app is backgrounded and suspended, the virtual memory instrument continues to track its memory usage, and you can see whether further memory is reclaimed under pressure from the demands of the memory-hogging app in the foreground.
In the multitasking world, when the user leaves your app and then later returns to it, one of two things might have happened in the meantime (Chapter 11):
- Your app was suspended
- Your app was suspended in the background, and remained suspended while the user did something else. When the user returns to your app, the system simply unfreezes your app, and there it is, looking just as it did when the user left it.
- Your app was terminated
- Your app was suspended in the background, and then, as the user worked with other apps, a moment came where the system decided it needed the resources (such as memory) being held by your suspended app. Therefore it terminated your app. When the user returns to your app, the app launches from scratch.
For most apps, a general goal should be to make those two situations more or less indistinguishable to the user. It should always feel to the user as if the app is being resumed from where it left off the last time it was in the foreground, even if in fact the app was terminated while suspended in the background. This goal is state restoration. Your app has a state at every moment: some view controller’s view is occupying the screen, and views within it are displaying certain values (for example, a certain switch is set to ON, or a certain table view is scrolled to a certain position). The idea of state restoration is to save that information when the app goes into the background, and use it to make all those things true again if the app is subsequently launched from scratch.
Prior to iOS 6, this was quite a difficult problem, and most apps probably solved it only partially, if at all. It was hard to know exactly what information to save, in what form to save it, or even where to save it — a typical approach was to misuse user preferences (NSUserDefaults) to store something that wasn’t really a user preference at all. And the effort involved was a sad expenditure of developer ingenuity, given that state restoration was a near-universal goal, yet had to be reinvented and implemented freshly for every app. Moreover, most solutions were not at all general, making maintainability a nightmare: a small change in an app’s interface over the course of its development might well cost hours of time working out its implications for state restoration.
Starting in iOS 6, Apple provides, as part of the system, a general solution to the problem of state restoration. The system takes care of storing and interpreting the saved state: your code doesn’t have to worry about the exact format, or even the location, of this saved material. But I’ll tell you anyway where it’s saved: it’s in a folder called Saved Application State in your app’s sandboxed Library (see Chapter 36 for more about the app’s sandbox).
The solution is centered around UIViewController. This makes sense, since view controllers are the heart of the problem. At the time the app was terminated, some view controller was in charge of the interface, and various other view controllers may have existed; the goal of state restoration must therefore be to reconstruct all existing view controllers, initializing each one into the state it previously had.
In taking advantage of iOS 6 state saving and restoration, keep in mind what state isn’t. It isn’t preferences, and it isn’t data. If you were writing apps for iOS 5 and before, you may have been misusing NSUserDefaults to store view controller state and view state, and the new iOS 6 state saving and restoration mechanism is definitely an opportunity to stop doing that. But you should still use NSUserDefaults to store user defaults! If something is a preference, make it a preference. Similarly, if something is data (for example, the underlying model on which your app’s functionality is based), don’t misuse either NSUserDefaults or the built-in restoration mechanism to store it; keep it in a file (Chapter 36).
The reason for this is not only conceptual; it’s because saved state can be lost. For example, suppose the user kills your app outright by double-clicking the Home button to show the app switcher interface, holds down a finger to get the icons into “jiggly mode,” and taps the Minus button on your app’s icon. The next time your app runs, it will launch from the beginning, making a clean start. In the same way, if your app crashes, the system will throw away its state. And that’s not bad; it’s good. There could be good reason to throw away state and start your app over from the beginning. It’s only state! Your app still works fine if the interface happens to start over from the beginning. But losing the app’s saved data, or the user’s saved preferences, could be a disaster. So don’t store data or preferences as part of your state.
Warning
As of this writing, iOS 6 treats a restart of the device like an app crash. Thus, if the user leaves your app and returns to it, you will get state restoration even if the app was terminated in the background, but not if the user switched the device off and on again. This might mean that you have to rely on your own state restoration in addition to, or instead of, the built-in state restoration.
Built-in state restoration operates more or less automatically. All you have to do is tell the system that you want to participate in it. To do so, you take three basic steps:
- Implement app delegate methods
-
The app delegate must implement
application:shouldSaveApplicationState:andapplication:shouldRestoreApplicationState:to return YES. (Naturally, your code can instead return NO to prevent state from being saved or restored on some particular occasion.) -
Implement
application:willFinishLaunchingWithOptions: -
The earliest moment when your code is called in iOS 5 and before,
application:didFinishLaunchingWithOptions:, is too late for state restoration. Your app needs its basic interface before state restoration begins. The solution is a new iOS 6 app delegate method,application:willFinishLaunchingWithOptions:. If implemented, it is called absolutely first, before any other code of yours runs, including state restoration. Typically, if you don’t care about supporting any earlier system, you can just move all yourapplication:didFinishLaunchingWithOptions:code unchanged intoapplication:willFinishLaunchingWithOptions:. - Provide restoration IDs
-
Both UIViewController and UIView have a
restorationIdentifierproperty, which is a string. Setting this string to a non-nil value is your signal to the system that you want this view controller (or view) to participate in state restoration. If a view controller’srestorationIdentifieris nil, neither it nor any subsequent view controllers down the chain — neither its children nor its presented view controller, if any — will be saved or restored. (A nice feature of this architecture is that it lets you participate partially in state restoration, omitting selected view controllers by not assigning them a restoration identifier.)You can set the
restorationIdentifiermanually, in code; typically you’ll do that early in a view controller’s lifetime. If the view controller is instantiated from a nib or storyboard, you’ll want to set it there; the Identity inspector has a Restoration ID field for this purpose. (It’s a good idea, in general, to make a view controller’s restoration ID in the storyboard the same as its storyboard ID, the string used to identify the view controller in a call toinstantiateViewControllerWithIdentifier:; in fact, it’s such a good idea that the storyboard editor provides a checkbox, “Use Storyboard ID,” that makes the one value automatically the same as the other.)
In the case of a simple storyboard-based app, where each needed view controller instance can be reconstructed directly from the storyboard, those steps alone can be sufficient to bring state restoration to life, operating correctly at the view controller level. Let’s test it. Start with a storyboard-based app with a navigation architecture very similar to the one I posited in an earlier section:
- A navigation controller.
-
Its root view controller, connected by a relationship from the navigation controller. This might be the master controller in a master–detail architecture, so call its class MasterViewController.
- An extra view controller, connected by a modal segue from the root view controller. Call its class ExtraViewController.
-
A second view controller, connected by a push segue from the navigation controller’s root view controller. This might be the detail controller in a master–detail architecture, so call its class DetailViewController.
- The very same extra view controller (ExtraViewController), also connected by a modal segue from the second view controller.
This storyboard-based app runs perfectly with just about no code at all; all we need is an empty implementation of an unwind method in MasterViewController and DetailViewController so that we have a way to get back from the presented ExtraViewController instance to either of these.
We will now make this app implement state restoration:
-
Change the name of
application:didFinishLaunchingWithOptions:in the app delegate toapplication:willFinishLaunchingWithOptions:. -
Implement
application:shouldSaveApplicationState:andapplication:shouldRestoreApplicationState:to return YES. -
Give all four view controller instances in the storyboard restoration IDs: let’s call them
@"nav",@"master",@"detail", and@"extra".
That’s all! The app now saves and restores state.
How to Test State Restoration
To work with state restoration, you need to know how to test. Here’s what to do. Run the app as usual, in the Simulator or on a device. At some point, in the Simulator or on the device, click the Home button. This causes the app to be suspended in good order, and state is saved. Now, back in Xcode, stop the running project (Product → Stop) and run the project again. If there is saved state, it is restored. (To test the app’s behavior from a truly cold start, delete it from the Simulator or device. You might need to do this after changing something about the underlying save-and-restore model.)
The previous example, while entertaining and easy, wasn’t very informative or realistic. Having everything done for us by the storyboard reveals nothing about what’s really happening. To learn more, let’s rewrite the example without a storyboard. Throw away the storyboard (and delete the Main Storyboard entry from the Info.plist) and implement the same architecture using code alone:
// AppDelegate.m:
- (BOOL)application:(UIApplication *)application
        didFinishLaunchingWithOptions:(NSDictionary *)launchOptions
{
    self.window =
        [[UIWindow alloc] initWithFrame:[[UIScreen mainScreen] bounds]];
    // Override point for customization after application launch.
    MasterViewController* mvc = [MasterViewController new];
    UINavigationController* nav =
        [[UINavigationController alloc] initWithRootViewController:mvc];
    self.window.rootViewController = nav;
    self.window.backgroundColor = [UIColor whiteColor];
    [self.window makeKeyAndVisible];
    return YES;
}

// MasterViewController.m:
-(id)initWithNibName:(NSString*)nibNameOrNil bundle:(NSBundle*)bundleOrNil {
    self = [super initWithNibName:nibNameOrNil bundle:bundleOrNil];
    if (self) {
        self.navigationItem.title = @"Master";
    }
    return self;
}

-(void)viewDidLoad {
    [super viewDidLoad];
    UIBarButtonItem* b =
        [[UIBarButtonItem alloc] initWithTitle:@"Detail"
            style:UIBarButtonItemStylePlain
            target:self action:@selector(doDetail:)];
    self.navigationItem.rightBarButtonItem = b;
    UIButton* button = [UIButton buttonWithType:UIButtonTypeRoundedRect];
    [button setTitle:@"Extra" forState:UIControlStateNormal];
    [button addTarget:self
        action:@selector(doPresent:)
        forControlEvents:UIControlEventTouchUpInside];
    [button sizeToFit];
    button.center = self.view.center;
    [self.view addSubview:button];
}

-(void)doPresent:(id)sender {
    ExtraViewController* evc = [ExtraViewController new];
    [self presentViewController:evc animated:YES completion:nil];
}

-(void)doDetail:(id)sender {
    DetailViewController* dvc = [DetailViewController new];
    [self.navigationController pushViewController:dvc animated:YES];
}

// DetailViewController.m:
-(id)initWithNibName:(NSString*)nibNameOrNil bundle:(NSBundle*)bundleOrNil {
    self = [super initWithNibName:nibNameOrNil bundle:bundleOrNil];
    if (self) {
        self.navigationItem.title = @"Detail";
    }
    return self;
}

-(void)viewDidLoad {
    [super viewDidLoad];
    UIButton* button = [UIButton buttonWithType:UIButtonTypeRoundedRect];
    [button setTitle:@"Extra" forState:UIControlStateNormal];
    [button addTarget:self
        action:@selector(doPresent:)
        forControlEvents:UIControlEventTouchUpInside];
    [button sizeToFit];
    button.center = self.view.center;
    [self.view addSubview:button];
}

-(void)doPresent:(id)sender {
    ExtraViewController* evc = [ExtraViewController new];
    [self presentViewController:evc animated:YES completion:nil];
}

// ExtraViewController.m:
-(void)viewDidLoad {
    [super viewDidLoad];
    self.view.backgroundColor = [UIColor greenColor];
    UIButton* button = [UIButton buttonWithType:UIButtonTypeRoundedRect];
    [button setTitle:@"Done" forState:UIControlStateNormal];
    [button addTarget:self
        action:@selector(doDismiss:)
        forControlEvents:UIControlEventTouchUpInside];
    [button sizeToFit];
    button.center = self.view.center;
    [self.view addSubview:button];
}

-(void)doDismiss:(id)sender {
    [self dismissViewControllerAnimated:YES completion:nil];
}
Now let’s start adding state restoration, just as before:
-
Change the name of
application:didFinishLaunchingWithOptions:in the app delegate toapplication:willFinishLaunchingWithOptions:. -
Implement
application:shouldSaveApplicationState:andapplication:shouldRestoreApplicationState:to return YES. -
Give all four view controller instances restoration IDs: let’s call them
@"nav",@"master",@"detail", and@"extra". We’ll have to do this in code. We’re creating each view controller manually, so we may choose to assign itsrestorationIdentifierin the next line, like this:MasterViewController* mvc = [MasterViewController new]; mvc.restorationIdentifier = @"master"; UINavigationController* nav = [[UINavigationController alloc] initWithRootViewController:mvc]; nav.restorationIdentifier = @"nav";And so on.
Run the app. We’re getting state saving, but not state restoration. That’s because the restorationIdentifier alone is not sufficient to tell the state restoration mechanism what to do as the app launches. What the restoration mechanism is trying to do is to generate instances of all the view controllers that were in existence when the app was suspended, tied together in the same parent–child and presenter–presented relationships. For our example app, the restoration of the relationships is no problem; the question is how to obtain those instances. In our storyboard example, the storyboard was the source of the instances. Now the instances must come from your code.
The restorationIdentifier of each view controller instance is the beginning of the restoration process. It is partly a signal that a view controller should be saved, but it is also a guide during restoration as to what view controller is needed at each point in the view controller hierarchy. Any particular view controller instance, given its position in the tree of parent–child and presenter–presented relationships starting with the root view controller, is uniquely identified by the restorationIdentifier values of all the view controllers running down that branch of the hierarchy, including its own.
Those restorationIdentifier values, taken together and in sequence, constitute the identifier path for any given view controller instance. Each identifier path is, in fact, an array of strings. In effect, the identifier paths are like a trail of breadcrumbs that you left behind as you created each view controller while the app was running, and that will now be used to create each view controller again as the app launches.
Note
A restorationIdentifier value thus does not have to be unique across your entire application; it only has to be unique to the specific point where it is used in the hierarchy. For example, a sequence @[@"root", @"root"] is no problem — the two view controllers identified as @"root" needn’t even be the same view controller — provided no other view controller called @"root" could possibly appear at the first position in the hierarchy, and no other view controller called @"root" could possibly appear at the second position in the hierarchy given that the first position is occupied by @"root".
The system has already saved the identifier paths and relationships for all the view controllers we’re going to need. Now, as the app launches, it tries to match them up with existing view controller instances. In our storyboard example, the app succeeded in doing this for every saved identifier path. Suppose that, at the time the app was suspended, the detail view controller’s view was showing. The process then went something like this:
-
The first path is
@[@"nav"]. My first view controller is the initial view controller in the storyboard, which I’ve already made root view controller of the whole app. Is its restoration identifier@"nav"? Why, yes! That’s our first problem solved. -
The next path is
@[@"nav", @"master"], and it’s a parent–child relationship. Do I have in the storyboard a child of my@"nav"view controller whose restoration identifier is@"master"? Yes, I do. -
The next path is
@[@"nav", @"detail"], and it’s a parent–child relationship. Do I have in the storyboard a child of my@"nav"view controller whose restoration identifier is@"detail"? Yes, I do.
Note
The identifier paths reflect relationships, not history. Thus, in our example, the third path is @[@"nav", @"detail"], not @[@"nav", @"master", @"detail"] — because the DetailViewController is to be a child of the navigation view controller. The fact that in our app a MasterViewController instance originally summoned this DetailViewController instance is irrelevant to the structure of the identifier path; each view controller’s identifier path is the shortest path based purely on parent–child or presenter–presented relationships.
Now, however, there is no storyboard. Again, suppose that, at the time the app was suspended, the detail view controller’s view was showing. Bear in mind that state restoration begins after application:willFinishLaunchingWithOptions:. Therefore the navigation controller, acting as root view controller of the app, and its first child, the master view controller, already exist. So the process will go something like this:
-
The first path is
@[@"nav"]. My first view controller is the root view controller of the whole app. Is its restoration identifier@"nav"? Why, yes! That’s our first problem solved. -
The next path is
@[@"nav", @"master"], and it’s a parent–child relationship. Is there a child of my@"nav"view controller whose restoration identifier is@"master"? Yes, there is. -
The next path is
@[@"nav", @"detail"], and it’s a parent–child relationship. Is there a child of my@"nav"view controller whose restoration identifier is@"detail"? No!
At this moment the restoration mechanism must turn to your code and ask for the view controller whose identifier path is @[@"nav", @"detail"]. But what code should it turn to? This is very early in the life of the app, so we have very few instances in existence. But we do have all your app’s classes already in existence! Therefore the method in your code to which the restoration mechanism will now turn is a class method. But what class? To answer this question, the state saving mechanism has saved a second piece of information about every view controller that was in existence when we were suspended: its restoration class. This is a reference to the class that the restoration mechanism should turn to when it wants to reconstruct this view controller instance.
To implement restoration of view controllers in code, then, we perform the following additional modifications for each view controller that has not been restored in application:willFinishLaunchingWithOptions::
-
Give the view controller a
restorationClass. Typically, this will be the view controller’s own class, or the class of the view controller responsible for creating this view controller instance. -
Implement the class method
viewControllerWithRestorationIdentifierPath:coder:on the class named by each view controller’srestorationClassproperty, returning a view controller instance as specified by the identifier path. Very often,viewControllerWithRestorationIdentifierPath:coder:will itself instantiate this view controller. -
Specify formally that each class named as a
restorationClassimplements the UIViewControllerRestoration protocol.
Accordingly, let’s make our DetailViewController instance restorable. In our simple example, it is created and configured by the MasterViewController instance, so one possible strategy is for MasterViewController to act as its restoration class. (Another perfectly good strategy would be for DetailViewController to act as its own restoration class.) In its implementation of viewControllerWithRestorationIdentifierPath:coder:, MasterViewController should do for DetailViewController everything that it was doing before we added state restoration to our app — except for putting it into the view controller hierarchy! The state restoration mechanism itself, remember, is responsible for assembling the view controller hierarchy; our job is merely to supply any needed view controller instances.
So MasterViewController now must adopt UIViewControllerRestoration (I like to do this in a class extension inside the implementation file), and will contain this code:
-(void)doDetail:(id)sender {
    DetailViewController* dvc = [DetailViewController new];
    dvc.restorationIdentifier = @"detail";
    dvc.restorationClass = [self class]; // *
    [self.navigationController pushViewController:dvc animated:YES];
}

+ (UIViewController*) viewControllerWithRestorationIdentifierPath:(NSArray*)ic
        coder:(NSCoder*)coder {
    if ([[ic lastObject] isEqualToString:@"detail"]) {
        DetailViewController* dvc = [DetailViewController new];
        dvc.restorationIdentifier = @"detail";
        dvc.restorationClass = [self class];
        return dvc;
    }
    return nil;
}
In doDetail:, MasterViewController is creating a DetailViewController instance and configuring it, prior to pushing it onto the navigation controller’s stack; in particular, it is supplying the restorationIdentifier and restorationClass. Therefore, in viewControllerWithRestorationIdentifierPath:coder:, it does all those same things. We thus end up with a DetailViewController instance configured in exactly the same way as before — and that’s the point of the exercise.
The result of doing all those same things is, of course, code duplication. We can reduce the amount of code duplication by factoring out the duplicated code into a single method. But remember that doDetail: is an instance method, whereas viewControllerWithRestorationIdentifierPath:coder: is a class method:
+(DetailViewController*) newDetailViewController {
    DetailViewController* dvc = [DetailViewController new];
    dvc.restorationIdentifier = @"detail";
    dvc.restorationClass = [self class];
    return dvc;
}

-(void)doDetail:(id)sender {
    [self.navigationController pushViewController:
        [[self class] newDetailViewController] animated:YES];
}

+ (UIViewController*) viewControllerWithRestorationIdentifierPath:(NSArray*)ic
        coder:(NSCoder*)coder {
    if ([[ic lastObject] isEqualToString:@"detail"]) {
        return [self newDetailViewController];
    }
    return nil;
}
The structure of our viewControllerWithRestorationIdentifierPath:coder is typical. We test the identifier path — usually, it’s sufficient to examine its last element — and return the corresponding view controller; ultimately, we are also prepared to return nil, in case we are called with an identifier path we can’t interpret. viewControllerWithRestorationIdentifierPath:coder can also return nil deliberately, to tell the restoration mechanism, “Go no further; don’t restore the view controller you’re asking for here, or any view controller further down the same path.”
It should now be obvious how to modify MasterViewController and DetailViewController to nominate themselves as, and to function as, the restoration class for the ExtraViewController instance that each creates. (There’s no conflict in the notion that both MasterViewController and DetailViewController can fulfill this role, as we’re talking about two different ExtraViewController instances.) I’ll show the implementation in DetailViewController. Don’t forget to make DetailViewController adopt UIViewControllerRestoration! Many are the hours I’ve lost through forgetting that step and then wondering why state restoration wasn’t working:
+(ExtraViewController*) newExtraViewController {
    ExtraViewController* evc = [ExtraViewController new];
    evc.restorationIdentifier = @"extra";
    evc.restorationClass = [self class];
    return evc;
}

-(void)doPresent:(id)sender {
    [self presentViewController:
        [[self class] newExtraViewController] animated:YES completion:nil];
}

+ (UIViewController*) viewControllerWithRestorationIdentifierPath:(NSArray*)ic
        coder:(NSCoder*)coder {
    if ([[ic lastObject] isEqualToString:@"extra"]) {
        return [self newExtraViewController];
    }
    return nil;
}
In this case, the identifier path will be @[@"nav", @"extra"], because ExtraViewController is presented fullscreen and therefore its presentingViewController is the navigation controller, the root view of the app.
It is also permitted not to assign a view controller a restorationClass. In that case, if the restoration mechanism can’t find a way forward through the sequence, it will call your app delegate’s application:viewControllerWithRestorationIdentifierPath:coder:. If you implement this method, be prepared to receive identifier paths for existing view controllers! For example, if we were to implement application:viewControllerWithRestorationIdentifierPath:coder: now, it would be called for @[@"nav"] and for @[@"nav", @"master"]. Do not respond by creating a new view controller! These view controllers are already in the view controller hierarchy, because application:willFinishLaunchingWithOptions: has already created them; just return pointers to the existing instances:
-(UIViewController *)application:(UIApplication *)application
        viewControllerWithRestorationIdentifierPath:(NSArray *)ic
                                              coder:(NSCoder *)coder {
    if ([[ic lastObject] isEqualToString:@"nav"]) {
        return self.window.rootViewController;
    }
    if ([[ic lastObject] isEqualToString:@"master"]) {
        return [(UINavigationController*)self.window.rootViewController
                viewControllers][0];
    }
    return nil;
}
Again, you can return nil on a particular occasion to prevent restoration from continuing down a particular path (if the view controller in question hasn’t been created already).
Here’s an overview of the order of operations during state restoration:
-
application:willFinishLaunchingWithOptions: -
application:shouldRestoreApplicationState:(and let’s presume the response is YES) -
viewControllerWithRestorationIdentifierPath:coder:andapplication:viewControllerWithRestorationIdentifierPath:coder:, as needed, to instantiate all necessary view controllers - Restoration of individual view controller state, discussed in the next section
-
application:didDecodeRestorableStateWithCoder: -
application:didFinishLaunchingWithOptions:
Up to now, I’ve been talking about restoration of the view controller hierarchy. But I haven’t yet said anything about restoration of the state of individual view controllers. A view controller might have instance variables, and its view might contain features, whose values need to be saved as we are suspended and restored as part of the state restoration mechanism. And this might need to be done for all the view controller instances in your app, not just the one whose view happens to be showing at restoration time; that, after all, is the overall state of your entire app.
This work is done with the help of a keyed archiver (((NSKeyedArchiver)), an NSCoder subclass), as follows:
-
When it’s time to save state (as the app is about to be suspended), the state saving mechanism sends your app delegate
application:willEncodeRestorableStateWithCoder:. It then turns to all your existing participating view controller instances and sends themencodeRestorableStateWithCoder:(if they implement it). Thecoder:is an NSCoder. If your view controller has state to save, it sends the coder an appropriate encode message with a key, such asencodeFloat:forKey:orencodeObject:forKey:. Much as in a dictionary, the key is an arbitrary string identifying this value. You should callsuper.If an object’s class doesn’t adopt the NSCoding protocol, you may have to archive it to an NSData object before you can encode it. However, views and view controllers can be handled by this coder, because they are treated as references.
-
When it’s time to restore this view controller instance and its state, the state restoration mechanism brings back the same coder containing the same keys. Whatever was saved in the coder can be extracted by the reverse operation using the same key, such as
decodeFloatForKey:ordecodeObjectForKey:. It is your job to reconfigure the view controller instance so that its state matches that of the instance at the time the app was suspended. The coder is brought back in four places:-
In
application:shouldRestoreApplicationState:. The coder is the second parameter, and is the same coder that was the second parameter toapplication:shouldSaveApplicationState:. -
In
application:viewControllerWithRestorationIdentifierPath:coder:orviewControllerWithRestorationIdentifierPath:coder:. This is useful if your view controller has an initializer that requires extra data. If that data was saved into the coder, you can now extract it and create the view controller with that data. -
After the view controller instance has been created, it is sent
decodeRestorableStateWithCoder:. This is your chance to pull out and apply toselfany material that you didn’t pull out for this instance as you created it inviewControllerWithRestorationIdentifierPath:coder:. You should callsuper. -
Finally, the app delegate is sent
application:didDecodeRestorableStateWithCoder:.
-
In
I said “the same coder” because there are multiple coders — one for each view controller, and one for the app delegate. This means that you don’t have to worry about key names colliding across view controllers; each view controller gets its own coder, so all you have to do is use unique key names with regard to that view controller.
The UIStateRestoration.h header file describes three built-in keys that are available from every coder during restoration:
-
UIStateRestorationViewControllerStoryboardKey -
A reference to the storyboard from which this view controller came, if any. This could allow your implementation of
viewControllerWithRestorationIdentifierPath:coder:to extract the same view controller manually from the storyboard, if necessary. -
UIApplicationStateRestorationBundleVersionKey -
Your Info.plist
CFBundleVersionstring at the time of state saving. This could allow your implementation ofapplication:shouldRestoreApplicationState:to opt out of state restoration after an update. -
UIApplicationStateRestorationUserInterfaceIdiomKey -
An NSNumber wrapping either
UIUserInterfaceIdiomPhoneorUIUserInterfaceIdiomPad. This could allow your implementation ofapplication:shouldRestoreApplicationState:to opt out of state restoration if the app has been backed up and restored to a different type of device.
In real life, it is very likely that your view controllers will need to implement encodeRestorableStateWithCoder: and decodeRestorableStateWithCoder:. Even an app whose view controller hierarchy can be completely restored from a storyboard, with no code, will probably also need to restore the state of the individual view controller instances or of views within the view controller’s view. decodeRestorableStateWithCoder: is guaranteed to be called after viewDidLoad, so it is quite typical to update the interface directly from within decodeRestorableStateWithCoder:. Here’s an example from the TidBITS News app, where we save and restore a feature of the visible user interface:
-(void)encodeRestorableStateWithCoder:(NSCoder *)coder {
    [coder encodeObject: self.refreshControl.attributedTitle.string
                 forKey:@"lastPubDate"];
    [super encodeRestorableStateWithCoder:coder];
}

-(void)decodeRestorableStateWithCoder:(NSCoder *)coder {
    NSString* s = [coder decodeObjectForKey:@"lastPubDate"];
    if (s)
        [self setRefreshControlTitle:s];
    [super decodeRestorableStateWithCoder:coder];
}
As I mentioned a moment ago, it’s fine to save a reference to a view controller into the coder. One important reason for doing this is when you have a custom container view controller. The restoration mechanism understands some basic built-in parent view controller types (UINavigationController, UITabBarController), and it understands presented view controllers, but that’s all. If you want state restoration for the children of your custom parent view controller, you must save those children into the coder.
As an example, I’ll return to the case of a UIPageViewController whose child view controller is an instance of my Pep class, which accepts and stores the name of a Pep Boy and displays his image. The view controller architecture is:
- RootViewController, a custom parent view controller
-
pvc, a UIPageViewController, child of RootViewController so that I can display its view inside the RootViewController’s view - Pep, the class of the UIPageViewController’s children
RootViewController’s viewDidLoad creates the interface. It instantiates the UIPageViewController and formally makes that instance, pvc, its own child and puts its view into its own view. It also sets the page view controller’s initial child view controller, a Pep instance (displaying Manny, when the app launches for the first time). It also sets itself (the RootViewController) as the page view controller’s data source; when a new page is requested, it examines the existing Pep instance to obtain its boy property, works out what Pep Boy is needed now, creates a new Pep and calls its initWithPepBoy:nib:bundle:, and supplies it.
So far so good. Now let’s add saving and restoration of state. Here’s the problem. We have attached restoration identifiers to the RootViewController, the page view controller, and the Pep instances, but Pep’s encodeRestorableStateWithCoder: and decodeRestorableStateWithCoder: are never called; it isn’t participating in state saving and restoration. The reason is that the saving and restoration mechanism knows nothing about the structure of our app. It has no innate knowledge of UIPageViewController, and it doesn’t know about the parent–child relationship between the RootViewController and the UIPageViewController, or between the UIPageViewController and the Pep instance whose view it is displaying. If we want a Pep instance to participate in saving and restoration, we have to show the mechanism a Pep instance.
The way we do this is by saving a Pep instance into the coder. The Pep instance we’ll save is, of course, the one that’s currently showing in the page view controller. So, in RootViewController:
- (void)encodeRestorableStateWithCoder:(NSCoder *)coder {
    UIPageViewController* pvc = self.childViewControllers[0];
    Pep* pep = pvc.viewControllers[0];
    [coder encodeObject:pep forKey:@"pep"];
    [super encodeRestorableStateWithCoder:coder];
}
That will cause the state saving mechanism to be aware of the Pep instance. Moreover, the Pep instance has a restoration identifier (which happens to be @"pep"). Therefore it will turn to that Pep instance and send it encodeRestorableStateWithCoder:. So now the Pep instance can record which Pep Boy it’s displaying:
-(void)encodeRestorableStateWithCoder:(NSCoder *)coder {
    [coder encodeObject:self.boy forKey:@"boy"];
    [super encodeRestorableStateWithCoder:coder];
}
Now let’s talk about restoration. First, observe that there is no need to give Pep a restoration class. This is just like the case where the app’s root view controller is a navigation controller with an initial root view controller; both of those view controllers already exist, so there’s no need for the restoration mechanism to hunt for them. In just the same way, there is no need for the restoration mechanism to ask for a Pep instance, because we’re going to make a Pep instance in any case, in RootViewController’s viewDidLoad. The issue is only to configure that Pep instance to correspond to the correct Pep Boy.
I can think of various ways to do that, but the simplest, I think, is to let the Pep instance configure itself. The state restoration mechanism will be able to find and identify this Pep instance, so it’s going to be sent decodeRestorableStateWithCoder:, and can extract the boy value that it saved earlier.
But now we have to think about the Pep instance’s interface. Pep’s viewDidLoad configures the interface, based on the boy property:
- (void)viewDidLoad {
    [super viewDidLoad];
    self.name.text = self.boy;
    self.pic.image =
        [UIImage imageNamed:
            [NSString stringWithFormat: @"%@.jpg",
             [self.boy lowercaseString]]];
}
By the time decodeRestorableStateWithCoder: is called, viewDidLoad has already been called. In fact, this Pep instance has already been fully configured, thanks to RootViewController’s viewDidLoad — but with Manny as its Pep Boy. No problem; all we have to do is configure it again:
-(void)decodeRestorableStateWithCoder:(NSCoder *)coder {
    NSString* boy = [coder decodeObjectForKey:@"boy"];
    if (boy) {
        self.boy = boy;
        self.name.text = self.boy;
        self.pic.image =
            [UIImage imageNamed:
                [NSString stringWithFormat: @"%@.jpg",
                 [self.boy lowercaseString]]];
    }
    [super decodeRestorableStateWithCoder:coder];
}
We are left with some duplicate code; if we don’t like that, we can factor it out into a method that’s called by both viewDidLoad and decodeRestorableStateWithCoder:.
The remarkable thing about that example is that RootViewController stored a Pep instance into its coder but never extracted it. It could have done so, but there was no need; storing the Pep instance was sufficient to switch on state saving and restoration for the Pep instance itself, which is what we were really after.
I have mentioned more than once that viewDidLoad is called before decodeRestorableStateWithCoder:. Not only is this true for each view controller; it’s true for all view controllers collectively. All view controller views exist, and their viewDidLoad has been called, before decodeRestorableStateWithCoder: is called for any view controller. When decodeRestorableStateWithCoder: is called, it is called on view controllers successively from the top down; each view controller’s parent or presenter has been given a chance to configure itself already.
Unfortunately, no similar guarantee can be made for other view-related events. In particular, you can’t be sure when decodeRestorableStateWithCoder: will be called with respect to the various “appear”/“disappear” events. In fact, it’s quite easy to write an app where, if a certain view controller’s view was frontmost when the app was suspended, decodeRestorableStateWithCoder: precedes the “appear”/“disappear” events for each view controller, but if a different view controller’s view was frontmost, decodeRestorableStateWithCoder: follows the “appear”/“disappear” events for each view controller. This is very frustrating, and can make it quite tricky to slot a view controller’s state restoration into its other tasks as it comes to life.
We have talked about view controllers, but not about views. A view will participate in automatic saving and restoration of state if its view controller does, and if it itself has a restoration identifier. Some built-in UIView subclasses have built-in restoration abilities. For example, a scroll view that participates in state saving and restoration will automatically return to the point to which it was scrolled previously. You should consult the documentation on each UIView subclass type to see whether it participates usefully in state saving and restoration, and I’ll mention a few significant cases when we come to discuss those views in later chapters.
Note
If your app has additional state restoration work to do on a background thread (Chapter 38), the documentation says you should call UIApplication’s extendStateRestoration as you begin and completeStateRestoration when you’ve finished. The idea is that if you don’t call completeStateRestoration, the system can assume that something has gone very wrong (like, your app has crashed) and will throw away the saved state information, which may be faulty.